
Installation Guide


13
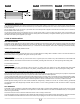
CONCRETE SELECTOR TABLE*
USAGE
SPECIFIC CONCRETE PRODUCTS
CABLE EMBEDDING
(SCRATCH COAT ONLY)
CERAMIC TILE
ADHESIVE
GROUT STANDARDS
Self-leveling mortar YES NO NO N/A**
Polymer-modied mortar*** YES YES NO ANSI A118.4 (A)
Polymer-modied grout (with or without sand) NO NO YES ANSI A118.6 (A) or A118.7 (A)
Epoxy grout NO NO YES ANSI A118.3
TTMAC: Terrazzo, Tile & Marble Association of Canada
ANSI: American National Standards Institute
* For each of these concrete products, follow the manufacturer’s recommendations and ensure compatibility of their product
with oor heating systems and your suboor type.
** N/A: Standard not available. Check with the manufacturer to ensure product compatibility with the oor heating system.
*** A polymer-modied mortar (thin-set) can be obtained using one of these two methods: by adding water to a polymer-
modied mortar or by adding a liquid additive containing polymers to a non-polymer-modied mortar.
STEP 10: INSTALL FLOOR COVERING ON SCRATCH COAT
Once the self-leveling mortar is dry, you can install your oor covering (oating oor, vinyl oor, etc.). Be careful. Before installing a oor cover-
ing other than ceramic tiles on the scratch-coat surface, consult the oor covering manufacturer to determine if it is suitable for installation on a
radiant oor.
Note: Natural hardwood ooring is not compatible with oor heating systems.
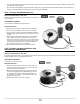
Install ceramic tile ooring
Given the large number of “on/off” cycles dictated by the thermostat, only a highly exible polymer-modied mortar (thin-set) meeting A118.4(A)
ANSI standards may be used to secure the tiles onto the scratch coat. The polymers comprised in this type of mortar contribute to its strength and
exibility ensuring long term effectiveness.
Spread the thin-set with a notched trowel (1/4” x 3/8”) to cover the surface well and install the tiles on top, working in sections (learn more about
the procedure before getting started).
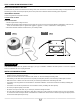
Grouting can begin no sooner than 24 hours after the installation has been completed. Either use a polymer-modied grout (with or with-
out sand) meeting A118.6(A) or A118.7(A) ANSI standards or an epoxy grout meeting A118.3 ANSI standards (see FIG. 13 and CONCRETE
SELECTOR TABLE).
Note: Tile can be installed directly with thin-set. However, care must be taken not to damage the heating cable with the notched trowel
(see FIG. 14).
Thin-set mortar
Heating cable spacers
See Table 1 for details
Floor covering
Heating cable
Preparation must comply with standards in effect for tile floor installation
Self-levelling mortar
See Table 1 for details
Laid out according to the installer’s plan
Subfloor
Polymer-modified grout
See Table 1 for details
Apply cement on plywood with cable spacers
FIG. 13
FIG. 14