
Owner's Manual


8
C
A
B
C
3
A
D
1
2
C
A
B
C
3
A
D
1
2
1
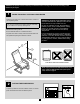
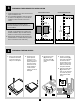
UNHOOK THE WALL BRACKET FROM THE DEVICE
2
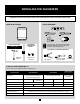
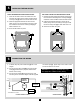
INSTALL THE WALL BRACKET
3
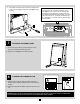
HANG AND PLUG IN THE DEVICE
11 1/2 IN.
29 CM
5 5/16 IN.
13 CM
6 to 10 IN.
15 to 25 CM
1. Using a screwdriver, press the plastic tab [A] under the device.
2. Hold the tab down and rotate the bracket slightly.
3. Pull out the bracket to remove the upper hooks from the device.
1. Position the wall bracket at the desired height respect-
ing the clearances from the oor. Make sure the unit
is close enough to an electrical outlet.
2. 2. Secure the bracket to the wall using three screws
(No 6 to 10) with the appropriate anchors depending on
the wall type and weight of the product (4.3 kg/9.4 lb).
Make sure the bracket is level. When drilling the wall,
be sure not to damage the electrical wiring or other
hidden utilities.
NOTE: The wall where you install the unit must be
straight so that the bracket is installed perfectly at
without any pressure. You must follow this guide-
line to prevent the wall bracket from warping during
installation, which could cause the wall bracket to
malfunction.
1. Hang the device on the top hooks [A] of the wall
bracket [B].
2. Tilt the bottom of the device and push it in to snap it into
the plastic tab [C].
3. Plug the fan heater plug into a 120 V electrical out-
let. The plug should only be plugged into a grounded
outlet. If the plug does not t into your outlet, contact
an electrician.
NOTE: Do not use an extension cord or connect any
other device to the same circuit. Do not conceal the
power cord behind the heater when it is installed
and powered.
4. Press the switch [D] on the side of the fan heater to turn it
on. The buttons and will light up red when the device
is on.
1 7/8 IN.
5 CM
2 IN.
5 CM
WARNING: Never remove the plug’s grounding pin.
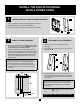
INSTALL THE SOA1501PW MODEL
(WITH A POWER CORD)