
Use and Care Manual


5
INSSORB1017
ZIGBEE CONNECTIVITY
This convector is compatible with the Zigbee smart home protocol.
Once connected, it can be controlled remotely by means of the
application included with the user’s Zigbee controller.
FOLLOW THESE STEPS TO CONNECT YOUR UNIT TO A ZIGBEE
NETWORK:
- Make sure that the Zigbee controller is in ASSOCIATION mode.
- Access the advanced menus.
- Select menu 1 (
).
- If ON is selected, the convector will nd the channel assigned to
the Zigbee network. You can also manually specify the channel that
your Zigbee controller is currently using. The Zigbee connection
process will be faster if the Zigbee channel is manually specied.
- During the association, your selection will ash rapidly and the con-
nectivity icon (
) will be animated.
- Once the association with the Zigbee network has been established,
the channel number will be shown on the display.
- If an error occurs during association, ERR will be displayed for three
(3) seconds followed by OFF being displayed.
FOLLOW THESE STEPS TO DISCONNECT YOUR UNIT FROM
THE ZIGBEE NETWORK:
- Access the advanced menus.
- Select menu 1 (
).
- Change the parameter to OFF.
- During the disassociation, OFF will ash rapidly and the connectivity
icon (
) will be animated.
- Once the disassociation with the Zigbee network has been completed,
OFF will be displayed.
- If an error occurs during disassociation, ERR will be displayed for
3 seconds followed by the channel number being displayed.
TEMPERATURE FORMAT
The temperature can be displayed in either degrees Celsius or Fahrenheit.
Follow these steps to select the temperature format:
- Access the advanced menus.
- Select menu 2.
- Select either °C or °F.
DISPLAY BACKLIGHTING
Both the display backlighting as well as the lighted control buttons
can be congured. When either button is pressed, the buttons are lit
with a color (see ADJUSTING THE TEMPERATURE SETPOINT for
informations about the colors displayed) and the LCD display will be
set at 100% brightness. If no button is pressed for 15 seconds, the
display can behave in one of three ways:
1. ALL: LCD display backlighting is active but dimmed. The button
contours remain colored.
2. BTN: LCD backlighting is off. The button contours remain colored.
3. OFF: LCD backlighting is off. The button contours are colored light gray
Follow these steps to congure LCD backlighting and button behavior:
- Access the advanced menus.
- Select menu 3 (
).
- Select ALL, BTN or OFF.
NOTE: The display backlighting and the button contours will be at
100% intensity if a problem is detected with the Zigbee communication,
a window is open or the unit detects overheating.
LOCKING THE CONTROLS
This mode allows you to lock the controls in order to prevent unwanted
changes to the setpoint and/or operation modes.
While the
icon is lit, only changes sent by the Zigbee controller are
possible.
NOTE: The advanced menus remain accessible at all times.
Follow these steps to activate or deactivate the control lock:
- Access the advanced menus.
- Select menu 4 (
).
- Select ON or OFF.
STANDBY MODE
In order to protect your home against freezing and limit energy
consumption during long absences, set the thermostat to STANDBY
mode. To enter this mode, lower the temperature to between 5°C and
7°C until the
icon is displayed.
OPEN WINDOW DETECTION
This unit is designed to detect an open window in the room and lower
the setpoint so as not to waste energy.
When the convector detects an open window in the room, the
icon
will ash and the button contours will ash in blue. The setpoint will be
automatically set to 7°C (45°F).
Once the convector detects that the window has been closed, the
setpoint will return to its previous setting.
Follow these steps to activate or deactivate the open window detection:
-Access the advanced menus.
-Select menu 5 (
) and select ON or OFF.
BOOST MODE SETTING
By default, BOOST mode is set to 26.0°C (79°F). However, this value
can be set from 20.0°C (68°F) to 30.0°C (86°F).
Follow these steps to change the BOOST mode setting:
- Access the advanced menus OR access the Boost menu directly by
pressing the “BOOST” button for 3 seconds.
- Change the setting of menu 6 according to your choice.
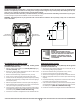
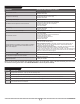
BUTTONS MAIN SCREEN ADVANCED MENUS
UP BUTTON OR DOWN BUTTON Set the temperature setpoint* Browse and edit settings
BOOST BUTTON Activate/deactivate BOOST mode
Select and conrm BOOST setting
(in the BOOST menu)
UP AND DOWN BUTTONS SIMULTANEOUSLY FOR 3 SECONDS Access advanced menus Exit advanced menus
BOOST BUTTON FOR 3 SECONDS
Access
BOOST
menu
Exit BOOST menu
UP AND DOWN BUTTONS SIMULTANEOUSLY
FOR LESS THAN 3 SECONDS
---
Selection in Advanced Menus
*If the UP or DOWN button is pressed during BOOST mode, the BOOST temperature setpoint will ash for 3 seconds but cannot be changed.
BUTTON FONCTIONS