English
Michael Ruf, Matthias Klag Revision and quality control: Cristina Bachmann, Heiko Bischoff, Marion Bröer, Christina Kaboth, Insa Mingers, Sabine Pfeifer, Benjamin Schütte This PDF provides improved access for vision-impaired users. Please note that due to the complexity and number of images in this document, it is not possible to include text descriptions of images.
Table of Contents 5 Introduction 5 5 Loading the VST Sound Instrument Set Loading and Saving Presets 6 Plug-in Controls 6 7 7 9 10 11 Plug-in Functions Section Edit Display Options Page Performance Control Section Quick Controls Trigger Pads 12 Macro Page Parameters 12 14 15 Instrument Page Amp & FX Page Fx Section 4
Introduction The Neo Soul Keys VST Sound Instrument Set comes with a large number of highquality VST Sound presets. In your Steinberg DAW, you can load the instrument set as a VST 3 plug-in. Furthermore, you can load the instrument set as a program in HALion, HALion Sonic, and HALion Sonic SE. Loading the VST Sound Instrument Set • To load the instrument set as a plug-in, open your Steinberg DAW and create an instrument track that is associated with the instrument set.
Plug-in Controls This chapter describes the sections that are available if you open the Neo Soul Keys VST Sound Instrument Set as a plug-in. Plug-in Functions Section The section at the top of the plug-in panel contains global functions that affect both the currently loaded preset and the general operation of the plug-in. Preset Controls With the preset controls on the left, you can load and save presets. To step through the available presets, use the left and right arrow buttons.
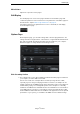
Edit Display Main Volume Adjusts the output level of the plug-in. Edit Display The edit display in the center of the plug-in window shows the Macro page that contains the parameters of the instrument set. The parameters on the Macro page are described in the chapter “Macro Page Parameters” on page 12. If the Options button in the global functions section is activated, the edit display shows the Options page. Options Page On the Options page, you can make settings that control the plug-in behavior.
Options Page Balancing Disk vs. RAM With this slider, you can balance the hard disk versus the RAM usage. This setting is not saved with the project. It has to be set up only once for your computer system. • If you need more RAM for other applications, drag the slider to the left towards the Disk setting. • If your hard disk is not supplying data fast enough, drag the slider to the right towards the RAM setting.
Performance Control Section MIDI Controller Smoothing MIDI controllers have a maximum resolution of 128 steps, which is rather low. Therefore, if you use a MIDI controller to remote-control a quick control, for example, the parameter change may occur in audible steps. To avoid this, the plug-in provides MIDI controller smoothing, allowing for less abrupt parameter changes. • If MIDI controller changes cause audible artifacts, turn the control towards slower settings.
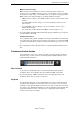
Quick Controls Sphere H and Sphere V The sphere is the ball on the right. It is a two-dimensional control, which allows you to adjust two quick controls simultaneously by dragging the mouse horizontally and vertically within the sphere. The quick control on the horizontal axis is called Sphere H. The quick control on the vertical axis is called Sphere V. Typically, two parameters that belong together are assigned to the sphere. For instance, Cutoff is assigned to Sphere H and Resonance to Sphere V.
Trigger Pads Trigger Pads You can use the trigger pads on the left to remotely trigger single notes or whole chords. Many of the presets make use of the trigger pads. • Pads with a colored frame have single notes or whole chords assigned. • The line above a pad lights up when the pad switches between FlexPhraser variations. • To trigger a pad with your mouse, simply click the corresponding pad. Assigning Trigger Notes to Pads You can assign a MIDI note to a pad and trigger the pad by playing this note.
Macro Page Parameters The macro page for the Neo Soul Keys VST Sound Instrument Set is divided into two pages, one for the instrument and its parameters and one for the amplifier and effect sections. Instrument Page The lower section of the Instrument page shows the main instrument parameters. The upper section contains settings for sound components like bell and bark, for example. Volume Adjusts the overall instrument level before it is sent to the amplifier.
Instrument Page Vibrato On/Off Activates/deactivates the vibrato. Intensity Determines the intensity of the vibrato effect, which modulates the signal in the stereo panorama. Speed Controls the speed of the vibrato modulation. Sound Components The electric piano sound consists of several components. These can be activated independently and have individual level settings. • To activate/deactivate a component, move the mouse pointer over its label and click the button.
Amp & FX Page Amp & FX Page The upper section of the Amp & FX page contains the amplifier settings. The lower section contains the parameters of the built-in effects like Wah, Chorus, and Flanger. Amp Section Amp On/Off Activates/deactivates the amplifier. Gain Controls the input gain. Bass Adjusts the tone color of the low frequencies. Middle Adjusts the tone color of the mid frequencies. Treble Adjusts the tone color of the high frequencies. Presence Adds brightness to the sound.
Fx Section Fx Section The effect section features seven different effects that can be used all at the same time. Each effect can be turned on and off individually. Wah On/Off Activates/deactivates the effect. Pedal Drag the pedal up and down to simulate the filter and level modulation of a classic wah pedal effect. Distortion On/Off Activates/deactivates the effect. Drive Specifies the amount of distortion. Phaser/Flanger/Chorus The modulation effects Phaser, Flanger, and Chorus have their own page.
Fx Section Phase Here, you can adjust the phase of the left and right channel modulation. When this is set to 0, both channels are modulated in the same way, that is, the volume changes for both channels in the same way. When it is set to 180°, the level increases for one channel and decreases for the other. Depth Sets the intensity of the modulation. Mix Sets the ratio between the dry and wet signal. Delay On/Off Activates/deactivates the effect. Type Here, you can select the type of delay to use.
Fx Section Reverb On/Off Activates/deactivates the effect. Type Here, you can select the type of reverb to use: spring, plate, or hall. Time Specifies the reverb time. PreDelay Determines the amount of time between the dry signal and the onset of the reverb. With higher predelay values, you can simulate larger rooms. Mix Sets the ratio between the dry and wet signal.
日本語
Michael Ruf, Matthias Klag 改訂管理および品質管理 : Cristina Bachmann, Heiko Bischoff, Marion Bröer, Christina Kaboth, Insa Mingers, Sabine Pfeifer, Benjamin Schütte この PDF マニュアルでは、目の不自由な方のための高度なアクセシビリティ機能を提供しています。このマニュアルは複雑かつ多くの 図が使用されているため、図の説明は省略されていることをご了承ください。 本書の記載事項は、Steinberg Media Technologies GmbH 社によって予告なしに変更されることがあり、同社は記載内容に対する責任を 負いません。 本書に掲載されている画面は、すべて操作説明のためのもので、実際の画面と異なる場合があります。 本書で取り扱われているソフトウェアは、ライセンス契約に基づいて供与されるもので、ソフトウェアの複製は、ライセンス契約の範囲 内でのみ許可されます ( バックアップコピー )。 Steinberg Media Technologies Gm
目次 21 はじめに 21 VST Sound Instrument Set のロード 21 プリセットのロードと保存 22 プラグインコントロール 22 プラグイン機能セクション 23 編集画面 23 「Options」 ページ 25 パフォーマンスコントロールセクション 26 クイックコントロール 26 トリガーパッド 28 「Macro」ページのパラメーター 28 「Instrument」ページ 30 「Amp & FX」 ページ 31 エフェクトセクション 20
はじめに Neo Soul Keys VST Sound Instrument Set には、高品質な VST サウンドプリセットが数多く収録されています。 Steinberg の DAW では、インストゥルメントセットを VST 3 プラグインとしてロードできます。また、HALion、 HALion Sonic、および HALion Sonic SE では、インストゥルメントセットをプログラムとしてロードできます。 VST Sound Instrument Set のロード • インストゥルメントセットをプラグインとしてロードするには、Steinberg の DAW を起動してインストゥルメン トセットに関連付けられたインストゥルメントトラックを作成します。 • HALion、HALion Sonic、または HALion Sonic SE にインストゥルメントセットをロードするには、Neo Soul Keys に含まれるいずれかのプリセットをロードします。 ➯ VST Sound Instrument Set は Steinberg 以外のアプリケーションにもロードできます。詳細については、それら の
プラグインコントロール この章では、Neo Soul Keys VST Sound Instrument Set をプラグインとして開いた場合に使用できるセクションにつ いて説明します。 プラグイン機能セクション プラグインパネル上部のセクションには、現在ロードされているプリセットおよびプラグインの全般的な操作の両 方に影響するグローバル機能が含まれています。 プリセットコントロール 左側のプリセットコントロールで、プリセットをロードおよび保存できます。使用できるプリセットの中から選択 するには、左右の矢印ボタンを使用します。 Switch Off All Insert FX エフェクトなしでサウンドを再生します。 Lock FlexPhraser and Trigger Pads このボタンを有効にすると、別のプリセットをロードした場合にトリガーパッドの現在の設定が上書きされません。 ➯ 一部のプリセットでは、アルペジオやフレーズのプレーヤーである FlexPhraser が使用されます。ロックボタンを 有効にすると、これらも合わせてロックされます。 MIDI Reset MIDI ノートに対し
編集画面 編集画面 プラグインウィンドウの中央にある編集画面には、インストゥルメントセットのパラメーターを含む「Macro」ペー ジが表示されます。「Macro」ページのパラメーターの詳細については、28 ページの「「Macro」ページのパラメー ター」を参照してください。 グローバル機能セクションの「Options」ボタンが有効になっている場合、編集画面には「Options」ページが表示 されます。 「Options」ページ 「Options」ページでは、プラグインの動作をコントロールする設定ができます。これらの設定には、特定の VST Sound Instrument Set の 1 つのインスタンスに影響するもの、すべてのインスタンスに影響するもの、あるいはコ ンピューターにインストールされているすべての VST Sound Instrument Set に影響するものがあります。どの範囲 に影響するかは、以下の項で示します。 「Disk Streaming」セクション ➯ このセクションの設定は、コンピューターにインストールされているすべての VST Sound Instrument Set プ
「Options」ページ 「Global」セクション Polyphony 同時に発音できるノートの数を設定します。ポリフォニーを制限することで、求められるパフォーマンスを妥当な 範囲で維持できます。 ➯ この設定は、現在のプラグインインスタンスにのみ影響します。 Master Tune 「Master Tune」パラメーターは 415.3 〜 466.
パフォーマンスコントロールセクション FlexPhraser Hold Reset プリセットで使用されるすべての FlexPhraser モジュールに、グローバル「Hold Reset」メッセージを送信します。 「Reset Controller」ポップアップメニューでは、FlexPhraser の「Hold Reset」ボタンに MIDI コントローラーを割り 当てできます。これにより、「Hold Reset」ボタンをリモートコントロールできます。 ➯ この設定は、特定の VST Sound Instrument Set で開かれているすべてのプラグインインスタンスに影響します。 パフォーマンスコントロールセクション プラグインパネル下部のパフォーマンスコントロールセクションには、インストゥルメントの演奏に必要なピッチ ベンド、モジュレーションホイール、バーチャルキーボード、およびスフィアが含まれています。 ホイールコントロール バーチャルキーボードの左側に、ピッチベンドホイールとモジュレーションホイールがあります。モジュレーショ ンホイールは、MIDI コントロールチェンジ #1 に組み込まれてい
クイックコントロール クイックコントロール 右側の 8 つのポテンショメーターコントロールをクイックコントロールといいます。これらを使用すると、プリセッ トの最も重要なサウンドパラメーターをリモートコントロールできます。 クイックコントロールの割り当ては、VST Sound Instrument Set では変更できません。割り当ては HALion または HALion Sonic で変更できます。 トリガーパッド 左側のトリガーバッドを使用して、リモートで 1 つのノートまたはコード全体をトリガーできます。多くのプリセッ トがトリガーパッドを使用します。 • 枠に色が付いたパッドには、1 つのノートまたはコード全体が割り当てられています。 • FlexPhraser バリエーション間でパッドが切り替わると、パッドの上のラインが点灯します。 • マウスでパッドをトリガーするには、目的のパッドをクリックするだけです。 26 プラグインコントロール
トリガーパッド パッドへのトリガーノートの割り当て MIDI ノートをパッドに割り当てて、その MIDI ノートを発音することで、パッドをトリガーできます。 手順は以下のとおりです。 1. パッドを右クリックします。 2. メニューから「Assign Trigger Note」を選択します。 3. サブメニューから、オクターブおよび割り当てるノートを選択します。 または 1. パッドを右クリックします。 2. コンテキストメニューから「Learn Trigger Note」を選択します。 3. MIDI キーボードでノートを発音するか、またはバーチャルキーボードでノートをクリックします。 トリガーノートとして割り当てた MIDI ノートの名前が、パッドの左上角に表示されます。 ➯ バーチャルキーボードでは、トリガーノートとして割り当てられているキーが青色で表示されます。これらのキー ではそれ以降音が鳴らず、対応するパッドがトリガーされます。 トリガーノートの割り当ての削除 パッドからトリガーノートを削除するには、以下の手順を実行します。 1. パッドを右クリックします。 2.
「Macro」ページのパラメーター Neo Soul Keys VST Sound Instrument Set の「Macro」ページは、インストゥルメントおよびそのパラメーターのペー ジと、アンプリファイアーおよびエフェクトのページの 2 つに分かれています。 「Instrument」ページ 「Instrument」ページの下部セクションには、主なインストゥルメントパラメーターが表示されます。上部セクショ ンには、ベルやバークなどのサウンドコンポーネントのコントロールがあります。 VOLUME アンプリファイアーに送られる前のインストゥルメント全体のレベルを調節します。 BASS 低域のレベルを調節します。 MID 中域のレベルを調節します。ノブの下にあるコントロールで、中域ベルフィルターの周波数を調節できます。 TREBLE 高域のレベルを調節します。 28
「Instrument」ページ VIBRATO ON/OFF ビブラートのオン / オフを切り替えます。 INTENSITY ステレオでの信号を変調し、ビブラート効果の強さを調節します。 SPEED ビブラートモジュレーションの速度を調節します。 サウンドコンポーネント 電子ピアノのサウンドは、複数のコンポーネントで構成されています。これらのコンポーネントはオン / オフの切り 替えおよびレベル設定を個別に行なえます。 • コンポーネントのオン / オフを切り替えるには、マウスポインターをコンポーネントのラベルに置いて、ボタンを クリックします。 以下のコンポーネントを追加できます。 コンポーネント 説明 BELL ベルコンポーネント。 PEDAL NOISE サステインペダルを押したときに発生するペダルノイズサウンド。 PEDAL RESO サステインペダルを押したときに発生するレゾナンスサウンド。 KEY UP キーを離したときに発生するキーアップノイズ。 KEY DOWN ノートを発音したときに発生するキーダウンノイズ。 REL FX キーを離したときのノイズ。 BA
「Amp & FX」ページ 「Amp & FX」ページ 「Amp & FX」ページの上部セクションには、アンプリファイアーのコントロールがあります。下部セクションには、 ワウ、コーラス、フランジャーなどの内蔵エフェクトのパラメーターが含まれます。 アンプセクション ON/OFF アンプリファイアーのオン / オフを切り替えます。 GAIN 入力ゲインを調節します。 BASS 低域の音質を調節します。 MIDDLE 中域の音質を調節します。 TREBLE 高域の音質を調節します。 PRESENCE サウンドに明るさを加えます。 MASTER アンプリファイアーの出力レベルを調節します。 MODEL スピーカーのモデルを選択します。モデルによってサウンドが異なります。 • モデルを省略する場合は「No Speaker」を選択します。 MICROPHONE アンプリファイアーのサウンドを拾うのに使用するマイクを選択します。 POSITION マイクの位置を設定します。 30 「Macro」ページのパラメーター
エフェクトセクション エフェクトセクション エフェクトセクションには 7 種類のエフェクトがあり、すべてを同時に使用できます。エフェクトは個別にオン / オ フを切り替えできます。 WAH オン / オフ エフェクトのオン / オフを切り替えます。 ペダル ペダルを上下にドラッグして、クラシックなワウペダルエフェクトのフィルターおよびレベルモジュレーションを シミュレートします。 DIST オン / オフ エフェクトのオン / オフを切り替えます。 DRIVE ディストーションの量を指定します。 PHAS/FLANG/CHO フェイザー、フランジャー、およびコーラスのモジュレーションエフェクトには、個別のページがあります。エフェ クト名のラベルをクリックすると、対応するエフェクトの設定が表示されます。 オン / オフ エフェクトのオン / オフを切り替えます。 RATE ピッチモジュレーションの周波数をヘルツで調節します。 31 「Macro」ページのパラメーター
エフェクトセクション PHASE 左右のチャンネルモジュレーションのフェーズを調節できます。0 に設定すると、両方のチャンネルが等しく変調さ れ、チャンネルのボリュームが等しく変わります。180° に設定すると、1 つのチャンネルのレベルが上がると、も う一方のレベルが下がります。 DEPTH モジュレーションの強さを調節します。 MIX ドライ信号とウェット信号の比率を設定します。 DELAY オン / オフ エフェクトのオン / オフを切り替えます。 TYPE 使用するディレイのタイプを選択します。 ディレイ 説明 ST (ステレオ) 左右のオーディオチャンネルそれぞれに対して、独立した 2 つのディレイラインが使用されます。 CROSS (クロス) クロスフィードバックを持つ 2 つのディレイラインが使用されます。クロスフィードバックとは 左チャンネルのディレイが右チャンネルのディレイにフィードバックされ、また右チャンネルの ディレイが左チャンネルのディレイにフィードバックされるという意味です。 PP (ピンポン) 左右の入力チャンネルを混合して、それをハード的に分離された左右
エフェクトセクション REVERB オン / オフ エフェクトのオン / オフを切り替えます。 TYPE 使用するリバーブのタイプ ( スプリング、プレート、またはホール ) を選択します。 TIME リバーブタイムを設定します。 PreDelay ドライ信号にリバーブがかかり始めるまでの時間を設定します。プリディレイの数値を高く設定すると、より広い 室内をシミュレートできます。 MIX ドライ信号とウェット信号の比率を設定します。 33 「Macro」ページのパラメーター