
User manual
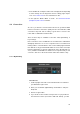

• To the middle left, usually the studio video is displayed, but depending
on other settings, also the large mixer view or settings pages may be
seen. See Toolbox tems for more information on this.
• To the right, the Monitor Mixer is shown. See Performer Monitor
(Headphone) Mix section for details.
4.2 Connection
Of course, you must be connected to the Internet. A good and reliable
Internet connection is vital to the quality of both sound and video; WiFi
connections may work, but it is always a good idea to connect to the
router with a solid Ethernet network cable.
There are three ways to establish a connection: LAN, mySteinberg, or
key exchange.
If the connection is to be established in a local network, the "LAN" button
will light up whenever one or more computers in the local network are
running Cubase / Nuendo with the VST Connect PRO plug-in installed.
Note that this is only possible with the PRO version of VST Connect (the
Performer application or app runs against both of the SE and PRO ver-
sions). Click the lit LAN button to obtain a list of computers that you can
connect to, and choose the desired name and local IP address entry.
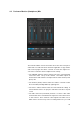
4.2.1 MySteinberg
PROCEDURE
1. On the top right of the VST Connect and Performer user interface
you will find the login section.
2. Fill in your credentials (MySteinberg email address and pass-
word) and
3. click the "Login" button.
4. If you do this for the first time and you have not yet provided a
VST Cloud user name (for instance with VST Transit), you will
30