Contents Preface 3 1 Overview 5 1.1 Quick Guide . . . . . . . . . . . . . . . . . . . . . . . . . . 5 1.2 Cubase / Nuendo Setup . . . . . . . . . . . . . . . . . . . 6 2 VST Connect 8 2.1 User Interface Overview . . . . . . . . . . . . . . . . . . . 8 2.2 Connection . . . . . . . . . . . . . . . . . . . . . . . . . . 9 2.2.1 MySteinberg . . . . . . . . . . . . . . . . . . . . . 9 2.2.2 Key . . . . . . . . . . . . . . . . . . . . . . . . . . 10 2.2.3 LAN . . . . . . . . . . . . . . . . . .
2.11 Status and File Transfer . . . . . . . . . . . . . . . . . . . 27 3 VST Connect Monitor 28 4 VST Connect Performer 29 4.1 User Interface Overview . . . . . . . . . . . . . . . . . . . 29 4.2 Connection . . . . . . . . . . . . . . . . . . . . . . . . . . 30 4.2.1 MySteinberg . . . . . . . . . . . . . . . . . . . . . 30 4.2.2 Key . . . . . . . . . . . . . . . . . . . . . . . . . . 31 4.3 Performer Monitor (Headphone) Mix . . . . . . . . . . . . 32 4.4 Effects . . . . . . . . . . . . . . .
Preface Welcome to VST Connect! We are very proud to present this exciting new version of VST Connect, which features an all new user interface and mixer, significantly simplified setup for the engineer, and many more new features and improvements. VST Connect has been used by skilled and professional producers all over the world to record artists from all over the world conveniently and with highest audio quality standards using the affordable PRO version.
Internet for more than 10 years now. Having come a long way from the early 80s, when Internet wasn’t yet a word and we just started to send our first e-mails to those "chosen few" who even knew that remote communication was applicable, it is truly exciting for me to see how far it has come, and I’m particularly amazed to be part of this process.
1 1.1 Overview Quick Guide VST Connect is used by two people, the artist or talent performing vocals or other instrument, and an engineer in a studio using Cubase / Nuendo along with the VST Connect components. The artist downloads and installs the VST Connect Performer application or app. The Apple OSX and Microsoft Windows versions are freely downloadable from the Steinberg website, the iPad IOS version is very affordable.
RESULT You can see, hear, and immediately record the artist now, just like you would record yourself or somebody else next door! 1.2 Cubase / Nuendo Setup With version 4 of VST Connect comes an all new menu in Cubase / Nuendo. It is called VST Cloud. To begin with, let’s assume that you start from scratch, so the first step is to launch Cubase / Nuendo and PROCEDURE 1. Create a new empty project, using either the "Empty", "Default", or your preferred default project template.
tions row). This is the same procedure as assigning audio ports in the "Inputs" tab of the VST Connections panel. It is a good idea to save the Studio (Control Room) settings once all works as desired. Note If you have never recorded an artist or yourself in your studio using the Control Room, you might consider having look around the Control Room and its settings in the "Studio" tab and/or refer to the Control Room section of the Cubase / Nuendo manual.
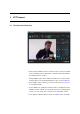
2 2.1 VST Connect User Interface Overview • On the top left, Talkback can be controlled. These controls are linked to the according controls in the Cubase / Nuendo Control Room Mixer. See Talkback how to use this. • The top middle section shows status information, none of these can be changed, they are for informational purpose only. See Event Monitor. • The top right section is where you connect to the artist.
2.2 Connection Now you are ready to record the remote artist. You should see the VST Connect plug-in user interface; if that window has been closed accidentally, you can re-open it by selecting Open Editor in the Cubase / Nuendo "Project/VST Connect" menu. The connection procedure has changed since version 4. With the new connection procedure, both the Studio and the Performer can initiate a connection and it is no longer required to exchange a key number.
5. After successful login, the Network page opens automatically on the Friends tab. Note If you don’t have an account, please go to the MySteinberg Website to create an account free of charge. 2.2.2 Key PROCEDURE 1. If you haven’t done so yet, type your name in the "Name" field in the top right "Network login" section. This can be your real name, or a nickname that the artist will see. 2. Click on the "Login" button right to the name field.
in the Performer documentation. You should now see the artist in the VST Connect plug-in window, provided he or she has a webcam connected and installed, and hear his or her voice provided he or she has connected a microphone via an audio interface to the computer.
2.3.1 Find User Tab This network tab allows you to search the VST Cloud for your partner. Type his or her VST Cloud name to find it in the list. To send a friendship, select the user and double press the request button. You also can send a request if you start the context menu with a right click to the user. The selected user receives the request and needs to confirm . The symbol shows you that the user is your friend.
2.3.2 Friends Tab This network tab shows all friends. It also shows all users with a friendship request or waiting to be confirmed as a friend. To accept a friendship double-click to the accept button. Note To connect to a friend select the friend and double click to the connect button. The friend needs to be online. 2.3.3 Icons Send user a friendship request. A friendship request has been sent to an user. The user is a friend. Accept a friendship request.
2.4 Control Room The artist will hear whatever you send via the Control Room Cue Mix channel. Playback and review channels (tracks on which you already recorded a performance of the artist) are sent to the Performer application via the VST Connect Cue Channel.
determines how much of that channel is audible on the artist side. This can be set pre or post fader like other channel sends, and also features a pan control. Note You may find further details about Cue Sends in the Cubase / Nuendo manual.
• Use the "Talkback" button to switch TB on and off. You can also for instance assign a key (like "t") on the computer keyboard to instantly switch TB in the "File/Keyboard Shortcuts" menu ("Control Room" section). The TB button is linked to the top left button in the VST Connect Window. • Adjust TB level (this is also linked to the matching control in the VST Connect editor window). • Adjust "Dim" to adjust dimming the artist cue mix while TB is active.
• a "rehearse" button. When this is activated, TB continues to be active even when playback or recording are running. You can use this to talk to the artist while playback is running so to coach him or her or discuss other aspects of the production. When recording, you must not enable the Rehearsal function, as your microphone signal may confuse the artist and also the Performer signal is no more in sync.
the engineer does in this area has any influence on the sound that he receives and records from the artist. Because these controls affect the Performer application, the details are described in the VST Connect Performer chapter, in the Mixer section. Note Note the plus and minus buttons which are available only with the VST Connect PRO version. With this, you can add up to 16 channels for recording, for instance a drum set with individual full quality tracks for each instrument! 2.6.
: Record Button There is also a record button per channel with the PRO version of VST Connect. With this, each channel can be recorded individually by the Performer application on the artist’s computer, and later transfered in full resolution for single or multi-track recordings. The stereo mix can also be recorded in HD by enabling the according record enable button in the MASTER channel. Individual tracks can only be recorded with the PRO version.
: Add Talkback Channel Adds a TB channel to the Control Room ("Studio" tab in Cubase / Nuendo "Devices/VST Connections" menu). You may have to assign an audio input in the aforementioned VST Connections "Studio" entry where your TB microphone is connected. : Open Performer Video Opens a window with the performer video feed (if applicable). This is the same signal as in the VST Connect plug-in window, but can be sized or moved to another monitor or projector etc.
nect plug-in. It displays several LEDs which indicate the connection quality for the studio and the performer side. The two rightmost LEDs should always be green to indicate that data is received, sent, and that both sides of the connection are in sync. It is normal, however, for the sync indicators to light up red during transport operations like start, stop, and locate. The two bar graphs show how well the two partners are synchronized during playback and recording.
: Audio Upstream Open this pop-up menu and select the audio upstream rate for the signal sent to the performer (shown in kilobits per second). The higher the rate, the better the audio quality for the playback that is being sent to the artist, but of course there has to be sufficient bandwidth within the connection to provide the goods. Usually lower rates are sufficient here, as this setting has no influence on the recorded audio.
performer via the Control Room VST Connect Cue Mix channel. The performer performs in sync to this playback and the result is sent back to Cubase / Nuendo so that when playback actually starts to become audible there, the artist’s audio signal has arrived for listening and recording in perfect sync to the project timeline. You can enter a value between 0.5 and 5 seconds. Usable delay times should be between 0.75 and about 1.5 seconds.
2.9.3 Manager Here, you organize and manage availability of HD recordings that have been recorded on the Performers’ computer, and are informed about correct placement of VST Connect components in Cubase / Nuendo. If for instance the VST Connect cue mix plug-in is missing in the Control Room mixer, the Manager informs about that. The VST Connect menu then offers a way to solve this. The main task of the Manager however is to manage and organize available recordings.
in window and the VST Connect Performer application window. When transfer is finished, those files are automatically replaced in the Cubase / Nuendo arrangement, and tagged with "HD" in the Manager. Also, the recording title in Cubase / Nuendo is changed accordingly. Often several takes were recorded. In this case, the engineer is offered the option to replace specific recordings by their HD equivalent. This is accomplished by right-clicking the file on its display in the Manager.
2.9.4 Recordings It allows you to manage all audio files recorded on the computer of the artist using the VST Connect Performer application. To display single files of which the take consists, click on the take’s name. For example, you can easily delete any file you do not need anymore easily. If you have recorded in HD, but decide to only transmit the stereo mix, you can delete the HD files for single tracks that are saved on the Performer side.
the smaller default mixer view; the effects sections get a larger display and effects can all be seen at once, as opposed to the smaller view where you have to select which controls are visible. The controls work the same way as in the smaller version as well. : Video Window This feature allows you to open the video sent from the artists’ Performer application in a separate window. It shows the same content as with the video display in the VST Connect editor window.
3 VST Connect Monitor When you configure VST Connect using the Cubase / Nuendo Project / VST Connect Menu item "Create VST Connect", not only will an Input Channel be created with the VST Connect plug-in, and a Control Room Cuemix channel with the VST Connect Cuemix plug-in, but also the VST Connect Monitor plug-in will be added to the main Control Room Output. This allows you to listen to the Performer signal while chatting and during recording or playback.
4 VST Connect Performer VST Connect Performer is available as an application for Windows and Mac OSX, as well as an app for the iPad (iOS). The desktop version can be freely downloaded from the Steinberg website, the affordable iPad version is available in the Apple appstore. The artist does not have to own any DAW (Digital Audio Workstation) software, and should not start any.
• To the middle left, usually the studio video is displayed, but depending on other settings, also the large mixer view or settings pages may be seen. See Toolbox tems for more information on this. • To the right, the Monitor Mixer is shown. See Performer Monitor (Headphone) Mix section for details. 4.2 Connection Of course, you must be connected to the Internet.
have to do so now. Choose a name that can be easily recognised, because this is the name that your friends may be searching for, using the search function described below. You will need to do this only once. Note that a VST Cloud user name can not be changed later. 5. After successful login, the Network page opens automatically on the Friends tab. Note If you don’t have an account, please go to the MySteinberg Website to create an account free of charge. 4.2.
4.3 Performer Monitor (Headphone) Mix The Performer Mixer controls the monitor mix for the artist. This part is visible and accessible in both the Performer application or app, and the VST Connect plug-in in Cubase / Nuendo. It means the engineer too can remote control the artists’ headphone mix, namely: • The "MASTR" (Master) channel, which controls the overall listening level for the artist.
for instance use the "Mic" channel for the artist to chat and sing, and the "Instr" channel to record a guitar signal fed into another audio input of the artists’ audio interface at the same time. Each of these channels features : Volume A slider to control its individual level. : Signal A Signal meter. : Mute A button to disable audio of this channel altogether. : Pan/Balance A setting to determine where the signal appears between the left and right output channels.
4.4 Effects As explained before, the Performer application features built-in effects for the artists’ monitoring. These can be recorded in Cubase / Nuendo, or, when fx record is off, are only audible by the artist. As with all other Monitor mixer controls, they can be accessed by both the artist and the engineer remotely.
: Mid Freq Sets the center frequency (250 Hz to 5 kHz) for "Mid". : High Sets the amount of high frequency (6 kHz) increase or decrease. 4.4.3 Compressor The Compressor of each channel smoothes out dynamic changes of the signal so to make it more consistent (simplified, lower signals become louder, while louder signals become lower). A compressor is a somewhat complex device, we don’t give advice here how to operate it.
Plug ins to be used must of course be installed on the artists’ computer or device where the VST Connect Performer application or app runs. : On/Off Sets all four insert plug-ins active or inactive : Slots 1-4 • On/Off - Activate or deactivate this slots Insert effect • e - Show or hide the editor of the Insert effect. • Menu - Select an Insert plugging here, or remove an installed one via the "Remove Insert" entry 4.
: Help Opens the Help Document. 4.6 Status and File Transfer The status text field to the lower left displays useful information about the current status of VST Connect. Below the status text, a file transfer progress bar is shown once an HD file transfer is started. This is only available when connected to the PRO version of VST Connect. It shows the progress of currently transfered HD files as described with the Manager Tab before. 4.
: Buffer Size (Mac only) Sets the size of the audio buffers. The lower the buffer size, the lower the latency, but the higher the CPU load and risk of dropouts. : Audio Upstream Open this pop-up menu and select the audio upstream rate for the signal sent to the studio (shown in kilobits per second). The higher the rate, the better the audio quality for the signal that is being sent to the studio, but of course there has to be sufficient bandwidth within the connection to provide the goods.
can be restored the next time the Performer application is opened. 4.8 Plug-In Manager This section provides an overview of VST Instruments and VST effects plug-ins which are installed on the Performer’s system. The Plug-in Manager supports VST 2 and VST 3 plug-ins, but it does not support so called "Bridging". You can only use either 64 bit plug-ins. Plug-in support is initially switched off and can be individually activated for VST 2 and/or VST 3.
5 5.1 Troubleshooting Connection There is usually no need for so called port forwarding, but it may help to improve connection quality. If you know how to do so, you may instruct your router and firewall to open (forward) UDP ports 51111 through 51113. If you think it is required to do this but don’t know how, please refer to various games sites where you can find instructions of how to configure your router and/or firewall.
5.3 Avoid Audio Dropouts If the values set for Audio Upstream and Video Upstream in the configuration settings for the performer and/or engineer exceed approx. 80 % of what the respective Internet Provider (IP) delivers as upstream rate, dropouts will occur. For example, if your provider guarantees only 384 kBit/s upstream, you should set both the audio upstream and video upstream parameters to 128 kBit/s. This gives you sufficient headroom for reliable network operation without dropouts.