
User manual
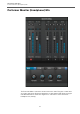


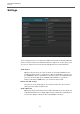


Table Of Contents

VST Connect Performer
Plug-In Manager
39
Plugging support is initially switched off and can be individually activated for VST 2
and/or VST 3. To activate VST 2 support, the Plugging Manager requires a path to
the directory, where VST 2 plug-ins are installed. For VST 3, this path is
standardized and does not need to be set explicitly.
If a plugging type is activated, an additional window showing information about
validation of the plug-ins is displayed. After validation, that window is automatically
closed and all supported plug-ins are being listed. The list shows Name, Category,
and Type of plug-in (type being either VST 2 or VST 3). All listed plug-ins can
immediately be used within VST Connect Performer.
The Manager also features to possibly exclude plug-ins from the popup-menu lists
in VST Connect Performer. This can be useful should there be many plug-ins, but
only some are to be used. Each column features a check box to indicate plug-ins
that appear in the lists.
NOTE
Newly installed plug-ins will automatically be validated by the next time the
Performer is started, provided the according support is activated.
Using a VST Instrument
A VST Instrument plug-in can be loaded in the according slot to the top left of the
VST Connect Performer application. When you click here, a list of available VST
Instruments is displayed, one of which you can select to use it. Availability of VST
Instruments is configured in the Plug-in Manager described before.
When an Instrument is loaded, its editor window is opened automatically. This
window can be opened again clicking the “Edit” button next to the VST Instrument
slot.
NOTE
Furthermore, there is a MIDI activity LED in this section.