
User Manual


Usage Examples
UR824 Operation Manual 27
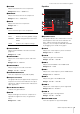
6. While singing into the microphone, adjust
the output signal level of the headphones by
the PHONES knob on the device.
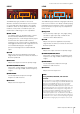
7. Set the Channel Strip settings and REV-X
settings on the Input Settings window.
Select the Channel Strip Insertion Location
depending on the desired insert point. The
default setting is “Lower” (applied to both the
monitor signal and the recording signal). For
details on the Insertion Location, refer to the
“Effect Insertion Location” (page 17) in the
section “Dedicated Windows for Cubase
Series.”
8. Click “Record” to start the recording.
9. After finishing the recording, click “Stop” to
stop it.
10. Turn “Monitor” off (dark) for the audio track.
11. Click the Ruler to move the project cursor to
the desired point for starting playback.
12. Click “Play” to check the recorded sound.
When listening to the sound over monitor
speakers, adjust the output signal level by the
OUTPUT LEVEL knob on the device.
Operation is now completed.
Programs Other Than Cubase Series
1. Launch your DAW software.
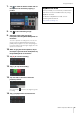
2. Open the dspMixFx UR824.
For instructions on how to open the dspMixFx
UR824, refer to the section “How to Open the
Window” (page 10).
3. Adjust the input signal level of the
microphone by the INPUT GAIN knob on the
device.
Adjust the input signal level so that the SIG/
PEAK lamp flashes dimly in red.
4. Adjust the output signal level of the
headphone by the PHONES knob on the
device.
5. Set the Channel Strip settings and REV-X
settings on the dspMixFx UR824.
6. Start recording on your DAW software.
7. After finishing recording, stop it.
8. Playback the newly recorded sound to
check it.
Operation is now completed.