
1.0

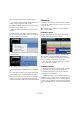


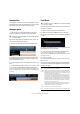


Table Of Contents

35
Tutorial 4: Live Pads and Chain Play mode
Introduction
In this chapter, we’ll show you how to use Sequel to make
performing live fun and easy. We’ll take you through creat-
ing Arranger parts and using the Arranger page.
Arranger parts
Ö The following sections make references to tutorial
projects, located in the default Sequel project folder.
Let’s use Arranger parts to separate the intro, verse, cho-
rus, and extro into different sections.
1. Activate the Arranger track button in the Pilot Zone.
2. Place the cursor within the Arranger track and press
and hold [Alt]/[Option] on your computer keyboard. The
cursor will turn into a pencil.
3. Click and drag to create an Arranger part from bar 1 to
bar 5.
4. Create three more parts from bar 5 to 13, 13 to 17, and
17 to 25. They will be labeled alphabetically from A to Z.
You can create up to 26 parts. One for each letter of the alphabet. If you
want to use a different project, feel free to create as many Arranger parts
as you like.
Live Mode
Now that we have Arranger parts set up, let’s use them to
play back our project.
1. Select the Arranger page in the Multi Zone.
2. Make sure that the Pad Mode is set to “Live Pads”
mode. This is represented by four small pads in the shape
of a box.
3. Below the Pad Mode button you can select the Jump
mode. Make sure it is set to “End”.
4. Click on “Pad A” and it will begin looping the intro.
You can also press the [A] key on your computer keyboard.
Notice that the pad is highlighted. This signifies that the pad is currently
playing back or active.
5. Click on “Pad B”.
Notice that pad “B” starts flashing. This signifies that this pad is next in
line to be played.
The order in which the pads will be played and the exact
time at which a pad is played depend on the settings to
the left of the pads.
!
Load the project “Live Mode 1” found in the “Sequel
Tutorial 4” folder.
!
Load the project “Live Mode 2” found in the “Sequel
Tutorial 4” folder.
Option Description
Now Jumps to the next section immediately.
4 bars,
2 bars
When one of these modes is selected, a grid of 4 or 2 bars (de-
pending on the setting) will be placed on the active Arranger part.
Whenever the respective grid line is reached, playback will jump
to the next Arranger part. An example:
Let’s say you have an Arranger part which is 8 bars long and
Jump mode is set to 4 bars. When the cursor is anywhere within
the first 4 bars of the Arranger part when you hit the next pad,
playback will jump to the next part when the end of the fourth bar
of the Arranger part is reached. When the cursor is anywhere
within the last 4 bars of the Arranger part, playback will jump to
the next part at the end of the part.
When a part is shorter than 4 (or 2) bars when this mode is se-
lected, playback will jump to the next section at the part end.
1 bar Jumps to the next section at the next bar line.
1 beat Jumps to the next section at the next beat.
End Plays the current section to the end, then jumps to the next section.