
1.0

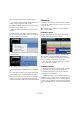
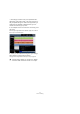


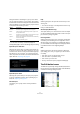
Table Of Contents

31
Tutorial 3: Mixing
Output Effects
Output Effects, like Track Effects, are inserts, but in this
case, they are applied to the Master channel. The “Output
Effects” tab features two changeable effects and two fixed
effects.
The two fixed effects are a maximizer and stereo enhancer.
Both are controllable via sliders and a bypass button.
Let’s use the “Maximizer” to raise the overall volume of the
project and the “Stereo Enhancer” to create a more
spread effect of the mix.
1. Move the “Maximizer” slider until the effect is at a suit-
able level.
2. You can bypass the effect by clicking on the button
above the effect slider.
3. Crank up the “Stereo Enhancer” a little bit to add
some spread to your project.
For details on each effect and its parameters, see the
chapter “Effects reference” on page 91.
That’s it for effects. Let’s move on to automation.
Adding Automation
Automation allows us to make things like faders, pan,
knobs, and effects be adjusted automatically. This is very
handy, especially when you have a lot of tracks in your
project. Any changes you make will be remembered and
will occur again automatically without you having to worry
about them.
Let’s make the whole song fade out by changing the vol-
ume automation on the Master track.
1. Activate the “Edit/Write Automation” button in Pilot
Zone.
The Master track will appear in the Arrange Zone.
2. Make sure that “Volume” is selected on the automation
pop-up menu.
Let’s create a fade-out in the last bar of the project.
3. Create two anchor points by clicking on the volume
automation line. One at the beginning of the last bar and
one at the end of the last bar.
To delete an anchor point that you may have created by mistake, select it
and press [Delete] or [Backspace] on your computer keyboard.
4. Drag the anchor point at the end of the song down un-
til you can’t drag it any further.
!
Load the project “Mixing 8” found in the “Sequel
Tutorial 3” folder.
Edit/Write Automation
Make sure Volume is selected here