
User manual
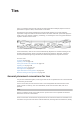
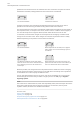
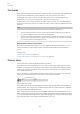

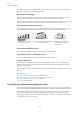
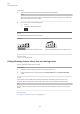
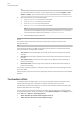
Table Of Contents
- Table of Contents
- Introduction
- First steps
- Dorico Elements concepts
- User interface
- Hub
- Windows
- Setting up your workspace
- Switching between layouts
- Opening new tabs
- Showing multiple tabs in the same project window
- Closing tabs
- Switching between tabs
- Changing the order of tabs
- Moving tabs to another tab group
- Moving tabs to other windows
- Opening multiple project windows
- Changing to full screen mode
- Changing the view type in the music area
- Preferences dialog
- Setup mode
- Project window in Setup mode
- Project Info dialog
- Layout Options dialog
- Players
- Ensembles
- Instruments
- Instrument numbering
- Transposing instruments
- Adding instruments to players
- Adding empty percussion kits to players
- Combining individual percussion instruments into kits
- Changing instruments
- Moving instruments between players
- Deleting instruments
- Edit Percussion Kit dialog
- Adding instruments to percussion kits
- Changing instruments in percussion kits
- Defining percussion kits as drum sets
- Creating groups of instruments within grid presentation percussion kits
- Renaming groups in grid presentation percussion kits
- Deleting groups within grid presentation percussion kits
- Changing the positions of instruments within percussion kits
- Changing the size of gaps between lines in percussion grids
- Removing individual instruments from percussion kits
- Player groups
- Flows
- Layouts
- Videos
- Write mode
- Project window in Write mode
- Introduction to inputting and editing
- Notation Options dialog
- Note input
- Notations input
- Inputting articulations
- Inputting fingerings
- Input methods for key signatures
- Input methods for time signatures
- Input methods for bars and barlines
- Input methods for dynamics
- Input methods for chord symbols
- Input methods for clefs and octave lines
- Input methods for holds and pauses
- Input methods for ornaments, arpeggio signs, glissando lines, and jazz articulations
- Ornaments popover
- Inputting ornaments with the popover
- Inputting ornaments with the panel
- Inputting arpeggio signs with the popover
- Inputting arpeggio signs with the panel
- Inputting glissando lines with the popover
- Inputting glissando lines with the panel
- Inputting jazz articulations with the popover
- Inputting jazz articulations with the panel
- Input methods for pedal lines, retakes, and pedal level changes
- Input methods for playing techniques
- Inputting lyrics
- Inputting rehearsal marks
- Inputting markers/timecodes
- Input methods for repeats and tremolos
- Inputting slurs
- Input methods for tempo marks
- Inputting text
- Arranging tools
- Copying and pasting items
- Copying and pasting notes into different voices
- Copying and pasting items to multiple staves
- Copying and pasting items to fill a selected range
- Moving notes to other staves
- Swapping the contents of staves
- Reducing music onto fewer staves
- Exploding music onto multiple staves
- Changing the voice of existing notes
- Swapping the contents of voices
- Splitting flows
- Layout and formatting
- Engrave mode
- Frames
- Master pages
- Page layouts
- Music Fonts dialog
- Editing text
- Note spacing
- Staff spacing
- Play mode
- Project window in Play mode
- Playback Options dialog
- Event display
- Tracks
- Playhead
- Playing back music
- Swing playback
- Mixer
- Transport window
- Endpoints
- Expression maps
- Percussion maps
- Played vs. notated note durations
- Print mode
- Notation reference
- Introduction
- Accidentals
- Articulations
- Bars
- Barlines
- Bar numbers
- Beaming
- Note and rest grouping
- Brackets and braces
- Chord symbols
- Clefs
- Octave lines
- Cues
- Dynamics
- Types of dynamics
- General placement conventions for dynamics
- Showing dynamics in parentheses
- Moving dynamics rhythmically
- Copying dynamics
- Deleting dynamics
- Voice-specific dynamics
- Niente hairpins
- Expressive text
- Gradual dynamics
- Placement of dynamics
- Groups of dynamics
- Dynamics linked across multiple staves
- VST Expression Maps for volume types
- Fingering
- General placement conventions for fingering
- Changing fingerings to substitution fingerings
- Changing existing fingerings
- Changing the placement of fingerings relative to the staff
- Hiding/Showing fingering
- Deleting fingerings
- Cautionary fingerings
- Fingerings for valved brass instruments
- Hiding/Showing fingering shifts for string instruments
- Fingerings imported from MusicXML files
- Front matter
- Grace notes
- Holds and pauses
- Key signatures
- Lyrics
- General placement conventions for lyrics
- Filters for lyrics
- Types of lyrics
- Types of syllables in lyrics
- Changing the text of existing lyrics
- Showing lyrics in italics
- Positions of lyrics
- Lyric hyphens and lyric extender lines
- Deleting lyric lines
- Lyric line numbers
- Verse numbers
- East Asian elision slurs
- Project-wide engraving options for lyrics
- Notes
- Ornaments
- Arpeggio signs
- Glissando lines
- Jazz articulations
- Page numbers
- Pedal lines
- General placement conventions for pedal lines
- Sustain pedal retakes and pedal level changes
- Sustain pedal lines in Engrave mode
- Adding retakes and pedal level changes to existing pedal lines with the popover
- Adding retakes and pedal level changes to existing pedal lines with the panel
- Changing the type of pedal line retakes
- Changing the start level of pedal lines
- Changing pedal levels at retakes and pedal level changes
- Changing the end level of pedal lines
- Removing retakes and pedal level changes
- Positions of pedal lines
- Lengthening/Shortening pedal lines
- Project-wide engraving options for pedal lines
- Pedal line start signs, hooks, and continuation lines
- Pedal line start, continuation, and restorative text
- Pedal lines in playback
- Pedal lines imported from MusicXML files
- Playing techniques
- General placement conventions for playing techniques
- Project-wide engraving options for playing techniques
- Positions of playing techniques
- Adding text to playing techniques
- Erasing the background of text playing techniques
- Hiding/Showing playing techniques
- Custom playing techniques
- Playing techniques in playback
- Rehearsal marks
- Markers
- Timecodes
- Repeat endings
- Changing the total number of playthroughs in repeat endings
- Project-wide engraving options for repeat endings
- Lengthening/Shortening segments in repeat endings
- Positions of repeat endings
- Deleting repeat endings
- Changing the text shown in repeat endings
- Changing the appearance of individual final repeat ending segments
- Lengthening/Shortening repeat ending hooks
- Repeat endings in MusicXML files
- Bar repeats
- Rhythm slashes
- Rests
- Slurs
- General placement conventions for slurs
- Project-wide engraving options for slurs
- Cross-staff and cross-voice slurs
- Nested slurs
- Moving slurs rhythmically
- Lengthening/Shortening slurs
- Linked slurs across multiple staves
- Slur segments
- Slurs in Engrave mode
- Short slurs that cover large pitch ranges
- Slur height
- Slur shoulder offset
- Slur curvature direction
- Slur styles
- Slur collision avoidance
- Slurs over system and frame breaks
- Slurs in playback
- Staff labels
- Staves
- Divisi
- Stems
- Tempo marks
- Types of tempo marks
- General placement conventions for tempo marks
- Text in tempo marks
- Positions of tempo marks
- Lengthening/Shortening gradual tempo changes
- Hiding/Showing tempo marks
- Deleting tempo marks
- Project-wide engraving options for tempo marks
- Tempo mark components
- Metronome marks
- Gradual tempo changes
- Ties
- Time signatures
- General conventions for time signatures
- Project-wide engraving options for time signatures
- Project-wide spacing gaps for time signatures
- Types of time signatures
- Large time signatures
- Time signature styles
- Positions of time signatures
- Hiding/Showing time signatures
- Deleting time signatures
- Time signature font styles
- Tremolos
- Tuplets
- Unpitched percussion
- Percussion kits vs. individual percussion instruments
- Percussion kits
- Project-wide engraving options for unpitched percussion
- Per-flow notation options for unpitched percussion
- Changing the playing techniques of notes on percussion kit staves
- Showing notes in percussion instruments as ghost notes
- Moving notes to different instruments in percussion kits
- Notations on notes in percussion kits
- Percussion kit presentation types
- Playing techniques for unpitched percussion instruments
- Percussion legends
- Adding percussion legends to five-line staff kit presentations
- Changing the sounding instrument percussion legend range
- Changing the percussion legend type
- Showing short instrument names in percussion legends
- Changing the text shown in percussion legends
- Changing the placement of percussion legends relative to the staff
- Voices in percussion kits
- Unpitched percussion in Play mode
- Universal Indian Drum Notation
- Voices
- Glossary
- Index

positioned at the horizontal center of noteheads. The other convention is to place the ends of
ties between noteheads, ideally positioned at the vertical center of noteheads.
A tie outside noteheads A tie between noteheads
For both conventions, Dorico Elements automatically positions the ends of ties as close as
possible to the notes that they join while avoiding collisions with other notations.
The vertical placement of ties is also automatically adjusted in Dorico Elements so that neither of
the end points of ties, nor the apex of tie curves, starts or ends on a staff line. If this happens, it
can cause the shape of ties to appear distorted, which makes the music harder to read.
To avoid this, Dorico Elements changes the vertical position of ties slightly, and makes small
changes to the curvature of ties. These changes are small, but the placement of ties is subtly
different depending on the position of notes relative to staff lines.
A tie outside noteheads
When transposed one note down, the tie appears
with a steeper curve to avoid reaching its apex on
the staff line.
A tie between noteheads, with the ends slightly
above the vertical center of the noteheads to avoid
the tie appearing too close to the staff line at its
ends or apex.
When transposed up, the ends of the tie are now
positioned at the vertical center of the notehead, as
there is no staff line with which it could collide.
Wherever possible, clef changes should not be positioned in the middle of tie chains. Changing
the clef changes the position of the tied note on the staff, which could easily cause a performer
to misread the tie as a slur and play two different notes.
Ties can look distorted when they are very short, and can be overlooked. You can change the
minimum length of ties when they are within a single system on the Ties page in Engrave >
Engraving Options.
NOTE
Slurs must not be confused with ties, which look supercially similar, but instead join notes of the
same pitch to indicate that they are played as a single note. In that sense, ties are part of
rhythmic notation, while slurs are considered articulation.
RELATED LINKS
Ties vs. slurs on page 713
Inputting ties on page 148
Project-wide engraving options for ties on page 718
General placement conventions for clefs on page 424
Ties
General placement conventions for ties
712