
User manual


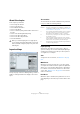
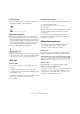
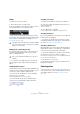
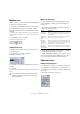
Table Of Contents
- Table of Contents
- Part I: Getting into the details
- About this manual
- Setting up your system
- VST Connections
- The Project window
- Working with projects
- Creating new projects
- Opening projects
- Closing projects
- Saving projects
- The Archive and Backup functions
- Startup Options
- The Project Setup dialog
- Zoom and view options
- Audio handling
- Auditioning audio parts and events
- Scrubbing audio
- Editing parts and events
- Range editing
- Region operations
- The Edit History dialog
- The Preferences dialog
- Working with tracks and lanes
- Playback and the Transport panel
- Recording
- Quantizing MIDI and audio
- Fades, crossfades and envelopes
- The arranger track
- The transpose functions
- Using markers
- The Mixer
- Control Room (Cubase only)
- Audio effects
- VST instruments and instrument tracks
- Surround sound (Cubase only)
- Automation
- Audio processing and functions
- The Sample Editor
- The Audio Part Editor
- The Pool
- The MediaBay
- Introduction
- Working with the MediaBay
- The Define Locations section
- The Locations section
- The Results list
- Previewing files
- The Filters section
- The Attribute Inspector
- The Loop Browser, Sound Browser, and Mini Browser windows
- Preferences
- Key commands
- Working with MediaBay-related windows
- Working with Volume databases
- Working with track presets
- Track Quick Controls
- Remote controlling Cubase
- MIDI realtime parameters and effects
- Using MIDI devices
- MIDI processing
- The MIDI editors
- Introduction
- Opening a MIDI editor
- The Key Editor – Overview
- Key Editor operations
- The In-Place Editor
- The Drum Editor – Overview
- Drum Editor operations
- Working with drum maps
- Using drum name lists
- The List Editor – Overview
- List Editor operations
- Working with SysEx messages
- Recording SysEx parameter changes
- Editing SysEx messages
- The basic Score Editor – Overview
- Score Editor operations
- Expression maps (Cubase only)
- Note Expression (Cubase only)
- The Logical Editor, Transformer, and Input Transformer
- The Project Logical Editor (Cubase only)
- Editing tempo and signature
- The Project Browser (Cubase only)
- Export Audio Mixdown
- Synchronization
- Video
- ReWire
- File handling
- Customizing
- Key commands
- Part II: Score layout and printing (Cubase only)
- How the Score Editor works
- The basics
- About this chapter
- Preparations
- Opening the Score Editor
- The project cursor
- Playing back and recording
- Page Mode
- Changing the zoom factor
- The active staff
- Making page setup settings
- Designing your work space
- About the Score Editor context menus
- About dialogs in the Score Editor
- Setting clef, key, and time signature
- Transposing instruments
- Printing from the Score Editor
- Exporting pages as image files
- Working order
- Force update
- Transcribing MIDI recordings
- Entering and editing notes
- About this chapter
- Score settings
- Note values and positions
- Adding and editing notes
- Selecting notes
- Moving notes
- Duplicating notes
- Cut, copy, and paste
- Editing pitches of individual notes
- Changing the length of notes
- Splitting a note in two
- Working with the Display Quantize tool
- Split (piano) staves
- Strategies: Multiple staves
- Inserting and editing clefs, keys, or time signatures
- Deleting notes
- Staff settings
- Polyphonic voicing
- About this chapter
- Background: Polyphonic voicing
- Setting up the voices
- Strategies: How many voices do I need?
- Entering notes into voices
- Checking which voice a note belongs to
- Moving notes between voices
- Handling rests
- Voices and Display Quantize
- Creating crossed voicings
- Automatic polyphonic voicing – Merge All Staves
- Converting voices to tracks – Extract Voices
- Additional note and rest formatting
- Working with symbols
- Working with chords
- Working with text
- Working with layouts
- Working with MusicXML
- Designing your score: additional techniques
- Scoring for drums
- Creating tablature
- The score and MIDI playback
- Tips and Tricks
- Index

667
Designing your score: additional techniques
Multiple rests
Multiple consecutive rests can be automatically displayed
as multi-rests. Proceed as follows:
1. Open the Score Settings and select the Layout page.
2. Set the Multi-Rests option to the number of empty
bars that are “allowed” before Cubase displays them as a
multi-rest.
For example, a value of 2 means that three or more consecutive empty
bars are displayed as a multi-rest. If you set this to “Off”, multi-rests are
not used.
3. Click Apply and close the dialog.
The multi-rests now appear in the score.
A multi-rest over three bars
Splitting multi-rests
To divide one long multiple rest into several shorter ones,
proceed as follows:
1. Double-click on the multi-rest symbol.
The Split Multi-Rest dialog appears:
2. In the dialog, enter the bar number where you want the
first split.
3. Click OK.
If you need more splits, double-click on any multi-rest symbol and proceed
as above.
Multi-rest appearance
The Project page in the Score Settings dialog contains
several subpages, on which you can make settings for
multi-rests:
• The subpage “Notation Style” contains the following
settings concerning multi-rests:
• On the Spacings subpage of the dialog, you can adjust
the height and width of multi-rest symbols.
• On the Text Settings subpage, you can select a font for
the multi-rest numbers (select “Multi-Rests” in the “Font
For” pop-up menu and make the desired settings).
Editing bar lines
Editing existing bar lines
For each bar line, you can choose whether you want a reg-
ular, single bar line, a double bar line, a repeat sign, etc.:
1. Double-click on the bar line for which you want to edit
the settings.
A dialog appears with a number of bar line types.
!
The program automatically splits multi-rests at time
signature changes, double bar lines, repeat signs
and rehearsal marks.
Option Description
Multi-Rests –
Church Style
When this is activated, multi-rests are shown in “church
style” (vertical bars), rather than with the regular, hori
-
zontal symbols.
Multi-Rests –
Numbers above
Symbol
When this is activated, the numbers are shown above
the multi-rest symbol, instead of below it.
Multi-Rests –
Snap Rests
moved with the
Layout tool
When this is activated, rests automatically snap to “intel-
ligent” positions in the score (i.e. positions used in regu-
lar notation) when moved with the layout tool. If this is
deactivated, rests can be positioned freely.
Bar numbers –
Show Range
with Multi-Rests
When this is activated, and bar numbers are displayed,
the bar numbers of a multi-rest are shown as a range.