
User manual

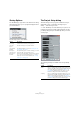
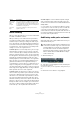
Table Of Contents
- Table of Contents
- Part I: Getting into the details
- About this manual
- Setting up your system
- VST Connections
- The Project window
- Working with projects
- Creating new projects
- Opening projects
- Closing projects
- Saving projects
- The Archive and Backup functions
- Startup Options
- The Project Setup dialog
- Zoom and view options
- Audio handling
- Auditioning audio parts and events
- Scrubbing audio
- Editing parts and events
- Range editing
- Region operations
- The Edit History dialog
- The Preferences dialog
- Working with tracks and lanes
- Playback and the Transport panel
- Recording
- Quantizing MIDI and audio
- Fades, crossfades and envelopes
- The arranger track
- The transpose functions
- Using markers
- The Mixer
- Control Room (Cubase only)
- Audio effects
- VST instruments and instrument tracks
- Surround sound (Cubase only)
- Automation
- Audio processing and functions
- The Sample Editor
- The Audio Part Editor
- The Pool
- The MediaBay
- Introduction
- Working with the MediaBay
- The Define Locations section
- The Locations section
- The Results list
- Previewing files
- The Filters section
- The Attribute Inspector
- The Loop Browser, Sound Browser, and Mini Browser windows
- Preferences
- Key commands
- Working with MediaBay-related windows
- Working with Volume databases
- Working with track presets
- Track Quick Controls
- Remote controlling Cubase
- MIDI realtime parameters and effects
- Using MIDI devices
- MIDI processing
- The MIDI editors
- Introduction
- Opening a MIDI editor
- The Key Editor – Overview
- Key Editor operations
- The In-Place Editor
- The Drum Editor – Overview
- Drum Editor operations
- Working with drum maps
- Using drum name lists
- The List Editor – Overview
- List Editor operations
- Working with SysEx messages
- Recording SysEx parameter changes
- Editing SysEx messages
- The basic Score Editor – Overview
- Score Editor operations
- Expression maps (Cubase only)
- Note Expression (Cubase only)
- The Logical Editor, Transformer, and Input Transformer
- The Project Logical Editor (Cubase only)
- Editing tempo and signature
- The Project Browser (Cubase only)
- Export Audio Mixdown
- Synchronization
- Video
- ReWire
- File handling
- Customizing
- Key commands
- Part II: Score layout and printing (Cubase only)
- How the Score Editor works
- The basics
- About this chapter
- Preparations
- Opening the Score Editor
- The project cursor
- Playing back and recording
- Page Mode
- Changing the zoom factor
- The active staff
- Making page setup settings
- Designing your work space
- About the Score Editor context menus
- About dialogs in the Score Editor
- Setting clef, key, and time signature
- Transposing instruments
- Printing from the Score Editor
- Exporting pages as image files
- Working order
- Force update
- Transcribing MIDI recordings
- Entering and editing notes
- About this chapter
- Score settings
- Note values and positions
- Adding and editing notes
- Selecting notes
- Moving notes
- Duplicating notes
- Cut, copy, and paste
- Editing pitches of individual notes
- Changing the length of notes
- Splitting a note in two
- Working with the Display Quantize tool
- Split (piano) staves
- Strategies: Multiple staves
- Inserting and editing clefs, keys, or time signatures
- Deleting notes
- Staff settings
- Polyphonic voicing
- About this chapter
- Background: Polyphonic voicing
- Setting up the voices
- Strategies: How many voices do I need?
- Entering notes into voices
- Checking which voice a note belongs to
- Moving notes between voices
- Handling rests
- Voices and Display Quantize
- Creating crossed voicings
- Automatic polyphonic voicing – Merge All Staves
- Converting voices to tracks – Extract Voices
- Additional note and rest formatting
- Working with symbols
- Working with chords
- Working with text
- Working with layouts
- Working with MusicXML
- Designing your score: additional techniques
- Scoring for drums
- Creating tablature
- The score and MIDI playback
- Tips and Tricks
- Index

59
Working with projects
Scrubbing audio
The Scrub tool allows you to locate positions in the audio
part or event by playing back, forwards or backwards, at
any speed:
1. Select the Play tool and click a second time on the
icon.
A pop-up menu opens.
2. Select “Scrub”.
3. Click at the desired position of your audio event or
part and keep the mouse button pressed.
The project cursor moves to the position where you click. The mouse
pointer is not visible anymore.
4. Drag to the left or right.
The project cursor moves correspondingly and the audio is played back.
The speed and thus the pitch of the playback depend on how fast you
move the mouse.
You can adjust the volume of the Scrub function in the
Preferences dialog (Transport–Scrub page).
Ö When scrubbing with the mouse, insert effects are al-
ways bypassed.
Ö It is also possible to “scrub” all audio and video tracks
of your project with the Jog wheel and Shuttle Speed con
-
trol on the Transport panel see “Playing back with the
shuttle speed control” on page 85.
Scrubbing can be quite a burden on your system. If play-
back problems occur, try deactivating the “Use High
Quality Scrub Mode” option in the Preferences dialog
(Transport–Scrub page). The resampling quality will then
be lower, but scrubbing will be less demanding on the
processor. This can be useful when scrubbing in large
projects.
Editing parts and events
This section describes techniques for editing in the Proj-
ect window. If not explicitly stated, all descriptions apply
to both events and parts, even though we use the term
“event” for convenience.
Ö When you are using the tools for editing, you can in
many cases get additional functions by pressing modifier
keys (e.
g. pressing [Alt]/[Option] and dragging with the
Arrow tool creates a copy of the dragged event).
On the following pages, the default modifier keys are de-
scribed – you can customize these in the Preferences dia-
log (Editing–Tool Modifiers page), see “Setting up tool
modifier keys” on page 545.
Selecting events
Selecting events is done using any of the following
methods:
• Use the Arrow tool.
The standard selection techniques apply.
• Use the Select submenu on the Edit menu.
The options are:
Option Description
All Selects all events in the Project window.
None Deselects all events.
Invert Inverts the selection – all selected events are dese-
lected and all events that were not selected are se-
lected instead.
In Loop Selects all events that are partly or wholly between
the left and right locator.
From Start to
Cursor
Selects all events that begin to the left of the project
cursor.
From Cursor to
End
Selects all events that end to the right of the project
cursor.
Equal Pitch These are available in the MIDI Editors (see “Select-
ing notes” on page 383) and the Sample Editor (see
“Using the Select menu” on page 269).
Select Controllers
in Note Range
This is available in the MIDI Editors (see “Selecting
controllers within the note range” on page 384).
All on Selected
Tracks
Selects all events on the selected track.
Events under
Cursor
Automatically selects all events on the selected
track(s) that are “touched” by the project cursor.