
User manual
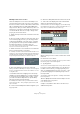
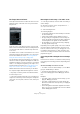
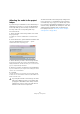
Table Of Contents
- Table of Contents
- Part I: Getting into the details
- About this manual
- Setting up your system
- VST Connections
- The Project window
- Working with projects
- Creating new projects
- Opening projects
- Closing projects
- Saving projects
- The Archive and Backup functions
- Startup Options
- The Project Setup dialog
- Zoom and view options
- Audio handling
- Auditioning audio parts and events
- Scrubbing audio
- Editing parts and events
- Range editing
- Region operations
- The Edit History dialog
- The Preferences dialog
- Working with tracks and lanes
- Playback and the Transport panel
- Recording
- Quantizing MIDI and audio
- Fades, crossfades and envelopes
- The arranger track
- The transpose functions
- Using markers
- The Mixer
- Control Room (Cubase only)
- Audio effects
- VST instruments and instrument tracks
- Surround sound (Cubase only)
- Automation
- Audio processing and functions
- The Sample Editor
- The Audio Part Editor
- The Pool
- The MediaBay
- Introduction
- Working with the MediaBay
- The Define Locations section
- The Locations section
- The Results list
- Previewing files
- The Filters section
- The Attribute Inspector
- The Loop Browser, Sound Browser, and Mini Browser windows
- Preferences
- Key commands
- Working with MediaBay-related windows
- Working with Volume databases
- Working with track presets
- Track Quick Controls
- Remote controlling Cubase
- MIDI realtime parameters and effects
- Using MIDI devices
- MIDI processing
- The MIDI editors
- Introduction
- Opening a MIDI editor
- The Key Editor – Overview
- Key Editor operations
- The In-Place Editor
- The Drum Editor – Overview
- Drum Editor operations
- Working with drum maps
- Using drum name lists
- The List Editor – Overview
- List Editor operations
- Working with SysEx messages
- Recording SysEx parameter changes
- Editing SysEx messages
- The basic Score Editor – Overview
- Score Editor operations
- Expression maps (Cubase only)
- Note Expression (Cubase only)
- The Logical Editor, Transformer, and Input Transformer
- The Project Logical Editor (Cubase only)
- Editing tempo and signature
- The Project Browser (Cubase only)
- Export Audio Mixdown
- Synchronization
- Video
- ReWire
- File handling
- Customizing
- Key commands
- Part II: Score layout and printing (Cubase only)
- How the Score Editor works
- The basics
- About this chapter
- Preparations
- Opening the Score Editor
- The project cursor
- Playing back and recording
- Page Mode
- Changing the zoom factor
- The active staff
- Making page setup settings
- Designing your work space
- About the Score Editor context menus
- About dialogs in the Score Editor
- Setting clef, key, and time signature
- Transposing instruments
- Printing from the Score Editor
- Exporting pages as image files
- Working order
- Force update
- Transcribing MIDI recordings
- Entering and editing notes
- About this chapter
- Score settings
- Note values and positions
- Adding and editing notes
- Selecting notes
- Moving notes
- Duplicating notes
- Cut, copy, and paste
- Editing pitches of individual notes
- Changing the length of notes
- Splitting a note in two
- Working with the Display Quantize tool
- Split (piano) staves
- Strategies: Multiple staves
- Inserting and editing clefs, keys, or time signatures
- Deleting notes
- Staff settings
- Polyphonic voicing
- About this chapter
- Background: Polyphonic voicing
- Setting up the voices
- Strategies: How many voices do I need?
- Entering notes into voices
- Checking which voice a note belongs to
- Moving notes between voices
- Handling rests
- Voices and Display Quantize
- Creating crossed voicings
- Automatic polyphonic voicing – Merge All Staves
- Converting voices to tracks – Extract Voices
- Additional note and rest formatting
- Working with symbols
- Working with chords
- Working with text
- Working with layouts
- Working with MusicXML
- Designing your score: additional techniques
- Scoring for drums
- Creating tablature
- The score and MIDI playback
- Tips and Tricks
- Index

474
Editing tempo and signature
The Tempo Detection Panel
The Tempo Detection Panel contains the functions for an-
alyzing the tempo of an audio event. It is opened via the
Project menu.
In the top section of the panel, the name of the selected
audio event is shown. Below the name, the Analyze button
is located. Click this button to start the tempo detection
for an event.
The middle section contains several functions for correct-
ing and fine-tuning the detected tempo curve. These func-
tions are described in the section “Correcting and fine-
tuning the detected tempo map” on page 474.
The arrow buttons at the bottom right let you change the
direction in which the algorithm will analyze the audio ma
-
terial during a manual correction operation. To work back-
wards, i. e. to reanalyze the beginning of the tempo curve,
activate the left arrow button (see
“The beginning of the
tempo curve needs to be corrected” on page 475).
With the Reset button at the bottom left you can delete
the complete analysis data and start again from scratch.
Ö Any tempo events beyond the event timeline will also
be removed upon reset.
Ö The Tempo Detection Panel has to be opened specif-
ically for the event that you want to analyze. To analyze an-
other event, close the panel, select the event, and reopen
the panel.
Detecting the basic tempo of an audio event
1. In the Project window, select the audio event that you
want to analyze.
2. On the Project menu, select “Tempo Detection…”.
The Tempo Detection Panel opens.
3. Click the Analyze button.
The following happens:
• A rough tempo map based on the beat analysis is created for
the selected audio clip.
• A tempo and a signature track are added to the project.
• The project will get a 1/4 signature, because the tempo de-
tection only calculates a tempo based on beats, regardless of
a musical signature. The signature can be modified later.
• The Time Warp Tool is selected for fine-tuning or adjusting
the newly generated tempo map.
Depending on the rhythmic quality of the source material,
the tempo analysis may directly lead to a perfect result.
However, if this is not the case, you can apply the correc
-
tion and fine-tuning functions. To find out whether such
actions are necessary, activate the metronome click and
play back the project.
Correcting and fine-tuning the detected tempo
map
If the metronome click does not match the audio perfectly,
perform any of the following operations, depending on the
situation.
The detected tempo is too fast or too slow
• To double or halve the detected tempo, use the “Multi-
ply by 2” and “Divide by 2” buttons.
• To adjust the detected tempo with a factor of 3/4 or
4/3, use the “Multiply by 4/3” and “Multiply by 3/4” but-
tons.
Examples:
• If your audio is twice as fast as the detected tempo, you can
apply the “Multiply by 2” function.
• If your audio contains dotted notes or triplets and the algo-
rithm detects 3 beats where 4 are expected, you can apply the
4/3 conversion.
• If the actual signature is 2/4 and the algorithm detected 6/8
beats or vice versa, you can apply a 3/4 conversion combined
with the “Multiply by 2” function.