
User manual
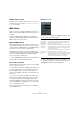

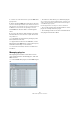

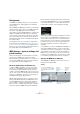
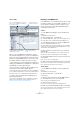
Table Of Contents
- Table of Contents
- Part I: Getting into the details
- About this manual
- Setting up your system
- VST Connections
- The Project window
- Working with projects
- Creating new projects
- Opening projects
- Closing projects
- Saving projects
- The Archive and Backup functions
- Startup Options
- The Project Setup dialog
- Zoom and view options
- Audio handling
- Auditioning audio parts and events
- Scrubbing audio
- Editing parts and events
- Range editing
- Region operations
- The Edit History dialog
- The Preferences dialog
- Working with tracks and lanes
- Playback and the Transport panel
- Recording
- Quantizing MIDI and audio
- Fades, crossfades and envelopes
- The arranger track
- The transpose functions
- Using markers
- The Mixer
- Control Room (Cubase only)
- Audio effects
- VST instruments and instrument tracks
- Surround sound (Cubase only)
- Automation
- Audio processing and functions
- The Sample Editor
- The Audio Part Editor
- The Pool
- The MediaBay
- Introduction
- Working with the MediaBay
- The Define Locations section
- The Locations section
- The Results list
- Previewing files
- The Filters section
- The Attribute Inspector
- The Loop Browser, Sound Browser, and Mini Browser windows
- Preferences
- Key commands
- Working with MediaBay-related windows
- Working with Volume databases
- Working with track presets
- Track Quick Controls
- Remote controlling Cubase
- MIDI realtime parameters and effects
- Using MIDI devices
- MIDI processing
- The MIDI editors
- Introduction
- Opening a MIDI editor
- The Key Editor – Overview
- Key Editor operations
- The In-Place Editor
- The Drum Editor – Overview
- Drum Editor operations
- Working with drum maps
- Using drum name lists
- The List Editor – Overview
- List Editor operations
- Working with SysEx messages
- Recording SysEx parameter changes
- Editing SysEx messages
- The basic Score Editor – Overview
- Score Editor operations
- Expression maps (Cubase only)
- Note Expression (Cubase only)
- The Logical Editor, Transformer, and Input Transformer
- The Project Logical Editor (Cubase only)
- Editing tempo and signature
- The Project Browser (Cubase only)
- Export Audio Mixdown
- Synchronization
- Video
- ReWire
- File handling
- Customizing
- Key commands
- Part II: Score layout and printing (Cubase only)
- How the Score Editor works
- The basics
- About this chapter
- Preparations
- Opening the Score Editor
- The project cursor
- Playing back and recording
- Page Mode
- Changing the zoom factor
- The active staff
- Making page setup settings
- Designing your work space
- About the Score Editor context menus
- About dialogs in the Score Editor
- Setting clef, key, and time signature
- Transposing instruments
- Printing from the Score Editor
- Exporting pages as image files
- Working order
- Force update
- Transcribing MIDI recordings
- Entering and editing notes
- About this chapter
- Score settings
- Note values and positions
- Adding and editing notes
- Selecting notes
- Moving notes
- Duplicating notes
- Cut, copy, and paste
- Editing pitches of individual notes
- Changing the length of notes
- Splitting a note in two
- Working with the Display Quantize tool
- Split (piano) staves
- Strategies: Multiple staves
- Inserting and editing clefs, keys, or time signatures
- Deleting notes
- Staff settings
- Polyphonic voicing
- About this chapter
- Background: Polyphonic voicing
- Setting up the voices
- Strategies: How many voices do I need?
- Entering notes into voices
- Checking which voice a note belongs to
- Moving notes between voices
- Handling rests
- Voices and Display Quantize
- Creating crossed voicings
- Automatic polyphonic voicing – Merge All Staves
- Converting voices to tracks – Extract Voices
- Additional note and rest formatting
- Working with symbols
- Working with chords
- Working with text
- Working with layouts
- Working with MusicXML
- Designing your score: additional techniques
- Scoring for drums
- Creating tablature
- The score and MIDI playback
- Tips and Tricks
- Index

359
Using MIDI devices
Installing a preset MIDI device
To install a preset MIDI device, proceed as follows:
1. Click the Install Device button.
A dialog opens listing all pre-configured MIDI devices. For now we as-
sume that your MIDI device is included in this list.
2. Locate and select the device in the list and click OK.
• If your MIDI device is not included in the list but is com-
patible with the GM (General MIDI) or XG standards, you
can select the generic GM or XG Device options at the
top of the list.
When you select one of these options, a name dialog will appear. Enter a
name for the instrument and click OK.
The device now appears in the Installed Devices list to the
left.
3. Make sure that the new device is selected in the list
and open the Output pop-up menu.
4. Select the MIDI output that the device is connected to.
5. If you are using Cubase, click the Open Device button.
A separate window opens for the selected device, showing a node struc-
ture in the left half of the window. At the top of this structure is the device
itself, and below it the MIDI channels used by the device. For more infor
-
mation about the Device window, see the separate PDF document “MIDI
Devices”.
6. Select Patch Banks from the pop-up menu at the top
of the window.
The Patch Banks list in the left half of the window shows
the patch structure of the device. This could simply be a
list of patches, but it is usually one or several layers of
banks or groups containing the patches (much like a
folder structure on a hard disk for example).
• You can rename a device in the Installed Devices list by
double-clicking and typing – this is useful if you have sev-
eral devices of the same model, and want to separate
them by name instead of by number.
• To remove a device from the Installed Devices list, se-
lect it and click Remove Device.
Ö Note that if there already exists a panel for the device
(Cubase only), opening the device might open this panel
first. In this case, click on the Edit (“e”) button to open the
Device window.
About Patch Banks
Depending on the selected device, you may find that the
Patch Banks list is divided in two or more main banks.
Typically, these are called Patches, Performances, Drums,
etc. The reason for having several patch banks is that dif
-
ferent “types” of patches are handled differently in the in-
struments. For example, while “patches” typically are
“regular” programs that you play one at the time, “perfor-
mances” may be combinations of programs, which could
be split across the keyboard, layered, or used for multi-
timbral playback, and so on.
For devices with several banks, you will find an additional
item labeled “Bank Assignment” in the pop-up menu at
the top of the window. Selecting this opens a window in
which you can specify for each MIDI channel which bank it
should use.
The selection here will affect which bank is displayed
when you select programs by name for the device in the
track list or Inspector. For example, many instruments use
MIDI channel 10 as an exclusive drum channel, in which
case you would want to select the “Drums” (or “Rhythm
Set”, “Percussion”, etc.) bank for channel 10 in this list.
This would then let you choose between different drum
kits in the track list or Inspector.