
User manual
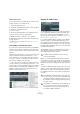
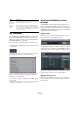
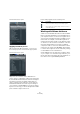
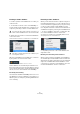
Table Of Contents
- Table of Contents
- Part I: Getting into the details
- About this manual
- Setting up your system
- VST Connections
- The Project window
- Working with projects
- Creating new projects
- Opening projects
- Closing projects
- Saving projects
- The Archive and Backup functions
- Startup Options
- The Project Setup dialog
- Zoom and view options
- Audio handling
- Auditioning audio parts and events
- Scrubbing audio
- Editing parts and events
- Range editing
- Region operations
- The Edit History dialog
- The Preferences dialog
- Working with tracks and lanes
- Playback and the Transport panel
- Recording
- Quantizing MIDI and audio
- Fades, crossfades and envelopes
- The arranger track
- The transpose functions
- Using markers
- The Mixer
- Control Room (Cubase only)
- Audio effects
- VST instruments and instrument tracks
- Surround sound (Cubase only)
- Automation
- Audio processing and functions
- The Sample Editor
- The Audio Part Editor
- The Pool
- The MediaBay
- Introduction
- Working with the MediaBay
- The Define Locations section
- The Locations section
- The Results list
- Previewing files
- The Filters section
- The Attribute Inspector
- The Loop Browser, Sound Browser, and Mini Browser windows
- Preferences
- Key commands
- Working with MediaBay-related windows
- Working with Volume databases
- Working with track presets
- Track Quick Controls
- Remote controlling Cubase
- MIDI realtime parameters and effects
- Using MIDI devices
- MIDI processing
- The MIDI editors
- Introduction
- Opening a MIDI editor
- The Key Editor – Overview
- Key Editor operations
- The In-Place Editor
- The Drum Editor – Overview
- Drum Editor operations
- Working with drum maps
- Using drum name lists
- The List Editor – Overview
- List Editor operations
- Working with SysEx messages
- Recording SysEx parameter changes
- Editing SysEx messages
- The basic Score Editor – Overview
- Score Editor operations
- Expression maps (Cubase only)
- Note Expression (Cubase only)
- The Logical Editor, Transformer, and Input Transformer
- The Project Logical Editor (Cubase only)
- Editing tempo and signature
- The Project Browser (Cubase only)
- Export Audio Mixdown
- Synchronization
- Video
- ReWire
- File handling
- Customizing
- Key commands
- Part II: Score layout and printing (Cubase only)
- How the Score Editor works
- The basics
- About this chapter
- Preparations
- Opening the Score Editor
- The project cursor
- Playing back and recording
- Page Mode
- Changing the zoom factor
- The active staff
- Making page setup settings
- Designing your work space
- About the Score Editor context menus
- About dialogs in the Score Editor
- Setting clef, key, and time signature
- Transposing instruments
- Printing from the Score Editor
- Exporting pages as image files
- Working order
- Force update
- Transcribing MIDI recordings
- Entering and editing notes
- About this chapter
- Score settings
- Note values and positions
- Adding and editing notes
- Selecting notes
- Moving notes
- Duplicating notes
- Cut, copy, and paste
- Editing pitches of individual notes
- Changing the length of notes
- Splitting a note in two
- Working with the Display Quantize tool
- Split (piano) staves
- Strategies: Multiple staves
- Inserting and editing clefs, keys, or time signatures
- Deleting notes
- Staff settings
- Polyphonic voicing
- About this chapter
- Background: Polyphonic voicing
- Setting up the voices
- Strategies: How many voices do I need?
- Entering notes into voices
- Checking which voice a note belongs to
- Moving notes between voices
- Handling rests
- Voices and Display Quantize
- Creating crossed voicings
- Automatic polyphonic voicing – Merge All Staves
- Converting voices to tracks – Extract Voices
- Additional note and rest formatting
- Working with symbols
- Working with chords
- Working with text
- Working with layouts
- Working with MusicXML
- Designing your score: additional techniques
- Scoring for drums
- Creating tablature
- The score and MIDI playback
- Tips and Tricks
- Index

325
The MediaBay
About the color scheme used in the Attribute Inspector
The colors used for the displayed values in the Attribute
Inspector have the following meaning:
Information on the meaning of the colors used in the Attri-
bute Inspector are also displayed in a tooltip when you
move the mouse pointer over one of the color icons below
the Attribute Inspector.
Editing attributes in the Results list
You can also edit attributes directly in the Results list. This
allows you for example to assign tags to a number of loop
files.
Proceed as follows:
1. In the Results list, select the file(s) for which you want
to change an attribute value.
2. Click in the column for the value you want to change
and make the desired settings.
As in the Attribute Inspector, you can choose a value from a pop-up
menu, enter the new value directly, etc.
Editing the attributes of multiple files simultaneously
There is no limit as to how many files can be tagged at the
same time, but you need to be aware that the tagging of a
large amount of files in one go may take quite a while. This
operation is executed in the background, so that you can
continue with your work as usual. By looking at the Attri
-
bute Counter above the Results list, you can see how
many files still have to be updated.
• If you close Cubase before the Attribute Counter has
gone down to zero, a dialog with a progress bar is dis-
played, indicating how long the updating process will take.
You can choose to abort this process.
In this case only the files that were updated before you clicked “Abort”
will have the new attribute values.
Editing the attributes of write-protected files
Media files may be write-protected due to a number of rea-
sons: They may belong to content that was provided by
someone else who write-protected the files, you may have
write-protected them yourself in order not to overwrite them
accidentally, or the file format could restrict write operations
by the MediaBay.
In the MediaBay, the write protection status of files is
shown as an attribute in the Attribute Inspector and in the
Write Protection column in the Results list.
However, there may be cases when you want to define at-
tributes for write-protected files. For example, you might
want to apply attributes to the content files that came with
Cubase or you are working on the same files with several
people and cannot modify these files. In these scenarios,
you still want to be able to find files quickly and improve
your workflow.
Therefore, it is possible to change the attribute values of
write-protected files in the MediaBay. These changes are
not written to disk though and occur in the MediaBay only.
• When you specify attribute values for a file that is write-
protected, this is reflected in the Pending Tags column
next to the Write Protection column in the Results list.
Note that if you rescan the MediaBay content and a media file on your
hard disk has changed since the last scan, all pending tags for this file
will be lost.
• If a file has pending tags, and you want to write the cor-
responding attributes to the file, you need to remove the
write protection first, and then select the “Write Tags to
File” command from the context menu.
Ö If the Write Protection and/or the Pending Tags col-
umn are not visible, you may have to enable the corre-
sponding attributes for the file type in question in the
Attribute Inspector.
Color Description
White This represents a “normal” attribute: One or more files are se-
lected in the Results list, and they have the same values.
Yellow Yellow color stands for an “ambiguous” attribute: Multiple files
are selected in the Results list, and their values differ.
Orange This stands for an “ambiguous static attribute”: Multiple files
are selected in the Results list, with differing values, and which
cannot be edited.
Red Red values are displayed for a “static attribute”: One or more
files are selected in the Results list, whose values cannot be
edited.
!
This is only possible if “Allow Editing in Results List”
is activated, see “Preferences” on page 327.