
User manual
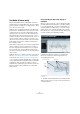
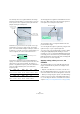
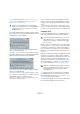
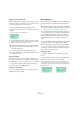

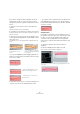
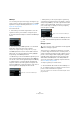
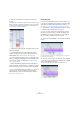
Table Of Contents
- Table of Contents
- Part I: Getting into the details
- About this manual
- Setting up your system
- VST Connections
- The Project window
- Working with projects
- Creating new projects
- Opening projects
- Closing projects
- Saving projects
- The Archive and Backup functions
- Startup Options
- The Project Setup dialog
- Zoom and view options
- Audio handling
- Auditioning audio parts and events
- Scrubbing audio
- Editing parts and events
- Range editing
- Region operations
- The Edit History dialog
- The Preferences dialog
- Working with tracks and lanes
- Playback and the Transport panel
- Recording
- Quantizing MIDI and audio
- Fades, crossfades and envelopes
- The arranger track
- The transpose functions
- Using markers
- The Mixer
- Control Room (Cubase only)
- Audio effects
- VST instruments and instrument tracks
- Surround sound (Cubase only)
- Automation
- Audio processing and functions
- The Sample Editor
- The Audio Part Editor
- The Pool
- The MediaBay
- Introduction
- Working with the MediaBay
- The Define Locations section
- The Locations section
- The Results list
- Previewing files
- The Filters section
- The Attribute Inspector
- The Loop Browser, Sound Browser, and Mini Browser windows
- Preferences
- Key commands
- Working with MediaBay-related windows
- Working with Volume databases
- Working with track presets
- Track Quick Controls
- Remote controlling Cubase
- MIDI realtime parameters and effects
- Using MIDI devices
- MIDI processing
- The MIDI editors
- Introduction
- Opening a MIDI editor
- The Key Editor – Overview
- Key Editor operations
- The In-Place Editor
- The Drum Editor – Overview
- Drum Editor operations
- Working with drum maps
- Using drum name lists
- The List Editor – Overview
- List Editor operations
- Working with SysEx messages
- Recording SysEx parameter changes
- Editing SysEx messages
- The basic Score Editor – Overview
- Score Editor operations
- Expression maps (Cubase only)
- Note Expression (Cubase only)
- The Logical Editor, Transformer, and Input Transformer
- The Project Logical Editor (Cubase only)
- Editing tempo and signature
- The Project Browser (Cubase only)
- Export Audio Mixdown
- Synchronization
- Video
- ReWire
- File handling
- Customizing
- Key commands
- Part II: Score layout and printing (Cubase only)
- How the Score Editor works
- The basics
- About this chapter
- Preparations
- Opening the Score Editor
- The project cursor
- Playing back and recording
- Page Mode
- Changing the zoom factor
- The active staff
- Making page setup settings
- Designing your work space
- About the Score Editor context menus
- About dialogs in the Score Editor
- Setting clef, key, and time signature
- Transposing instruments
- Printing from the Score Editor
- Exporting pages as image files
- Working order
- Force update
- Transcribing MIDI recordings
- Entering and editing notes
- About this chapter
- Score settings
- Note values and positions
- Adding and editing notes
- Selecting notes
- Moving notes
- Duplicating notes
- Cut, copy, and paste
- Editing pitches of individual notes
- Changing the length of notes
- Splitting a note in two
- Working with the Display Quantize tool
- Split (piano) staves
- Strategies: Multiple staves
- Inserting and editing clefs, keys, or time signatures
- Deleting notes
- Staff settings
- Polyphonic voicing
- About this chapter
- Background: Polyphonic voicing
- Setting up the voices
- Strategies: How many voices do I need?
- Entering notes into voices
- Checking which voice a note belongs to
- Moving notes between voices
- Handling rests
- Voices and Display Quantize
- Creating crossed voicings
- Automatic polyphonic voicing – Merge All Staves
- Converting voices to tracks – Extract Voices
- Additional note and rest formatting
- Working with symbols
- Working with chords
- Working with text
- Working with layouts
- Working with MusicXML
- Designing your score: additional techniques
- Scoring for drums
- Creating tablature
- The score and MIDI playback
- Tips and Tricks
- Index

284
The Sample Editor
Changing the note start or end point
If you find that a note starts or ends too early or too late,
e. g. when the reverb of a note or a consonant is not in-
cluded in the segment, proceed as follows:
1. On the VariAudio tab activate Segments mode.
2. To change the length of a segment, move the mouse
pointer over the start/end of the segment.
The mouse pointer becomes a double arrow.
3. Click and drag the segment start/end to the left or right.
The segment length changes accordingly. As the average pitch is recal-
culated, the segment may jump upwards or downwards. Snap will not be
taken into account.
Ö You can drag the segment start/end only until it reaches
the start/end of the next segment. Segments cannot over-
lap each other.
Cutting a segment
If you notice that a segment includes more than one note,
proceed as follows:
1. On the VariAudio tab activate Segments mode.
2. Move the mouse pointer over the lower border of the
segment that you would like to cut.
The mouse pointer becomes a scissor.
3. Click at the desired position to cut the segment.
The segment is cut accordingly taking Snap into account.
Ö There is a minimum size for a segment. Very short seg-
ments cannot be cut.
Gluing segments
If you notice that a single note is spread over two seg-
ments, proceed as follows:
1. On the VariAudio tab activate Segments mode.
2. Hold down [Alt]/[Option] and move the mouse pointer
over the segment that you want to glue to the next.
The mouse pointer becomes a glue tube.
3. Click to glue the active segment to the next segment.
If several segments are selected, they are all glued together. Snap is not
taken into account.
!
If the resulting segment pitch cannot be calculated
because of an increase in non-tonal data, the seg-
ment will be deleted.
!
When the resulting segment pitch cannot be calcu-
lated because of an increase in non-tonal data, the
segment will be deleted.
!
We recommend to correct the segmentation before
pitching. If you glue together segments after changing
the pitch (this includes manual pitch modifications,
Quantize Pitch, and Straighten Pitch), your modifica
-
tions are reset and the original pitch will be heard.
!
If the resulting segment pitch cannot be calculated
because of an increase in non-tonal data, the seg
-
ment will be deleted.