
User manual
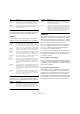
Table Of Contents
- Table of Contents
- Part I: Getting into the details
- About this manual
- Setting up your system
- VST Connections
- The Project window
- Working with projects
- Creating new projects
- Opening projects
- Closing projects
- Saving projects
- The Archive and Backup functions
- Startup Options
- The Project Setup dialog
- Zoom and view options
- Audio handling
- Auditioning audio parts and events
- Scrubbing audio
- Editing parts and events
- Range editing
- Region operations
- The Edit History dialog
- The Preferences dialog
- Working with tracks and lanes
- Playback and the Transport panel
- Recording
- Quantizing MIDI and audio
- Fades, crossfades and envelopes
- The arranger track
- The transpose functions
- Using markers
- The Mixer
- Control Room (Cubase only)
- Audio effects
- VST instruments and instrument tracks
- Surround sound (Cubase only)
- Automation
- Audio processing and functions
- The Sample Editor
- The Audio Part Editor
- The Pool
- The MediaBay
- Introduction
- Working with the MediaBay
- The Define Locations section
- The Locations section
- The Results list
- Previewing files
- The Filters section
- The Attribute Inspector
- The Loop Browser, Sound Browser, and Mini Browser windows
- Preferences
- Key commands
- Working with MediaBay-related windows
- Working with Volume databases
- Working with track presets
- Track Quick Controls
- Remote controlling Cubase
- MIDI realtime parameters and effects
- Using MIDI devices
- MIDI processing
- The MIDI editors
- Introduction
- Opening a MIDI editor
- The Key Editor – Overview
- Key Editor operations
- The In-Place Editor
- The Drum Editor – Overview
- Drum Editor operations
- Working with drum maps
- Using drum name lists
- The List Editor – Overview
- List Editor operations
- Working with SysEx messages
- Recording SysEx parameter changes
- Editing SysEx messages
- The basic Score Editor – Overview
- Score Editor operations
- Expression maps (Cubase only)
- Note Expression (Cubase only)
- The Logical Editor, Transformer, and Input Transformer
- The Project Logical Editor (Cubase only)
- Editing tempo and signature
- The Project Browser (Cubase only)
- Export Audio Mixdown
- Synchronization
- Video
- ReWire
- File handling
- Customizing
- Key commands
- Part II: Score layout and printing (Cubase only)
- How the Score Editor works
- The basics
- About this chapter
- Preparations
- Opening the Score Editor
- The project cursor
- Playing back and recording
- Page Mode
- Changing the zoom factor
- The active staff
- Making page setup settings
- Designing your work space
- About the Score Editor context menus
- About dialogs in the Score Editor
- Setting clef, key, and time signature
- Transposing instruments
- Printing from the Score Editor
- Exporting pages as image files
- Working order
- Force update
- Transcribing MIDI recordings
- Entering and editing notes
- About this chapter
- Score settings
- Note values and positions
- Adding and editing notes
- Selecting notes
- Moving notes
- Duplicating notes
- Cut, copy, and paste
- Editing pitches of individual notes
- Changing the length of notes
- Splitting a note in two
- Working with the Display Quantize tool
- Split (piano) staves
- Strategies: Multiple staves
- Inserting and editing clefs, keys, or time signatures
- Deleting notes
- Staff settings
- Polyphonic voicing
- About this chapter
- Background: Polyphonic voicing
- Setting up the voices
- Strategies: How many voices do I need?
- Entering notes into voices
- Checking which voice a note belongs to
- Moving notes between voices
- Handling rests
- Voices and Display Quantize
- Creating crossed voicings
- Automatic polyphonic voicing – Merge All Staves
- Converting voices to tracks – Extract Voices
- Additional note and rest formatting
- Working with symbols
- Working with chords
- Working with text
- Working with layouts
- Working with MusicXML
- Designing your score: additional techniques
- Scoring for drums
- Creating tablature
- The score and MIDI playback
- Tips and Tricks
- Index

260
Audio processing and functions
Ö When applying the Pitch Shift process, you can
choose between the regular setting and a setting where
the formants are preserved for each quality setting.
Standard
The Standard algorithm is optimized for CPU efficient
realtime processing. The following presets are available:
If you select the “Standard – Custom” option, a dialog
opens where you can manually adjust the three parame-
ters that govern the sound quality of the time stretching:
Limitations
Applying time stretching or pitch shifting to audio material
can lead to a degradation in audio quality and to audible
artifacts. The result depends on many factors, such as the
source material, the particular stretch and pitch operations
applied, and the selected audio algorithm preset.
As a rule of thumb, smaller changes in pitch or duration
cause less degradation. However, there are additional is
-
sues one should be aware of when working with time
stretching and pitch shifting algorithms.
Ö In rare cases, editing warped audio events may cause
discontinuities at the edit points. You can then try to move
the edit point to a different position or bounce the audio
event prior to editing.
Reverse playback and scrubbing
Most of the algorithms used for time stretching and pitch
shifting only support forward playback. Reverse playback
or scrubbing of warped audio events can lead to recurring
artifacts in the playback.
Pitch and stretch factor limitations
Some algorithms may put limitations on the maximum de-
gree of time stretching or pitch shifting supported. For the
élastique presets, the maximum pitch shift factor is 4, and
the stretch factor is limited to 10. In case your settings
cause a higher factor, Cubase displays a warning message
and deactivates the algorithm for the affected events until
the settings are changed to stay within the valid bounds.
MPEX – Poly
Musical
Use this for processing monophonic and polyphonic ma-
terial. This is the recommended MPEX default quality set-
ting. You can use this for drum loops, mixes, chords.
MPEX – Poly
Complex
This high quality setting is quite CPU-intensive and should
be used only when processing difficult material or for
stretch factors above 1.3.
Option Description
Standard –
Drums
This mode is best for percussive sounds, because it does
not change the timing of your audio. Using this option with
certain tuned percussion instruments may lead to audible
artifacts. In this case, try the Mix mode as an alternative.
Standard –
Plucked
Use this mode for audio with transients and a relatively sta-
ble spectral sound character (e. g. plucked instruments).
Standard –
Pads
Use this mode for pitched audio with slower rhythm and a
stable spectral sound character. This minimizes sound ar
-
tifacts, but the rhythmic accuracy is not preserved.
Standard –
Vocals
This mode is suitable for slower signals with transients
and a prominent tonal character (e.
g. vocals).
Standard –
Mix
This mode preserves the rhythm and minimizes the arti-
facts for pitched material that does not meet the above
criteria (i.
e. with a less homogenous sound character).
This preset is selected by default for audio that is not cat-
egorized.
Standard –
Custom
This preset allows you to manually tweak the time stretch-
ing parameters (see below). By default, the settings that
are shown when you open the dialog are those of the last
preset used (except if the Solo preset has been selected,
see below).
Standard –
Solo
This mode preserves the timbre of the audio. Only use it
for monophonic material (solo woodwind/brass instru
-
ments or solo vocals, monophonic synths or string instru-
ments that do not play harmonies).
Parameter Description
Grain size The standard time-stretching algorithm splits the audio
into small pieces called “grains”. This parameter deter
-
mines the size of the grains. For material with many tran-
sients, use low grain size values for best results.
Option Description
Overlap Overlap is the percentage of the whole grain that will
overlap with other grains. Use higher values for material
with a stable sound character.
Variance Variance is also a percentage of the whole length of the
grains, and sets a variation in positioning so that the over
-
lapping area sounds smooth. A Variance setting of 0 will
produce a sound akin to time stretching used in early
samplers, whereas higher settings produce more (rhyth
-
mic) “smearing” effects but less audio artifacts.
Parameter Description