
User manual
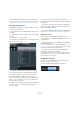
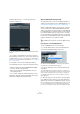
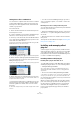
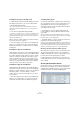


Table Of Contents
- Table of Contents
- Part I: Getting into the details
- About this manual
- Setting up your system
- VST Connections
- The Project window
- Working with projects
- Creating new projects
- Opening projects
- Closing projects
- Saving projects
- The Archive and Backup functions
- Startup Options
- The Project Setup dialog
- Zoom and view options
- Audio handling
- Auditioning audio parts and events
- Scrubbing audio
- Editing parts and events
- Range editing
- Region operations
- The Edit History dialog
- The Preferences dialog
- Working with tracks and lanes
- Playback and the Transport panel
- Recording
- Quantizing MIDI and audio
- Fades, crossfades and envelopes
- The arranger track
- The transpose functions
- Using markers
- The Mixer
- Control Room (Cubase only)
- Audio effects
- VST instruments and instrument tracks
- Surround sound (Cubase only)
- Automation
- Audio processing and functions
- The Sample Editor
- The Audio Part Editor
- The Pool
- The MediaBay
- Introduction
- Working with the MediaBay
- The Define Locations section
- The Locations section
- The Results list
- Previewing files
- The Filters section
- The Attribute Inspector
- The Loop Browser, Sound Browser, and Mini Browser windows
- Preferences
- Key commands
- Working with MediaBay-related windows
- Working with Volume databases
- Working with track presets
- Track Quick Controls
- Remote controlling Cubase
- MIDI realtime parameters and effects
- Using MIDI devices
- MIDI processing
- The MIDI editors
- Introduction
- Opening a MIDI editor
- The Key Editor – Overview
- Key Editor operations
- The In-Place Editor
- The Drum Editor – Overview
- Drum Editor operations
- Working with drum maps
- Using drum name lists
- The List Editor – Overview
- List Editor operations
- Working with SysEx messages
- Recording SysEx parameter changes
- Editing SysEx messages
- The basic Score Editor – Overview
- Score Editor operations
- Expression maps (Cubase only)
- Note Expression (Cubase only)
- The Logical Editor, Transformer, and Input Transformer
- The Project Logical Editor (Cubase only)
- Editing tempo and signature
- The Project Browser (Cubase only)
- Export Audio Mixdown
- Synchronization
- Video
- ReWire
- File handling
- Customizing
- Key commands
- Part II: Score layout and printing (Cubase only)
- How the Score Editor works
- The basics
- About this chapter
- Preparations
- Opening the Score Editor
- The project cursor
- Playing back and recording
- Page Mode
- Changing the zoom factor
- The active staff
- Making page setup settings
- Designing your work space
- About the Score Editor context menus
- About dialogs in the Score Editor
- Setting clef, key, and time signature
- Transposing instruments
- Printing from the Score Editor
- Exporting pages as image files
- Working order
- Force update
- Transcribing MIDI recordings
- Entering and editing notes
- About this chapter
- Score settings
- Note values and positions
- Adding and editing notes
- Selecting notes
- Moving notes
- Duplicating notes
- Cut, copy, and paste
- Editing pitches of individual notes
- Changing the length of notes
- Splitting a note in two
- Working with the Display Quantize tool
- Split (piano) staves
- Strategies: Multiple staves
- Inserting and editing clefs, keys, or time signatures
- Deleting notes
- Staff settings
- Polyphonic voicing
- About this chapter
- Background: Polyphonic voicing
- Setting up the voices
- Strategies: How many voices do I need?
- Entering notes into voices
- Checking which voice a note belongs to
- Moving notes between voices
- Handling rests
- Voices and Display Quantize
- Creating crossed voicings
- Automatic polyphonic voicing – Merge All Staves
- Converting voices to tracks – Extract Voices
- Additional note and rest formatting
- Working with symbols
- Working with chords
- Working with text
- Working with layouts
- Working with MusicXML
- Designing your score: additional techniques
- Scoring for drums
- Creating tablature
- The score and MIDI playback
- Tips and Tricks
- Index

205
Audio effects
Managing and selecting VST plug-ins
To display all available VST plug-ins, open the “VST
PlugIns” tab.
• To enable a plug-in (make it available for selection), put
a checkmark in the left column.
Only the enabled plug-ins will appear on the effect menus.
• The Instances column indicates how many instances of
the plug-in are currently used in Cubase.
Clicking in this column for a plug-in which is already in use produces a
pop-up showing exactly where each use occurs.
Ö A plug-in may be in use even if it is not enabled in the
left column.
You might for example have opened a project containing effects that are
currently disabled on the menu. The left column only determines whether
or not the plug-in will be visible on the effect menus.
• All columns can be resized by dragging the divider in
the column header.
The other columns show the following information about
each plug-in:
Update button
Clicking this button will make Cubase re-scan the desig-
nated VST folders for updated plug-in information.
VST 2.x Plug-in Paths button
This opens a dialog where you can see the current paths
to where VST 2.x plug-ins are located. You can add/re-
move folder locations by using the corresponding buttons.
If you click “Add”, a file dialog opens, where you can se
-
lect a folder location.
About the “shared” plug-ins folder (Windows and VST
2.x only)
You can designate a “shared” VST 2.x plug-ins folder.
This will allow VST 2.x plug-ins to be used by other pro
-
grams that support this standard.
You designate a shared folder by selecting a folder in the
list and clicking the “Set As Shared Folder” button in the
VST 2.x Plug-in Paths dialog.
Exporting plug-in information files
You can also save plug-in information as an XML file, e. g.
for archiving purposes or troubleshooting. The Export
function is available for VST, MIDI and Audio Codec plug-
ins. Proceed as follows:
1. Right-click on the desired tab in the Plug-in Information
window to open the context menu and select “Export”.
A file dialog opens.
2. In the dialog, specify a name and location for the Plug-
in Information export file and click OK to export the file.
• The Plug-in Information file contains information on the
installed/available plug-ins, their version, vendor, etc.
• The XML file can then be opened in any editor applica-
tion supporting the XML format.
Column Description
Name The name of the plug-in.
Vendor The manufacturer of the plug-in.
File This shows the complete name of the plug-in (with extension).
Category This indicates the category of each plug-in (such as VST in-
struments, surround effects, etc.).
Version Shows the version of the plug-in.
SDK Shows with which version of the VST protocol a plug-in is
compatible.
Latency This shows the delay (in samples) that will be introduced if the
effect is used as an Insert. This is automatically compensated
for by Cubase.
Side-
Chain
Inputs
Shows the number of side-chain inputs for a plug-in.
I/O This column shows the number of inputs and outputs for each
plug-in.
Path The path and name of the folder in which the plug-in file is
located.