
User manual
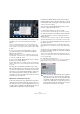

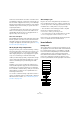
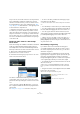
Table Of Contents
- Table of Contents
- Part I: Getting into the details
- About this manual
- Setting up your system
- VST Connections
- The Project window
- Working with projects
- Creating new projects
- Opening projects
- Closing projects
- Saving projects
- The Archive and Backup functions
- Startup Options
- The Project Setup dialog
- Zoom and view options
- Audio handling
- Auditioning audio parts and events
- Scrubbing audio
- Editing parts and events
- Range editing
- Region operations
- The Edit History dialog
- The Preferences dialog
- Working with tracks and lanes
- Playback and the Transport panel
- Recording
- Quantizing MIDI and audio
- Fades, crossfades and envelopes
- The arranger track
- The transpose functions
- Using markers
- The Mixer
- Control Room (Cubase only)
- Audio effects
- VST instruments and instrument tracks
- Surround sound (Cubase only)
- Automation
- Audio processing and functions
- The Sample Editor
- The Audio Part Editor
- The Pool
- The MediaBay
- Introduction
- Working with the MediaBay
- The Define Locations section
- The Locations section
- The Results list
- Previewing files
- The Filters section
- The Attribute Inspector
- The Loop Browser, Sound Browser, and Mini Browser windows
- Preferences
- Key commands
- Working with MediaBay-related windows
- Working with Volume databases
- Working with track presets
- Track Quick Controls
- Remote controlling Cubase
- MIDI realtime parameters and effects
- Using MIDI devices
- MIDI processing
- The MIDI editors
- Introduction
- Opening a MIDI editor
- The Key Editor – Overview
- Key Editor operations
- The In-Place Editor
- The Drum Editor – Overview
- Drum Editor operations
- Working with drum maps
- Using drum name lists
- The List Editor – Overview
- List Editor operations
- Working with SysEx messages
- Recording SysEx parameter changes
- Editing SysEx messages
- The basic Score Editor – Overview
- Score Editor operations
- Expression maps (Cubase only)
- Note Expression (Cubase only)
- The Logical Editor, Transformer, and Input Transformer
- The Project Logical Editor (Cubase only)
- Editing tempo and signature
- The Project Browser (Cubase only)
- Export Audio Mixdown
- Synchronization
- Video
- ReWire
- File handling
- Customizing
- Key commands
- Part II: Score layout and printing (Cubase only)
- How the Score Editor works
- The basics
- About this chapter
- Preparations
- Opening the Score Editor
- The project cursor
- Playing back and recording
- Page Mode
- Changing the zoom factor
- The active staff
- Making page setup settings
- Designing your work space
- About the Score Editor context menus
- About dialogs in the Score Editor
- Setting clef, key, and time signature
- Transposing instruments
- Printing from the Score Editor
- Exporting pages as image files
- Working order
- Force update
- Transcribing MIDI recordings
- Entering and editing notes
- About this chapter
- Score settings
- Note values and positions
- Adding and editing notes
- Selecting notes
- Moving notes
- Duplicating notes
- Cut, copy, and paste
- Editing pitches of individual notes
- Changing the length of notes
- Splitting a note in two
- Working with the Display Quantize tool
- Split (piano) staves
- Strategies: Multiple staves
- Inserting and editing clefs, keys, or time signatures
- Deleting notes
- Staff settings
- Polyphonic voicing
- About this chapter
- Background: Polyphonic voicing
- Setting up the voices
- Strategies: How many voices do I need?
- Entering notes into voices
- Checking which voice a note belongs to
- Moving notes between voices
- Handling rests
- Voices and Display Quantize
- Creating crossed voicings
- Automatic polyphonic voicing – Merge All Staves
- Converting voices to tracks – Extract Voices
- Additional note and rest formatting
- Working with symbols
- Working with chords
- Working with text
- Working with layouts
- Working with MusicXML
- Designing your score: additional techniques
- Scoring for drums
- Creating tablature
- The score and MIDI playback
- Tips and Tricks
- Index

189
Audio effects
However, be aware that this can lead to a situation where
you added more plug-ins on “transport stop” than the sys-
tem can handle on playback. Therefore, you should always
find the passage with the largest number of events playing
simultaneously to make sure that your system offers the
required performance.
Ö Activating this option can increase your system perfor-
mance a lot in certain projects, but it also makes it more
unpredictable whether the project can play back fine on
any timecode position of the project.
About side-chain inputs
Several VST3 effects feature side-chain inputs. This means
that the operation of the effect can be controlled via exter
-
nal signals routed to the side-chain input. The effect pro-
cessing is still applied to the main audio signal, see “Using
the side-chain input” on page 198.
About plug-in delay compensation
A plug-in effect may have some inherent delay or latency.
This means that it takes a brief time for the plug-in to pro
-
cess the audio fed into it – as a result, the output audio
will be slightly delayed. This especially applies to dynam-
ics processors featuring “look-ahead” functionality.
Cubase provides full plug-in delay compensation through-
out the entire audio path. All plug-in delays are compen-
sated for, maintaining the sync and timing of all audio
channels.
Normally, you do not have to make any settings for this.
However, VST3 dynamics plug-ins with look-ahead func-
tionality have a “Live” button, allowing you to disengage
the look-ahead to minimize latency, if they are to be used
during realtime recording (see the separate PDF docu
-
ment “Plug-in Reference”).
You can also constrain the delay compensation, which is
useful to avoid latency when recording audio or playing a
VST instrument in real time, see
“Constrain Delay Com-
pensation” on page 216.
About tempo sync
Plug-ins can receive timing and tempo information from
the host application (in this case, Cubase). Typically, this
is used to synchronize certain plug-in parameters (such as
modulation rates or delay times) to the project tempo.
• This information is automatically provided to any VST
plug-in (2.0 or later) that “requests it”.
You do not have to make any special settings for this.
• You set up tempo sync by specifying a base note value.
You can use straight, triplet or dotted note values (1/1 to 1/32).
Please refer to the separate PDF document “Plug-in Ref-
erence” for details about the included effects.
Insert effects
Background
As the name implies, insert effects are inserted into the au-
dio signal path – this means that the audio channel data will
be routed through the effect. You can add up to eight dif-
ferent insert effects independently for each audio-related
channel (audio track, group channel track, FX channel
track, VST instrument channel or ReWire channel) or out-
put bus. The signal passes through the effects in series
from the top downwards, with the signal path shown below:
Input gain
Insert effect 1
Insert effect 2
Insert effect 3
Insert effect 6
EQ
Volume (fader)
Insert effect 7
Insert effect 8
Insert effect 4
Insert effect 5