
Plug-in Reference


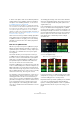
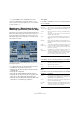
Table Of Contents
- Table of Contents
- The included effect plug-ins
- MIDI effects
- The included VST instruments
- Index

89
The included VST instruments
Performance Controls
Click the Performance Controls button to open the Perfor-
mance Controls page. On this page you find a row of but-
tons that are arranged according to the keys on a MIDI
keyboard.
• By clicking these buttons during playback, you can ap-
ply effects to your overall performance.
An effect will be applied as long as you keep the button activated.
Most of the available effects correspond to the effects that
you can apply to single slices, with the green buttons cor-
responding to the stutter and slur effects and the red but-
tons to the Mute, Reverse, Staccato effects, etc. (see
“Applying slice selection modifiers and slice effects” on
page 86).
Ö Effects triggered with the Performance Controls but-
tons override the slice effects.
With the blue buttons and the yellow button, you can apply
additional effects that cannot be applied to single slices:
Ö You cannot save these global effects in scenes. To
apply effects and save them in scenes, you should use
slice effects.
Triggering the Performance Controls with your MIDI
keyboard
You can trigger the Performance Controls with your MIDI
keyboard starting from C3 upwards. You can also make
use of the Virtual Keyboard for triggering the Performance
Controls (for information about the Virtual Keyboard see
the Operation Manual).
Saving and loading VST presets
You can save all current scenes as a VST preset. Proceed
as follows:
1. At the top of the LoopMash window, click the icon to
the right of the Preset field and select “Save Preset” from
the pop-up menu.
The Save Preset dialog opens.
2. Enter a name for the new preset and click OK.
The preset is saved in the User Content folder on your system. Make
sure that you tag your presets for better handling in the MediaBay.
To load an existing VST preset, proceed as follows:
1. At the top of the LoopMash window, click the icon to
the right of the Preset field and select “Load Preset” from
the pop-up menu.
The Presets browser opens.
2. The Presets browser shows all presets it finds in the
VST 3 Presets folder for LoopMash. Double-click the de-
sired preset.
The Presets browser is closed and the preset is loaded into LoopMash.
• When a loop belonging to a preset cannot be found,
LoopMash displays a standard file dialog in which you can
navigate to the file.
Ö The “Empty” preset clears all settings of the current
LoopMash instance.
Loading VST presets saved with a former version of
LoopMash
When you load a VST preset that was saved with a previ-
ous version of LoopMash, all new parameters will auto-
matically be set to values that match the behavior of the
previous LoopMash version.
Slice Timestretch Use this option to apply realtime timestretching to
the slices, filling gaps or avoiding overlaps be
-
tween slices that are not played back at their orig-
inal tempo, or when combining slices with different
original tempos. Applying timestretch increases
the CPU load and may affect the sound quality.
Reduce the need for timestretching by using loops
with similar original tempos. See also the descrip
-
tion of the track transposition value (see “Setting
track transposition value and track volume” on
page 85).
Staccato Amount When you move this slider to the right, the length
of the slices is gradually reduced, giving the output
a staccato feel.
Dry/Wet Mix This sets the balance between the volumes of the
master loop and the selected slices from the other
tracks.
Button Description
Cycle 4, 2, 1 Temporally sets up a short cycle over 4, 2, 1 slice,
respectively. This short cycle is always set up
within the loop range that is set in the ruler (see
“Setting a loop range” on page 85). Setting up a
cycle over 1 slice means that this slice is repeated
until you release the button.
Continue Plays back the tracks of the currently selected
slices continuously until you release the button.
Option Description