
Plug-in Reference


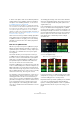
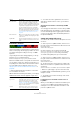
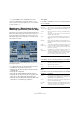
Table Of Contents
- Table of Contents
- The included effect plug-ins
- MIDI effects
- The included VST instruments
- Index

87
The included VST instruments
Transport controls
The transport controls can be found at the bottom of the
LoopMash panel.
Setting the LoopMash tempo
During playback, LoopMash can be synchronized to the
tempo set in Cubase, or can follow its own tempo setting:
• Click the sync button (to the right of the Play button) to
activate or deactivate synchronization to the project
tempo set in Cubase.
When sync is on, you can start playback using the Cubase transport
controls. With sync off, LoopMash starts playing only when you click the
Play button in LoopMash.
• When the sync button is deactivated, the current Loop-
Mash tempo (in BPM) is displayed in the tempo field to the
left of the master button. To change the “local” tempo, click
in the tempo field, enter a new value, and press [Enter].
• When the sync button is deactivated, you can click the
master button (to the right of the tempo field) to copy the
tempo of the current master loop into the tempo field.
The sync on/off parameter can be automated. This is useful to control
LoopMash in a Cubase project – with sync off, the playback of Loop
-
Mash within a project is paused.
Controlling transport functions with your MIDI keyboard
You can control the start, stop, sync on, and sync off func-
tion with your MIDI keyboard.
Ö If you do not have a MIDI keyboard connected to your
computer, you can make use of the Virtual Keyboard fea-
ture in Cubase (see the Operation Manual).
Storing your configuration as scenes
On the Slice Selection and the Audio Parameters pages
you will find a row of 24 pads. To each of these pads, you
can save one “scene”, i.
e. a combination of up to eight
tracks with all parameter settings. By triggering the pads,
you can quickly change between different scenes during
your performance.
• To save the current settings as a scene, click the round
button and then a pad.
This saves your setup to that pad.
• To recall a scene, click on the corresponding scene
pad.
• To remove a scene from a pad, click the x button and
then the desired pad.
• To edit a scene pad label, double-click on the scene
pad and enter a name.
• To rearrange the scene pads, click on a scene pad and
drag it to a new position.
Setting a jump interval
You can determine a point at which LoopMash changes to
the next scene during playback when you trigger a pad.
Proceed as follows:
• Click the Jump interval button and select an option from
the pop-up menu that opens.
Ö The option “e: End” means that the current loop is
played to the end before switching scenes. When you set
up a short loop range, you may need to set the interval to
“e: End” to ensure that the jump point is reached.
Button Description
Play Click the Play button to start or stop playback.
Locate Click the Locate button to return to the beginning of the
loop (bar 1/beat 1). Playback always starts automatically
when clicking this button.
Step Clicking the Step left/right button steps backwards/for-
wards through the timeline, playing one slice at a time.
Function Key
Start C2
Stop D2
Sync on E2
Sync off F2
Tempo field Play Locate Step left/right
!
Once you have set up a LoopMash configuration, you
should save it to a scene pad. Changing scenes with-
out saving means discarding any unsaved changes.
Save scene Remove scene
Jump interval
Pad with associated scene
Selected scene
Empty scene pad