
Plug-in Reference


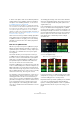
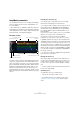
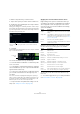
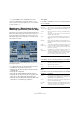
Table Of Contents
- Table of Contents
- The included effect plug-ins
- MIDI effects
- The included VST instruments
- Index
85
The included VST instruments
Playback and master slice indicators
A rectangle in the track color around a slice indicates the
current position within the master loop, i. e. the master
slice. The slice currently selected for playback is indicated
by a white rectangle.
Setting a loop range
At the top of the track display, a ruler showing bars and
beats (using the project’s time signature) is displayed. In
the ruler, you also find the loop range selector (the
bracket) that defines the play length.
• To shorten the play length, click and drag the handles of
the loop range selector (the bracket) at the top of the track
display.
This allows you to select even a very small range within your master loop
for playback – the rest of the loop is not taken into consideration. Note
that short loop ranges (less than 1 bar) may conflict with the jump interval
setting (see
“Storing your configuration as scenes” on page 87).
• To change the playback range, click the loop range se-
lector and drag it to a different position as a whole.
Setting track transposition value and track volume
The track controls to the right of each track allow you to
set a track transposition value and the track volume for
each track individually.
• To set a track transposition value, click the button to the
right of the track and select the desired transposition in-
terval from the pop-up menu.
The set value is displayed on the button.
Ö This function is tied to the setting for the Slice
Timestretch parameter (see “Audio Parameters” on page
88). When Slice Timestretch is deactivated, transposition
is created by increasing/decreasing the playback speed
of the slices (transposing a track up by one octave corre-
sponds to playing the slices twice as fast). With Slice
Timestretch on, you get true pitch shifting, i.
e., there is no
change in playback speed.
• You can change the relative volumes of your tracks with
the volume controls on the far right of each track.
This is useful for level adjustments between tracks. A VU meter to the left
of the volume control provides visual feedback of the current volume.
Setting the similarity
With the similarity gain slider (to the left of each track) you
can determine how important a particular track is for the
“mashing up” of the master loop. By moving the slider, you
specify that a track is more/less similar to the master track,
thus “overruling” the result of the LoopMash analysis. As a
result, more/less slices from this track are included in the
current mash.
• Move the slider to the right to select more slices from
the corresponding track for playback, and to the left to re
-
duce the number of slices for playback (set to middle po-
sition by default).
The brightness of the slices changes when moving the similarity gain
slider. The further to the right, the lighter the color, and the higher the
playback priority for these slices.
The vertical lines on the similarity gain slider correspond to
the slices in this loop. The changing pattern of slices indi-
cates similarity of each slice, on all tracks, to the current
master track slice. The further to the right a line is, the
greater the similarity of this slice to the master slice.
• Drag the similarity threshold control (the thin line with
handles at the top and bottom intersecting all similarity
gain sliders) to the left or right to determine a minimum
similarity that slices must match to be considered for play
-
back.
Slices with a similarity below (i. e. to the left of) this threshold are not
played.
On the Slice Selection page at the bottom of the Loop-
Mash panel, you can make further settings for influencing
which slices will be played (see
“Slice Selection” on page
88).
Creating composite tracks
LoopMash allows you to build composite tracks, i. e., as
soon as you drag a slice to a different position on the
same track or another track, you will be asked if you want
to create a composite track.