
Plug-in Reference


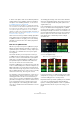
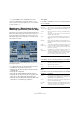
Table Of Contents
- Table of Contents
- The included effect plug-ins
- MIDI effects
- The included VST instruments
- Index

84
The included VST instruments
LoopMash parameters
You can influence the process of constantly assembling a
new loop with the various functions and parameter con-
trols of LoopMash.
Ö Note that many of LoopMash’s parameters can be au-
tomated. See the description for the automation of VST in-
strument parameters in the chapter “VST instruments and
instrument tracks” in the Operation Manual.
The track section
The track section contains the track display with the track
controls for setting the track volume and a transposition
value to the right of each track. To the left of the track dis
-
play you will find the similarity gain sliders. With the button
between the similarity gain slider and the track, you can
define the master track that serves as the reference for
rhythm and timbre. At the top of the track display you will
find a ruler that shows bars and beats and the loop range
selector.
Importing and removing loops
You can import up to eight audio loops onto the eight
tracks in the track display. Proceed as follows:
1. Locate the audio loop that you want to import in one of
the following locations: MediaBay and the MediaBay re-
lated browsers (e. g. the Mini Browser), Project window,
Pool, Sample Editor (regions), Audio Part Editor, or the
Explorer/Finder.
The quickest way to find the LoopMash content is to use the MediaBay:
Navigate to the LoopMash content via the VST Sound node.
2. Drag the loop file onto a track in LoopMash.
Dragging a loop to a track already occupied replaces the original loop.
LoopMash separates the loop into slices, analyzes them,
and displays them as a waveform on the track. One track
can hold up to 32 slices. Even if a long loop were to con
-
tain more than 32 slices, LoopMash imports only the first
32. Ideally, you would use a loop file cut at bar boundaries.
When you import your file from the MediaBay, LoopMash
uses the tempo information supplied by the MediaBay for
the slicing of the loop.
• To remove a loop from a LoopMash track, right-click the
track and select “Clear track”.
Defining the master loop
One track is always selected. This is the master track: it
provides the rhythmic pattern that you hear, and it is the
sounds of this loop that are replaced by slices selected
from the other loops in the current LoopMash configura
-
tion.
• To make a track the master track, activate the button to
the left of the track display.
Auditioning slices
To audition the slices, proceed as follows:
• Click on the slice that you want to hear.
• Use the Step function in the transport controls (see
“Transport controls” on page 87) to step through the
slices.
Similarity gain sliders
Ruler showing bars and beats
Track volume
Loop range selector
Master track on/off
VU meter
Track transposition value
Similarity threshold control
Track display