
Plug-in Reference


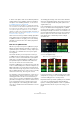
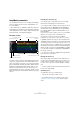
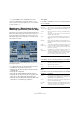
Table Of Contents
- Table of Contents
- The included effect plug-ins
- MIDI effects
- The included VST instruments
- Index

83
The included VST instruments
9. Select other pads to find out how different parameter
settings influence the LoopMash output. For a detailed
description of the available parameters, see the section
“LoopMash parameters” on page 84.
Some of the pads have the same label, e. g. “Original” and “Replaced”.
The scenes that are associated with these pads form the basis for varia
-
tions of that scene. The variations of a scene are associated with the
scene pads to the right of the original scene, i.
e., the scene labeled
“SliceFX” is a variation of the scene labeled “Original” and shows an ex
-
ample for the usage of slice effects (see “Applying slice selection modi-
fiers and slice effects” on page 86).
On the left of each track, you find the similarity gain sliders.
These sliders are the most important control elements of
LoopMash: the further to the right you move the similarity
gain slider of a track, the more slices will be played back
from this track.
How does LoopMash work?
Whenever you import a loop into LoopMash, the plug-in
analyzes the audio material. It generates so-called “per-
ceptual descriptors” (information on tempo, rhythm, spec-
trum, timbre, etc.) and then slices the loop into eighth-
note segments.
This means that after you have imported several loops,
LoopMash knows the rhythmic pattern of each loop and
the location of various sounds that make up this pattern
within each loop. During playback, LoopMash uses the
perceptual descriptors to determine how similar each
slice is to the current slice of the master track.
Note that LoopMash does not categorize the sounds, but
looks for overall similarity in the sound. For example, Loop
-
Mash might replace a low snare drum sound with a kick
drum sound, even though a high snare sound is also avail
-
able. LoopMash always tries to create a loop acoustically
similar to the master loop, but using other sounds.
The similarity is shown by the brightness of each slice on
each track, and also by the position of each slice on the
similarity gain slider to the left of each track (when you
click on a slice, its position is highlighted on the similarity
gain slider). The brighter a slice, the more similar a slice is
to the current master track slice, and the further to the
right it is displayed on the similarity gain slider. Darker
slices are less similar and can be found further to the left
on the slider.
The similarity gain settings of the various tracks determine
which slice gets playback priority. This creates a new loop,
over and over again, but with the rhythmic pattern of the
original master loop.
In the following figure you can see four tracks. The track at
the top is the master track. During playback, LoopMash
moves through the master loop step-by-step (which is in-
dicated by a rectangle in the track’s color around the cur-
rent slice) and automatically selects four slices from these
tracks to replace the slices of the master track. The cur-
rently playing slice is indicated by a white rectangle
around the slice.
The following figure shows the result of the selection pro-
cess for each playback step.
For best performance, use audio files that have the same
sample rate as your project (to avoid sample rate conver-
sion when loading presets or storing scenes).
Experiment with the provided LoopMash presets, and with
your own loops of different lengths and with different
rhythms, containing many different sounds – LoopMash is
like an instrument, and we very much encourage you to
play it!
Slices 1 to 4 selected for playback.
Master track slices for playback steps 1 to 4.