
Plug-in Reference


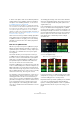
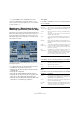
Table Of Contents
- Table of Contents
- The included effect plug-ins
- MIDI effects
- The included VST instruments
- Index

82
The included VST instruments
LoopMash
LoopMash is one of a kind: a powerful tool for the slicing
and instant re-assembling of any kind of rhythmic audio
material. With LoopMash, you can preserve the rhythmic
pattern of one audio loop, but you can replace all sounds
of this loop with the sounds from up to seven other loops.
LoopMash provides dozens of possibilities to influence
the way the slices are re-assembled, thus giving you full
control over the results of your performance. You can
choose from a variety of effects and apply them to single
slices or to your overall performance. Finally, you can store
your configuration as scenes on scene pads, and trigger
these scene pads with your MIDI keyboard. All this turns
LoopMash into a really powerful instrument for live perfor
-
mances and recordings!
LoopMash is fully integrated into Cubase, which allows you
to drag and drop audio loops from the MediaBay or Project
window directly onto the LoopMash panel. Furthermore,
you can drag and drop slices from LoopMash to the sam
-
ple pads of Groove Agent One. This allows you to extract
certain sounds that you like from LoopMash and use them
with Groove Agent One. LoopMash supports the undo and
redo functionality of Cubase, so that you can see and mod
-
ify your steps in the Edit History dialog, as long as the
LoopMash panel is open (for further information about the
Edit History dialog, see the Operation Manual).
Getting started
To give you a first impression of what you can do with
LoopMash, we have created a tutorial preset. Proceed as
follows:
1. In Cubase, create an instrument track with LoopMash
as the associated VST instrument.
2. In the Inspector for the new track, click the Edit Instru-
ment button to open the LoopMash panel.
It has two main areas: the track section in the upper part of the panel,
and the parameter section at the bottom.
3. At the top of the plug-in panel, click on the icon to the
right of the preset field and select Load Preset from the
pop-up menu.
4. The Presets browser opens, showing presets found in
the VST 3 Presets folder for LoopMash.
5. Select the preset called “A Good Start…(Tutorial) 88”.
The preset is loaded into LoopMash.
6. At the bottom of the panel, make sure that the sync
button in the transport controls is off, and start playback
by clicking the play button.
In the LoopMash panel, you can see a sliced loop wave-
form in the top (red) track. This track is selected (which is
indicated by the track’s background color and the lit but-
ton to the left of the waveform display).
The selected track holds the master loop. The rhythmic pat-
tern of the LoopMash output is governed by the master
loop – i.
e. what you hear is the rhythmic pattern of this loop.
7. Look at the 24 pads below the track section: the pad
labeled “Original” is selected. Select the pad named
“Clap”.
A new loop is displayed on the second track in the track display, and you
hear that the snare drum sound of the first loop has been replaced with a
handclap sound.
8. Select the pad labeled “Trio”, and then the pad la-
beled “Section”. Each time you click, a new loop is added
to the mash.
Note how the rhythmic pattern of the music stays the same, although an
increasing number of sounds is taken from the other loops.