
Plug-in Reference
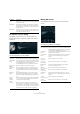
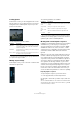


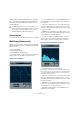


Table Of Contents
- Table of Contents
- The included effect plug-ins
- MIDI effects
- The included VST instruments
- Index

49
The included effect plug-ins
• By adjusting the Frequency knob, you can divide the
frequency spectrum into 8, 15, or 31 bands, or you set it
to “Spectrum”, which gives you a high-resolution view.
• Use the Mode A and Mode B buttons to switch be-
tween different view modes.
Mode A is more graphically detailed, showing a solid, blue amplitude bar
for each band. Mode B is less detailed, showing a continuous blue line
that displays the peak levels for each band. These view modes do not
have any effect if you have set the Frequency knob to “Spectrum”.
Phase Correlator mode (Scope)
• Click the Scope button so that it lights up.
The phase correlator indicates the phase and amplitude relationship be-
tween channels in a stereo pair or a surround configuration.
For stereo pairs, the indications work in the following way:
• A vertical line indicates a perfect mono signal (the left and
right channels are the same).
• A horizontal line indicates that the left channel is the same as
the right, but with an inverse phase.
• A random but fairly round shape indicates a well balanced ste-
reo signal. If the shape “leans” to the left, there is more energy
in the left channel and vice versa (the extreme case of this is if
one side is muted, in which case the phase meter will show a
straight line, angled 90° to the other side).
• A perfect circle indicates a sine wave on one channel, and the
same sine wave shifted by 90° on the other.
• Generally, the more you can see a “thread”, the more bass in
the signal, and the more “spray-like” the display, the more high
frequencies in the signal.
When MultiScope is used with a surround channel in
Scope mode, the pop-up menu to the right of the Scope
button determines the result:
• If “Stereo (Front)” is selected, the display will indicate
the phase and amplitude relationship between the front
stereo channels.
• If “Surround” is selected, the display indicates the
energy distribution in the surround field.
SMPTEGenerator (Cubase only)
This plug-in is not a real audio effect. It sends out SMPTE
timecode to an audio output, allowing you to synchronize
other equipment to Cubase (provided that the equipment
can sync directly to SMPTE timecode). This can be very
useful if you do not have access to a MIDI-to-timecode
converter.
The following parameters are available:
Parameter Description
Main timecode
display
This display shows the current timecode.
When “Link to Transport” is deactivated, the generator is
in “free run” mode. You can then use the timecode dis
-
play to set the SMPTE start time.
When “Link to Transport” is activated, you cannot change
any of the values. This display shows the current time
-
code in sync with the Transport panel. Where applicable,
the offset defined in the offset timecode display is taken
into account (see below).
Frame rate
display and
pop-up menu
The frame rate shown to the right of the timecode display
defaults to the frame rate set in the Project Setup dialog.
To generate timecode in a different frame rate (e.
g. to
stripe a tape), select another format on the pop-up menu
(only available if “Link to Transport” is deactivated).
Note that for another device to synchronize correctly to
Cubase, the same frame rate has to be set in the Project
Setup dialog, the SMPTE Generator and the receiving
device.