
Plug-in Reference
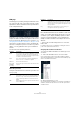

Table Of Contents
- Table of Contents
- The included effect plug-ins
- MIDI effects
- The included VST instruments
- Index
115
The included VST instruments
Decay
After the maximum value has been reached, the value
starts to drop. How long this takes is governed by the De-
cay time parameter. The Decay time has no effect if the
Sustain parameter is set to maximum. Range is from 0.0
milliseconds to 91.1 seconds.
Sustain
The Sustain parameter determines the level the envelope
rests at after the Decay phase. Note that Sustain repre
-
sents a level, whereas the other envelope parameters rep-
resent times. Range is from 0 to 100.
Release
Release determines the time it takes for the value to fall
back to zero after releasing the key. Range is from 0.0 mil-
liseconds to 91.1 seconds.
Punch
When Punch is activated, the start of the decay phase is
delayed a few milliseconds (the envelope “stays” at top
level for a moment before moving on to the decay phase).
The result is a punchier attack similar to a compressor ef
-
fect. This effect is more pronounced with short attack and
decay times.
Retrigger
When Retrigger is activated, the envelope re-triggers
each time you play a new note. However, with certain tex-
tures/pad sounds and a limited number of voices it is rec-
ommended to leave the button deactivated, due to click
noises that might occur, when the envelope is ended up
abruptly. This is caused by the incoming re-trigger that
forces the envelope to start over again.
Assigning Envelope modulation destinations
To assign a modulation destination for an Envelope, pro-
ceed as follows:
1. Click in the “Mod Dest” box for one of the Envelopes.
A pop-up menu appears in which all possible modulation destinations
are shown. All Sound parameters as well as most LFO and Envelope pa
-
rameters are available as destinations.
2. Select a destination, e.g. Cut.
The selected modulation destination is now shown in the list. Beside the
destination, a default value (50) has been set. The value represents the
modulation amount.
• You can set positive and negative modulation values by
clicking on the value in the list, typing in a new value and
pressing the Enter key.
To enter negative values type a minus sign followed by the value.
3. Select a suitable envelope curve for the modulation.
You should now hear the Cut parameter being modulated by the enve-
lope as you play.
4. Using the same basic method, you can add any num-
ber of modulation destinations for the envelope.
They are all listed in the “Mod Dest” box.
• To remove a modulation destination click on its name in
the list and select “Off” from the pop-up menu.
Assigning Envelope velocity destinations
You can also assign Envelope modulation that is velocity
controlled (i.e. governed by how hard or soft you strike a
key). Proceed as follows:
1. Click in the “Vel Dest” box for one of the envelopes.
A pop-up menu appears in which all possible velocity destinations are
shown.
2. Select a destination.
The selected velocity destination is now shown in the list. Beside the
destination, a default value (50) has been set. The value represents the
modulation amount. See below for an example of how velocity modula
-
tion works.
• You can set positive and negative values by clicking on
the value in the list, typing in a new value and pressing the
Enter key.
To enter negative values type a minus sign followed by the value.
3. Using the same basic method, you can add any num-
ber of velocity destinations for the Envelope.
They are all listed in the “Vel Dest” box.
• To remove a modulation destination click on its name in
the list and select “Off” from the pop-up menu.
Envelope modulation velocity control – an example:
If you follow the steps above and select the Cut parameter
as a Velocity destination, the following happens:
• The harder you strike the key, the more the parameter is
modulated by the Envelope.
• If you enter a negative value for the velocity modulation
amount, the opposite happens; the harder you play the
less the Cut parameter is modulated by the Envelope.