
Plug-in Reference
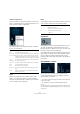
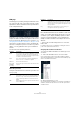

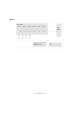
Table Of Contents
- Table of Contents
- The included effect plug-ins
- MIDI effects
- The included VST instruments
- Index

114
The included VST instruments
• You can set positive and negative modulation values by
clicking on the value in the list, typing in a new value and
pressing the Enter key.
To enter negative values type a minus sign followed by the value.
3. Select a suitable LFO Waveform, Speed, Depth, and
Sync mode.
You should now hear the Cut parameter being modulated by the LFO.
4. Using the same basic method, you can add any num-
ber of modulation destinations for the LFO.
They are all listed in the “Mod Dest” box.
• To remove a modulation destination click on its name in
the list and select “Off” from the pop-up menu.
Assigning LFO velocity destinations
You can also assign LFO modulation that is velocity con-
trolled (i.e. governed by how hard or soft you strike a key).
Proceed as follows:
1. Click in the “Vel Dest” box for one of the LFOs.
A pop-up menu appears in which all possible velocity destinations are
shown.
2. Select a destination.
The selected velocity destination is now shown in the list. Beside the
destination, a default value (50) has been set. The value represents the
modulation amount. See below for an example of how velocity modula
-
tion works.
• You can set positive and negative values by clicking on
the value in the list, typing in a new value and pressing the
Enter key.
To enter negative values type a minus sign followed by the value.
3. Using the same basic method, you can add any num-
ber of velocity destinations for the LFO.
They are all listed in the “Vel Dest” box.
• To remove a modulation destination click on its name in
the list and select “Off” from the pop-up menu.
LFO modulation velocity control – an example:
If you follow the steps above and select the Cut parameter
as a Velocity destination, the following happens:
• The harder you strike the key, the more the Cut parame-
ter is modulated by the LFO.
• If you enter a negative value for the velocity modulation
amount, the opposite happens; the harder you play the
less the Cut parameter is modulated by the LFO.
Envelope page
The Envelope page is opened by clicking the ENV button
at the top of the lower half of the control panel. The page
contains all parameters and the modulation and velocity
destinations for the four independent envelope generators.
Envelope generators govern how a parameter value
changes when a key is pressed, when a key is held and
finally when a key is released.
On the Envelope page, the parameters for one of the four
envelope generators is shown at a time.
• You switch between the four envelopes in the section to
the left.
Clicking on either of the four mini curve displays 1 to 4 selects it and dis-
plays the corresponding envelope parameters to the right. The mini curve
displays also reflect the envelope settings for each corresponding enve
-
lope.
• Envelope generators have four parameters; Attack, De-
cay, Sustain, and Release (ADSR).
See below for a description of these.
• You can set envelope parameters in two ways; either by
using the sliders or by click-dragging the curve in the En
-
velope curve display.
You can also do this in the mini curve displays.
• By default Envelope 1 is assigned to the master volume,
and therefore acts as an amplitude envelope. The ampli
-
tude envelope is used to adjust how the volume of the
sound changes from the time you press a key until the key
is released.
If no amplitude envelope were assigned, there would be no output.
The Envelope parameters are as follows:
Attack
The attack phase is the time it takes from zero to the max-
imum value. How long this takes is governed by the Attack
setting. If the Attack is set to “0”, the maximum value is
reached instantly. If this value is raised, it takes time before
the maximum value is reached. Range is from 0.0 millisec
-
onds to 91.1 seconds.