
User manual
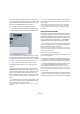

Table Of Contents
- Table of Contents
- Part I: Getting into the details
- About this manual
- VST Connections: Setting up input and output busses
- The Project window
- Playback and the Transport panel
- Recording
- Fades, crossfades and envelopes
- The Arranger track
- The Transpose functions
- The mixer
- Control Room (Cubase only)
- Audio effects
- VST Instruments and Instrument tracks
- Surround sound (Cubase only)
- Automation
- Audio processing and functions
- The Sample Editor
- The Audio Part Editor
- The Pool
- The MediaBay
- Working with Track Presets
- Track Quick Controls
- Remote controlling Cubase
- MIDI realtime parameters and effects
- Using MIDI devices
- MIDI processing and quantizing
- The MIDI editors
- Introduction
- Opening a MIDI editor
- The Key Editor - Overview
- Key Editor operations
- The In-Place Editor
- The Drum Editor - Overview
- Drum Editor operations
- Working with drum maps
- Using drum name lists
- The List Editor - Overview
- List Editor operations
- Working with System Exclusive messages
- Recording System Exclusive parameter changes
- Editing System Exclusive messages
- VST Expression
- The Logical Editor, Transformer and Input Transformer
- The Project Logical Editor
- Editing tempo and signature
- The Project Browser
- Export Audio Mixdown
- Synchronization
- Video
- ReWire
- File handling
- Customizing
- Key commands
- Part II: Score layout and printing
- How the Score Editor works
- The basics
- About this chapter
- Preparations
- Opening the Score Editor
- The project cursor
- Playing back and recording
- Page Mode
- Changing the Zoom factor
- The active staff
- Making page setup settings
- Designing your work space
- About the Score Editor context menus
- About dialogs in the Score Editor
- Setting key, clef and time signature
- Transposing instruments
- Printing from the Score Editor
- Exporting pages as image files
- Working order
- Force update
- Transcribing MIDI recordings
- Entering and editing notes
- About this chapter
- Score settings
- Note values and positions
- Adding and editing notes
- Selecting notes
- Moving notes
- Duplicating notes
- Cut, copy and paste
- Editing pitches of individual notes
- Changing the length of notes
- Splitting a note in two
- Working with the Display Quantize tool
- Split (piano) staves
- Strategies: Multiple staves
- Inserting and editing clefs, keys or time signatures
- Deleting notes
- Staff settings
- Polyphonic voicing
- About this chapter
- Background: Polyphonic voicing
- Setting up the voices
- Strategies: How many voices do I need?
- Entering notes into voices
- Checking which voice a note belongs to
- Moving notes between voices
- Handling rests
- Voices and Display Quantize
- Creating crossed voicings
- Automatic polyphonic voicing - Merge All Staves
- Converting voices to tracks - Extract Voices
- Additional note and rest formatting
- Working with symbols
- Working with chords
- Working with text
- Working with layouts
- Working with MusicXML
- Designing your score: additional techniques
- Scoring for drums
- Creating tablature
- The score and MIDI playback
- Tips and Tricks
- Index

441
Synchronization
23-bit audio (the least significant bit of this last channel
will be used for networking). In practice this makes no dis-
cernible difference to the audio quality, since you will still
have around 138dB headroom on this channel.
To set things up, open the VST System Link panel:
1. Open the Device Setup dialog on the Devices menu.
2. Select VST System Link in the Devices list to the left.
3. Use the ASIO Input and ASIO Output pop-up menus
to define which channel should be the networking channel
(and thus become a 23-bit audio channel, in our example).
Quite often you will be able to leave these pop-ups the way they are.
4. Click the Active checkbox at the top of the panel.
5. Repeat the steps above for every computer on the
network.
As the computers are made active, you should see the
small Sending and Receiving indicators flashing on each
active computer, and the name of each computer should
appear in the list at the bottom of the pane. Each com-
puter is assigned a random number – do not worry about
this, it is just so the network knows internally which one is
which.
• You can double-click on the name in bold (which is the
name of the computer you are currently working on) and
set it to whatever other name you wish.
This name will appear in the System Link window of every computer on
the network.
Ö If you do not see the name of each computer appear-
ing once you have made it active, you may have to check
your settings.
Go through the procedure above again and make sure that all ASIO
cards are listening to the digital clock signals correctly, and that each
computer has the correct inputs and outputs assigned to the System
Link network.
Putting the network online
After each computer’s name you will see whether it is online
or not. When a computer is online, it will receive transport
and timecode signals, and its sequencer application can be
started and stopped by remote control. If it is off-line, it can
only be started from its own keyboard – it is effectively an
independent machine, although it is still on the network.
Ö Note that any computer can control any and all of the
others – VST System Link is a peer-to-peer network and
there is no absolute “master” computer.
However, most users do like to think of one machine as the master (in a
one person/two computer network, this would be the machine you actu-
ally sit behind most of the time).
For now, let’s put all computers online:
1. Activate the Online checkbox in the VST System Link
panel for all computers.
2. Check that the system is working by pressing Play on
one computer – all computers should start almost instantly
and play perfectly in time, with sample-accurate precision.
• The Offset setting allows you to adjust whether one ma-
chine will play back slightly ahead or behind the rest.
This is normally not needed, but occasionally with some hardware you
may find that the lock is a few samples out. In that case you can adjust
the lock with the Offset value. For now, leave it set to 0 – it will most likely
be what you want.
• The Transfer Bits setting allows you to specify whether
you want to transfer 24 or 16 bits. This allows you to use
older audio cards which do not support transfer of 24 bits.