
User manual

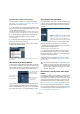
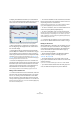

Table Of Contents
- Table of Contents
- Part I: Getting into the details
- About this manual
- VST Connections: Setting up input and output busses
- The Project window
- Playback and the Transport panel
- Recording
- Fades, crossfades and envelopes
- The Arranger track
- The Transpose functions
- The mixer
- Control Room (Cubase only)
- Audio effects
- VST Instruments and Instrument tracks
- Surround sound (Cubase only)
- Automation
- Audio processing and functions
- The Sample Editor
- The Audio Part Editor
- The Pool
- The MediaBay
- Working with Track Presets
- Track Quick Controls
- Remote controlling Cubase
- MIDI realtime parameters and effects
- Using MIDI devices
- MIDI processing and quantizing
- The MIDI editors
- Introduction
- Opening a MIDI editor
- The Key Editor - Overview
- Key Editor operations
- The In-Place Editor
- The Drum Editor - Overview
- Drum Editor operations
- Working with drum maps
- Using drum name lists
- The List Editor - Overview
- List Editor operations
- Working with System Exclusive messages
- Recording System Exclusive parameter changes
- Editing System Exclusive messages
- VST Expression
- The Logical Editor, Transformer and Input Transformer
- The Project Logical Editor
- Editing tempo and signature
- The Project Browser
- Export Audio Mixdown
- Synchronization
- Video
- ReWire
- File handling
- Customizing
- Key commands
- Part II: Score layout and printing
- How the Score Editor works
- The basics
- About this chapter
- Preparations
- Opening the Score Editor
- The project cursor
- Playing back and recording
- Page Mode
- Changing the Zoom factor
- The active staff
- Making page setup settings
- Designing your work space
- About the Score Editor context menus
- About dialogs in the Score Editor
- Setting key, clef and time signature
- Transposing instruments
- Printing from the Score Editor
- Exporting pages as image files
- Working order
- Force update
- Transcribing MIDI recordings
- Entering and editing notes
- About this chapter
- Score settings
- Note values and positions
- Adding and editing notes
- Selecting notes
- Moving notes
- Duplicating notes
- Cut, copy and paste
- Editing pitches of individual notes
- Changing the length of notes
- Splitting a note in two
- Working with the Display Quantize tool
- Split (piano) staves
- Strategies: Multiple staves
- Inserting and editing clefs, keys or time signatures
- Deleting notes
- Staff settings
- Polyphonic voicing
- About this chapter
- Background: Polyphonic voicing
- Setting up the voices
- Strategies: How many voices do I need?
- Entering notes into voices
- Checking which voice a note belongs to
- Moving notes between voices
- Handling rests
- Voices and Display Quantize
- Creating crossed voicings
- Automatic polyphonic voicing - Merge All Staves
- Converting voices to tracks - Extract Voices
- Additional note and rest formatting
- Working with symbols
- Working with chords
- Working with text
- Working with layouts
- Working with MusicXML
- Designing your score: additional techniques
- Scoring for drums
- Creating tablature
- The score and MIDI playback
- Tips and Tricks
- Index

373
VST Expression
Introduction
About articulations
Musical articulations, or expressions, define how certain
notes “sound”, i.e. how they should be sung or performed
on a given instrument. They allow you to specify that a string
instrument is bowed (not plucked), a trumpet muted (not
played open), and so on. Articulations also define the rela-
tive volume of notes (to play some notes louder or softer
than the others) or changes in pitch (create a tremolo).
Articulations can be divided into “Directions” and
“Attributes”.
• Directions are valid for all notes from the insert position
on, until another direction is scored. This means, they are
applied not to single notes, but to a continuous range of
notes, or even an entire piece of music.
An example for a direction is pizzicato, which means that the string in-
strument should be plucked.
• Attributes belong to single notes. They are only applied
to the notes for which they are scored.
Examples for this are accents, where a note should be played with an
emphasis, and staccato, where notes are played shorter.
Musical expressions in the Score Editor
Articulations and MIDI
When working with MIDI, i.e. when you are entering notes
via a MIDI keyboard, editing notes in the MIDI editors or
using VST Instruments, these articulations need to be re-
alized as different sounds. This can be achieved using the
following command and data types, which are used to
trigger the necessary sound changes:
Expression Maps
When working on a project, you might want to audition a
composition including articulations and other notation ex-
pressions. In Cubase, this can be achieved using the VST
Expression functionality. This feature makes use of so-
called “Expression Maps”, which can be selected via a
separate pop-up menu in the Inspector for MIDI or instru-
ment tracks. Within these maps, the sound mapping and
characteristics for all your musical expressions can be
specified, using the methods described in the above table.
In detail, this works as follows:
When you select an Expression Map for a MIDI or instru-
ment track, the articulations (sounds) defined in the map
are automatically applied during playback. Cubase recog-
nizes the expressions scored for the MIDI part and then
searches the sound slots in the Expression Map for a
sound that matches the defined criteria.
When a matching sound slot is found, the current note is
either modified (e.g. reduced in length or played louder), or
the MIDI channel, program change or key switch informa-
tion is sent to the connected instrument (the instrument
selected on the Output Routing pop-up menu for the
track), so that a different sound will be played. When no
sound slot is found that matches the articulations used in
the part, the “closest match” will be used, see “Groups” on
page 378.
When you enter articulations in a MIDI part, you need to set
up an Expression Map in a way that the right sounds in the
connected VST or MIDI instrument are triggered (see
“Creating and editing Expression Maps” on page 377).
Expression Maps also allow you to link your articulations
with remote keys on a MIDI input device and map these to
sounds that can be played by a MIDI device or VST instru-
ment. This way, you can enter notes and articulations us-
ing a remote MIDI device and have these automatically be
recorded and played back correctly by Cubase.
Option Description
Program
Change
Via Program Change messages, you can instruct a connected
VST instrument to switch from one program to another. De-
pending on the instrument, this can be used to play a different
articulation.
MIDI
channel
Multi-timbral instruments, such as Steinberg’s HALion, feature
so-called programs, usually representing different articulations.
These can be accessed via MIDI channel messages.
Pizzicato Tenuto Accent Staccato
AttributesDirection
Key
switches
Some software samplers, like Steinberg’s HALion Symphonic
Orchestra, make use of “key switches”, meaning that certain
keys are not used to trigger sounds, but to switch between ar-
ticulations, for example.
MIDI
editing
Articulations like staccatos or accents can be created by mod-
ifying the actual MIDI data, e.g. by changing length or velocity.
Option Description