
User manual
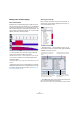
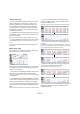
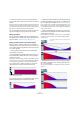
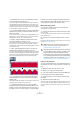
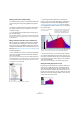
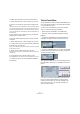

Table Of Contents
- Table of Contents
- Part I: Getting into the details
- About this manual
- VST Connections: Setting up input and output busses
- The Project window
- Playback and the Transport panel
- Recording
- Fades, crossfades and envelopes
- The Arranger track
- The Transpose functions
- The mixer
- Control Room (Cubase only)
- Audio effects
- VST Instruments and Instrument tracks
- Surround sound (Cubase only)
- Automation
- Audio processing and functions
- The Sample Editor
- The Audio Part Editor
- The Pool
- The MediaBay
- Working with Track Presets
- Track Quick Controls
- Remote controlling Cubase
- MIDI realtime parameters and effects
- Using MIDI devices
- MIDI processing and quantizing
- The MIDI editors
- Introduction
- Opening a MIDI editor
- The Key Editor - Overview
- Key Editor operations
- The In-Place Editor
- The Drum Editor - Overview
- Drum Editor operations
- Working with drum maps
- Using drum name lists
- The List Editor - Overview
- List Editor operations
- Working with System Exclusive messages
- Recording System Exclusive parameter changes
- Editing System Exclusive messages
- VST Expression
- The Logical Editor, Transformer and Input Transformer
- The Project Logical Editor
- Editing tempo and signature
- The Project Browser
- Export Audio Mixdown
- Synchronization
- Video
- ReWire
- File handling
- Customizing
- Key commands
- Part II: Score layout and printing
- How the Score Editor works
- The basics
- About this chapter
- Preparations
- Opening the Score Editor
- The project cursor
- Playing back and recording
- Page Mode
- Changing the Zoom factor
- The active staff
- Making page setup settings
- Designing your work space
- About the Score Editor context menus
- About dialogs in the Score Editor
- Setting key, clef and time signature
- Transposing instruments
- Printing from the Score Editor
- Exporting pages as image files
- Working order
- Force update
- Transcribing MIDI recordings
- Entering and editing notes
- About this chapter
- Score settings
- Note values and positions
- Adding and editing notes
- Selecting notes
- Moving notes
- Duplicating notes
- Cut, copy and paste
- Editing pitches of individual notes
- Changing the length of notes
- Splitting a note in two
- Working with the Display Quantize tool
- Split (piano) staves
- Strategies: Multiple staves
- Inserting and editing clefs, keys or time signatures
- Deleting notes
- Staff settings
- Polyphonic voicing
- About this chapter
- Background: Polyphonic voicing
- Setting up the voices
- Strategies: How many voices do I need?
- Entering notes into voices
- Checking which voice a note belongs to
- Moving notes between voices
- Handling rests
- Voices and Display Quantize
- Creating crossed voicings
- Automatic polyphonic voicing - Merge All Staves
- Converting voices to tracks - Extract Voices
- Additional note and rest formatting
- Working with symbols
- Working with chords
- Working with text
- Working with layouts
- Working with MusicXML
- Designing your score: additional techniques
- Scoring for drums
- Creating tablature
- The score and MIDI playback
- Tips and Tricks
- Index

352
The MIDI editors
Controller lane presets
Once you have added the required number of controller
lanes and selected the event types you need, you can
store this combination as a controller lane preset. You
could for example have a preset with one velocity lane
only, another with a combination of velocity, pitchbend
and modulation, and so on. This can make working with
controllers much quicker.
• To add the current controller lane setup as a preset, pull
down the pop-up menu to the left of the horizontal scroll-
bar and select “Add”.
Enter a name for the preset in the dialog that appears and click OK.
• To apply a stored preset, select it from the pop-up menu.
This immediately brings up the controller lanes and event types in the
preset.
• To remove or rename presets, select “Organize” from
the pop-up.
Editing velocity values
When “Velocity” is selected for viewing, the lane shows
the velocity of each note as a vertical bar.
Velocity values are edited with the Pencil or the Line tool.
The different tools and Line tool modes offer several pos-
sibilities, as listed below.
Ö The Arrow tool automatically switches to the Pencil tool
when you move the pointer into the controller display.
If you want to use the Arrow tool to select events in the controller display,
press [Alt]/[Option].
Ö If the Speaker icon (Acoustic Feedback) is activated
on the toolbar, the notes will be played back when you ad-
just the velocity, allowing you to audition your changes.
• You can use the Pencil tool to change the velocity of a
single note: click on its velocity bar and drag the bar up or
down.
While you drag, the current velocity value is shown in the display to the left.
• You can use the Pencil tool or the Line tool in Paint
mode to change the velocity values of several notes by
painting a “freehand curve”.
When editing velocity, these two methods have the same functionality.
• Use the Line tool in Line mode for creating linear veloc-
ity ramps.
Click where you want the ramp to start and drag the cursor to where you
want the ramp to end. When you release the mouse button, the velocity
values are aligned with the line between the two points.
• Parabola mode works in the same way, but aligns the
velocity values to a Parabola curve instead.
Use this for smooth, “natural” velocity fades, etc.
• The remaining three Line tool modes (Sine, Triangle and
Square) align the velocity values to continuous curve
shapes (see below).