
User manual
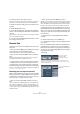

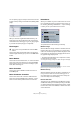

Table Of Contents
- Table of Contents
- Part I: Getting into the details
- About this manual
- VST Connections: Setting up input and output busses
- The Project window
- Playback and the Transport panel
- Recording
- Fades, crossfades and envelopes
- The Arranger track
- The Transpose functions
- The mixer
- Control Room (Cubase only)
- Audio effects
- VST Instruments and Instrument tracks
- Surround sound (Cubase only)
- Automation
- Audio processing and functions
- The Sample Editor
- The Audio Part Editor
- The Pool
- The MediaBay
- Working with Track Presets
- Track Quick Controls
- Remote controlling Cubase
- MIDI realtime parameters and effects
- Using MIDI devices
- MIDI processing and quantizing
- The MIDI editors
- Introduction
- Opening a MIDI editor
- The Key Editor - Overview
- Key Editor operations
- The In-Place Editor
- The Drum Editor - Overview
- Drum Editor operations
- Working with drum maps
- Using drum name lists
- The List Editor - Overview
- List Editor operations
- Working with System Exclusive messages
- Recording System Exclusive parameter changes
- Editing System Exclusive messages
- VST Expression
- The Logical Editor, Transformer and Input Transformer
- The Project Logical Editor
- Editing tempo and signature
- The Project Browser
- Export Audio Mixdown
- Synchronization
- Video
- ReWire
- File handling
- Customizing
- Key commands
- Part II: Score layout and printing
- How the Score Editor works
- The basics
- About this chapter
- Preparations
- Opening the Score Editor
- The project cursor
- Playing back and recording
- Page Mode
- Changing the Zoom factor
- The active staff
- Making page setup settings
- Designing your work space
- About the Score Editor context menus
- About dialogs in the Score Editor
- Setting key, clef and time signature
- Transposing instruments
- Printing from the Score Editor
- Exporting pages as image files
- Working order
- Force update
- Transcribing MIDI recordings
- Entering and editing notes
- About this chapter
- Score settings
- Note values and positions
- Adding and editing notes
- Selecting notes
- Moving notes
- Duplicating notes
- Cut, copy and paste
- Editing pitches of individual notes
- Changing the length of notes
- Splitting a note in two
- Working with the Display Quantize tool
- Split (piano) staves
- Strategies: Multiple staves
- Inserting and editing clefs, keys or time signatures
- Deleting notes
- Staff settings
- Polyphonic voicing
- About this chapter
- Background: Polyphonic voicing
- Setting up the voices
- Strategies: How many voices do I need?
- Entering notes into voices
- Checking which voice a note belongs to
- Moving notes between voices
- Handling rests
- Voices and Display Quantize
- Creating crossed voicings
- Automatic polyphonic voicing - Merge All Staves
- Converting voices to tracks - Extract Voices
- Additional note and rest formatting
- Working with symbols
- Working with chords
- Working with text
- Working with layouts
- Working with MusicXML
- Designing your score: additional techniques
- Scoring for drums
- Creating tablature
- The score and MIDI playback
- Tips and Tricks
- Index

335
MIDI processing and quantizing
OK and Cancel
Clicking OK performs the automatic delete according to
the rules set up. Clicking Cancel closes the dialog without
deleting notes.
Restrict Polyphony
Selecting this item opens a dialog in which you can spec-
ify how many “voices” should be used (for the selected
notes or parts). Restricting the polyphony this way is use-
ful when you have an instrument with limited polyphony
and want to make sure all notes will be played. The effect
is achieved by shortening notes as required, so that they
end before the next note starts.
Pedals to Note Length
This function scans for Sustain pedal on/off events, length-
ens the affected notes to match the Sustain pedal off posi-
tion, and then removes the Sustain Controller on/off events.
Delete Overlaps (mono)
This function allows you to make sure that no notes of the
same pitch overlap (i.e. that one starts before the other
ends). Overlapping notes of the same pitch can confuse
some MIDI instruments (a new Note On is transmitted be-
fore the Note Off is transmitted). This command can then
be used to automatically solve the problem.
Delete Overlaps (poly)
This function shortens notes when required, so that no
note begins before another ends. This happens regard-
less of which pitch the notes have.
Velocity
This function opens a dialog that allows you to manipulate
the velocity of notes in various ways.
The following types of velocity processing are available:
Add/Subtract
This simply adds a fixed number to the existing velocity
values. You set the value (positive or negative) with the
Amount parameter.
Compress/Expand
Compresses or expands the “dynamic range” of MIDI
notes by scaling the velocity values according to the Ratio
setting (0–300%). The principle behind this is that multi-
plying different velocity values with a factor higher than 1
(over 100%) will also make the differences between ve-
locity values greater, while using a factor lower than 1 (un-
der 100%) will make the differences smaller. In short:
• To compress (“even out” velocity differences), use ratio
values below 100%.
After compression, you would probably want to add a velocity amount
(with the Add/Subtract function) to maintain the average velocity level.
• To expand (create greater difference in velocity), use ra-
tio values above 100%.
Before you expand, you may want to adjust the velocity with the Add/
Subtract function, so that the average velocity is somewhere in the mid-
dle of the range. If the average velocity is high (near 127) or low (near 0),
expansion will not work properly, simply because velocity values can only
be between 0 and 127!
Limit
This function allows you to make sure that no velocity val-
ues fall outside a given range (the Lower and Upper val-
ues). Any velocity values outside this range are raised/
lowered to exactly the Lower/Upper values.
Fixed Velocity
This function sets the velocity of all selected notes to the
Insert Velocity value on the toolbar in the MIDI editors.
Thin Out Data
Thins out MIDI data. Use this to ease the load on your ex-
ternal MIDI devices if you have recorded very dense con-
troller curves etc.
You can also manually thin out the controller data by using
the quantize function in the Key Editor.