
User manual

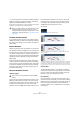
Table Of Contents
- Table of Contents
- Part I: Getting into the details
- About this manual
- VST Connections: Setting up input and output busses
- The Project window
- Playback and the Transport panel
- Recording
- Fades, crossfades and envelopes
- The Arranger track
- The Transpose functions
- The mixer
- Control Room (Cubase only)
- Audio effects
- VST Instruments and Instrument tracks
- Surround sound (Cubase only)
- Automation
- Audio processing and functions
- The Sample Editor
- The Audio Part Editor
- The Pool
- The MediaBay
- Working with Track Presets
- Track Quick Controls
- Remote controlling Cubase
- MIDI realtime parameters and effects
- Using MIDI devices
- MIDI processing and quantizing
- The MIDI editors
- Introduction
- Opening a MIDI editor
- The Key Editor - Overview
- Key Editor operations
- The In-Place Editor
- The Drum Editor - Overview
- Drum Editor operations
- Working with drum maps
- Using drum name lists
- The List Editor - Overview
- List Editor operations
- Working with System Exclusive messages
- Recording System Exclusive parameter changes
- Editing System Exclusive messages
- VST Expression
- The Logical Editor, Transformer and Input Transformer
- The Project Logical Editor
- Editing tempo and signature
- The Project Browser
- Export Audio Mixdown
- Synchronization
- Video
- ReWire
- File handling
- Customizing
- Key commands
- Part II: Score layout and printing
- How the Score Editor works
- The basics
- About this chapter
- Preparations
- Opening the Score Editor
- The project cursor
- Playing back and recording
- Page Mode
- Changing the Zoom factor
- The active staff
- Making page setup settings
- Designing your work space
- About the Score Editor context menus
- About dialogs in the Score Editor
- Setting key, clef and time signature
- Transposing instruments
- Printing from the Score Editor
- Exporting pages as image files
- Working order
- Force update
- Transcribing MIDI recordings
- Entering and editing notes
- About this chapter
- Score settings
- Note values and positions
- Adding and editing notes
- Selecting notes
- Moving notes
- Duplicating notes
- Cut, copy and paste
- Editing pitches of individual notes
- Changing the length of notes
- Splitting a note in two
- Working with the Display Quantize tool
- Split (piano) staves
- Strategies: Multiple staves
- Inserting and editing clefs, keys or time signatures
- Deleting notes
- Staff settings
- Polyphonic voicing
- About this chapter
- Background: Polyphonic voicing
- Setting up the voices
- Strategies: How many voices do I need?
- Entering notes into voices
- Checking which voice a note belongs to
- Moving notes between voices
- Handling rests
- Voices and Display Quantize
- Creating crossed voicings
- Automatic polyphonic voicing - Merge All Staves
- Converting voices to tracks - Extract Voices
- Additional note and rest formatting
- Working with symbols
- Working with chords
- Working with text
- Working with layouts
- Working with MusicXML
- Designing your score: additional techniques
- Scoring for drums
- Creating tablature
- The score and MIDI playback
- Tips and Tricks
- Index

329
MIDI processing and quantizing
• If you activate the “Auto” checkbox in the Quantize Setup
dialog, any change you make in the dialog is immediately
applied to the selected MIDI parts or notes.
A great way of using this feature is to set up a playback loop, and adjust
the settings in the dialog until you get the desired result.
The Auto Quantize function
If you activate the Auto Q button on the Transport panel,
all MIDI recordings you make are automatically quantized
according to the settings you have made in the Quantize
Setup dialog.
Iterative Quantize
Another way to apply “loose” quantization is to use the Iter-
ative Quantize function on the MIDI menu. It works like this:
Instead of moving a note to the closest quantize grid posi-
tion, Iterative Quantize moves it only part of the way. You
specify how much the notes should be moved towards the
grid with the “Iterative Strength” setting in the Quantize
Setup dialog.
Iterative Quantize also differs from “regular” quantization
in that the operation is not based on the notes’ original po-
sitions but on their current, quantized position. This makes
it possible to repeatedly use Iterative Quantize, gradually
moving the notes closer to the quantize grid until you’ve
found the desired timing.
Advanced Quantize functions
Quantize Lengths
This function (on the Advanced Quantize submenu on the
MIDI menu) will quantize the length of the notes, without
changing their start positions. At its most basic level, this
function will set the length of the notes to the Length
Quantize value on the MIDI editor toolbar. However, if you
have selected the “Quantize Link” option on the Length
Quantize pop-up menu, the function will resize the note
according to the quantize grid, taking the Swing, Tuplet
and Magnetic Area settings into account.
An example:
1. Length Quantize set to “Quantize Link”.
2. Some 16th notes.
3. Here, the quantize value has been set to straight 16th notes with
Swing at 100%.
4. Selecting Quantize Lengths will adjust the note lengths according to
the grid. If you compare the result to the first figure above, you will find
that notes that started within the odd sixteenth note “zones” show the
longer grid length, and notes in the even zones have the shorter length.
Quantize Ends
The Quantize Ends function on the Advanced Quantize
submenu will only affect the end positions of notes. Apart
from that, it works just like regular quantizing, taking the
Quantize pop-up menu setting into account.
Undo Quantize
As mentioned above, the original position of each quan-
tized note is stored. Therefore, you can make the selected
MIDI notes revert to their original, unquantized state at any
time by selecting Undo Quantize from the Advanced
Quantize submenu. This is independent from the regular
Undo History.
!
When you apply quantize, the result is based on the
original position of the notes. Therefore, you can
freely try out different quantize settings with no risk of
“destroying” anything. See also “Undo Quantize” on
page 329.
!
This function is only available from within the MIDI
editors.