
User manual
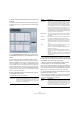
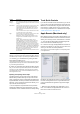
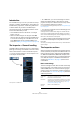

Table Of Contents
- Table of Contents
- Part I: Getting into the details
- About this manual
- VST Connections: Setting up input and output busses
- The Project window
- Playback and the Transport panel
- Recording
- Fades, crossfades and envelopes
- The Arranger track
- The Transpose functions
- The mixer
- Control Room (Cubase only)
- Audio effects
- VST Instruments and Instrument tracks
- Surround sound (Cubase only)
- Automation
- Audio processing and functions
- The Sample Editor
- The Audio Part Editor
- The Pool
- The MediaBay
- Working with Track Presets
- Track Quick Controls
- Remote controlling Cubase
- MIDI realtime parameters and effects
- Using MIDI devices
- MIDI processing and quantizing
- The MIDI editors
- Introduction
- Opening a MIDI editor
- The Key Editor - Overview
- Key Editor operations
- The In-Place Editor
- The Drum Editor - Overview
- Drum Editor operations
- Working with drum maps
- Using drum name lists
- The List Editor - Overview
- List Editor operations
- Working with System Exclusive messages
- Recording System Exclusive parameter changes
- Editing System Exclusive messages
- VST Expression
- The Logical Editor, Transformer and Input Transformer
- The Project Logical Editor
- Editing tempo and signature
- The Project Browser
- Export Audio Mixdown
- Synchronization
- Video
- ReWire
- File handling
- Customizing
- Key commands
- Part II: Score layout and printing
- How the Score Editor works
- The basics
- About this chapter
- Preparations
- Opening the Score Editor
- The project cursor
- Playing back and recording
- Page Mode
- Changing the Zoom factor
- The active staff
- Making page setup settings
- Designing your work space
- About the Score Editor context menus
- About dialogs in the Score Editor
- Setting key, clef and time signature
- Transposing instruments
- Printing from the Score Editor
- Exporting pages as image files
- Working order
- Force update
- Transcribing MIDI recordings
- Entering and editing notes
- About this chapter
- Score settings
- Note values and positions
- Adding and editing notes
- Selecting notes
- Moving notes
- Duplicating notes
- Cut, copy and paste
- Editing pitches of individual notes
- Changing the length of notes
- Splitting a note in two
- Working with the Display Quantize tool
- Split (piano) staves
- Strategies: Multiple staves
- Inserting and editing clefs, keys or time signatures
- Deleting notes
- Staff settings
- Polyphonic voicing
- About this chapter
- Background: Polyphonic voicing
- Setting up the voices
- Strategies: How many voices do I need?
- Entering notes into voices
- Checking which voice a note belongs to
- Moving notes between voices
- Handling rests
- Voices and Display Quantize
- Creating crossed voicings
- Automatic polyphonic voicing - Merge All Staves
- Converting voices to tracks - Extract Voices
- Additional note and rest formatting
- Working with symbols
- Working with chords
- Working with text
- Working with layouts
- Working with MusicXML
- Designing your score: additional techniques
- Scoring for drums
- Creating tablature
- The score and MIDI playback
- Tips and Tricks
- Index

301
Remote controlling Cubase
• In the Project window (Track list) and the mixer (bottom
of channel strips) you will now see white stripes indicating
which channels are currently linked to the remote control
device.
Audio 01 can be remote controlled, while Audio 02 is not linked to the
remote control device.
Operations
Global options for remote controllers
In the Device Setup dialog, on the page for your remote
device, some (or all) of the following global functions may
be available (depending on your remote device):
Writing automation using remote controls
Automating the mixer in Touch mode using a remote control
device is done in the same way as when you operate on-
screen controls in Write mode. However, when it comes to
replacing existing automation data, there is one important
difference:
• If you activate Write mode and move a control on the re-
mote control device, all data for the corresponding para-
meter is replaced from the position where you moved the
control, up until the position where playback is stopped!
In other words, as soon as you move a control in Write mode, it remains
“active” until you stop playback. The reason for this is explained below.
As a consequence, an additional precaution must be taken:
• Make sure you move only the controller you want to re-
place!
In order to replace existing automation data for a control in
Touch mode, the computer needs to know how long the
user actually “grabbed” or used the control. When doing
this “on screen”, the program simply detects when the
mouse button is pressed and released. When you are us-
ing an external remote control device, however, there is no
mouse button involved, and Cubase cannot tell whether
you “grab and hold” a fader, or simply move it and release
it. Instead, you have to indicate that you have “released”
the control by stopping playback.
!
Sometimes communication between Cubase and a
remote device is interrupted or the handshaking pro-
tocol fails to create a connection. To re-establish
communication with any device in the Devices list, se-
lect it and click the Reset button in the Device Setup
dialog. Also, the “Send Reset Message to all Devices”
button at the top of the dialog will reset every device in
the Devices list.
Option Description
Reset This allows you to revert to the factory default settings for
the remote device.
Bank If your remote device contains several banks, you can se-
lect the bank you want to use on this pop-up menu.
The bank you select here will be the one used by default
when Cubase is launched.
Smart Switch
Delay
Some of the Cubase functions (e.g. Solo and Mute) sup-
port the so called “smart switch” behavior: In addition to
regular activation/deactivation of a function by clicking a
button, you can also activate the function for as long as
the button is pressed. Upon releasing the mouse button,
the function is deactivated.
This pop-up menu allows you to specify how long a but-
ton must be pressed before it goes into “smart switch”
mode. When “Off” is selected, the “smart switch” func-
tion is deactivated in Cubase.
!
The above does not apply to the Mackie Control or
any other remote control device with touch sensitive
controls. These devices will stop writing as they have
touch sensitive faders, which means that they stop
writing as soon as you release the fader.
!
This is only relevant when you are using a remote
control device in Touch mode and Write mode is
activated in the mixer.