
User manual
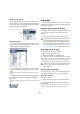
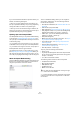
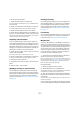
Table Of Contents
- Table of Contents
- Part I: Getting into the details
- About this manual
- VST Connections: Setting up input and output busses
- The Project window
- Playback and the Transport panel
- Recording
- Fades, crossfades and envelopes
- The Arranger track
- The Transpose functions
- The mixer
- Control Room (Cubase only)
- Audio effects
- VST Instruments and Instrument tracks
- Surround sound (Cubase only)
- Automation
- Audio processing and functions
- The Sample Editor
- The Audio Part Editor
- The Pool
- The MediaBay
- Working with Track Presets
- Track Quick Controls
- Remote controlling Cubase
- MIDI realtime parameters and effects
- Using MIDI devices
- MIDI processing and quantizing
- The MIDI editors
- Introduction
- Opening a MIDI editor
- The Key Editor - Overview
- Key Editor operations
- The In-Place Editor
- The Drum Editor - Overview
- Drum Editor operations
- Working with drum maps
- Using drum name lists
- The List Editor - Overview
- List Editor operations
- Working with System Exclusive messages
- Recording System Exclusive parameter changes
- Editing System Exclusive messages
- VST Expression
- The Logical Editor, Transformer and Input Transformer
- The Project Logical Editor
- Editing tempo and signature
- The Project Browser
- Export Audio Mixdown
- Synchronization
- Video
- ReWire
- File handling
- Customizing
- Key commands
- Part II: Score layout and printing
- How the Score Editor works
- The basics
- About this chapter
- Preparations
- Opening the Score Editor
- The project cursor
- Playing back and recording
- Page Mode
- Changing the Zoom factor
- The active staff
- Making page setup settings
- Designing your work space
- About the Score Editor context menus
- About dialogs in the Score Editor
- Setting key, clef and time signature
- Transposing instruments
- Printing from the Score Editor
- Exporting pages as image files
- Working order
- Force update
- Transcribing MIDI recordings
- Entering and editing notes
- About this chapter
- Score settings
- Note values and positions
- Adding and editing notes
- Selecting notes
- Moving notes
- Duplicating notes
- Cut, copy and paste
- Editing pitches of individual notes
- Changing the length of notes
- Splitting a note in two
- Working with the Display Quantize tool
- Split (piano) staves
- Strategies: Multiple staves
- Inserting and editing clefs, keys or time signatures
- Deleting notes
- Staff settings
- Polyphonic voicing
- About this chapter
- Background: Polyphonic voicing
- Setting up the voices
- Strategies: How many voices do I need?
- Entering notes into voices
- Checking which voice a note belongs to
- Moving notes between voices
- Handling rests
- Voices and Display Quantize
- Creating crossed voicings
- Automatic polyphonic voicing - Merge All Staves
- Converting voices to tracks - Extract Voices
- Additional note and rest formatting
- Working with symbols
- Working with chords
- Working with text
- Working with layouts
- Working with MusicXML
- Designing your score: additional techniques
- Scoring for drums
- Creating tablature
- The score and MIDI playback
- Tips and Tricks
- Index

261
The Pool
Background
Every time you record on an audio track, a file is created
on your hard disk. A reference to this file – a clip – is also
added to the Pool. Two general rules apply to the Pool:
• All audio and video clips that belong to a project are
listed in the Pool.
• There is a separate Pool for every project.
The way the Pool displays folders and their contents is
similar to the way the Mac OS X Finder and the Windows
Explorer display folders and lists of files.
In the Pool you can, among other things, perform the fol-
lowing operations:
Operations that affect files on disk
• Importing clips (audio files can automatically be copied and/or
converted)
• Converting file formats.
• Renaming clips (this will also rename the referenced files on
disk) and regions
• Deleting clips
• Preparing file archives for backup
• Minimizing files
Operations that only affect clips
• Copying clips
• Auditioning clips
• Organizing clips
• Applying audio processing to clips
• Saving or importing complete Pool files
Opening the Pool
You can open the Pool in any of the following ways:
• By clicking the Open Pool button on the Project win-
dow toolbar.
• By selecting “Pool” on the Project menu or “Open Pool
Window” on the Media menu.
• By using a key command (by default [Ctrl]/[Command]-
[P] – note that using this key command a second time will
close the Pool again).
The content of the Pool is divided into three main folders:
• The Audio folder
This contains all audio clips and regions currently in the project.
• The Video folder
This contains all video clips currently in the project.
• The Trash folder
Unused clips can be moved into the Trash folder for later permanent re-
moval from the hard disk.
These folders cannot be renamed or deleted from the Pool,
but any number of subfolders can be added (see “Organi-
zing clips and folders” on page 270).
Window overview
Toolbar overview
Audio folder
Trash folder Video folder
Audio clip
Region
Waveform image
Toolbar
Open/Close all
folders
View/Attributes
pop-up
Show Info
button
Project Folder
path
Pool Record
Folder path
Audition, Audition Loop, and
Volume controls
Import and Search
buttons