
User manual
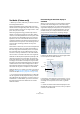
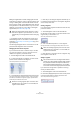

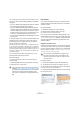
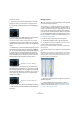
Table Of Contents
- Table of Contents
- Part I: Getting into the details
- About this manual
- VST Connections: Setting up input and output busses
- The Project window
- Playback and the Transport panel
- Recording
- Fades, crossfades and envelopes
- The Arranger track
- The Transpose functions
- The mixer
- Control Room (Cubase only)
- Audio effects
- VST Instruments and Instrument tracks
- Surround sound (Cubase only)
- Automation
- Audio processing and functions
- The Sample Editor
- The Audio Part Editor
- The Pool
- The MediaBay
- Working with Track Presets
- Track Quick Controls
- Remote controlling Cubase
- MIDI realtime parameters and effects
- Using MIDI devices
- MIDI processing and quantizing
- The MIDI editors
- Introduction
- Opening a MIDI editor
- The Key Editor - Overview
- Key Editor operations
- The In-Place Editor
- The Drum Editor - Overview
- Drum Editor operations
- Working with drum maps
- Using drum name lists
- The List Editor - Overview
- List Editor operations
- Working with System Exclusive messages
- Recording System Exclusive parameter changes
- Editing System Exclusive messages
- VST Expression
- The Logical Editor, Transformer and Input Transformer
- The Project Logical Editor
- Editing tempo and signature
- The Project Browser
- Export Audio Mixdown
- Synchronization
- Video
- ReWire
- File handling
- Customizing
- Key commands
- Part II: Score layout and printing
- How the Score Editor works
- The basics
- About this chapter
- Preparations
- Opening the Score Editor
- The project cursor
- Playing back and recording
- Page Mode
- Changing the Zoom factor
- The active staff
- Making page setup settings
- Designing your work space
- About the Score Editor context menus
- About dialogs in the Score Editor
- Setting key, clef and time signature
- Transposing instruments
- Printing from the Score Editor
- Exporting pages as image files
- Working order
- Force update
- Transcribing MIDI recordings
- Entering and editing notes
- About this chapter
- Score settings
- Note values and positions
- Adding and editing notes
- Selecting notes
- Moving notes
- Duplicating notes
- Cut, copy and paste
- Editing pitches of individual notes
- Changing the length of notes
- Splitting a note in two
- Working with the Display Quantize tool
- Split (piano) staves
- Strategies: Multiple staves
- Inserting and editing clefs, keys or time signatures
- Deleting notes
- Staff settings
- Polyphonic voicing
- About this chapter
- Background: Polyphonic voicing
- Setting up the voices
- Strategies: How many voices do I need?
- Entering notes into voices
- Checking which voice a note belongs to
- Moving notes between voices
- Handling rests
- Voices and Display Quantize
- Creating crossed voicings
- Automatic polyphonic voicing - Merge All Staves
- Converting voices to tracks - Extract Voices
- Additional note and rest formatting
- Working with symbols
- Working with chords
- Working with text
- Working with layouts
- Working with MusicXML
- Designing your score: additional techniques
- Scoring for drums
- Creating tablature
- The score and MIDI playback
- Tips and Tricks
- Index

243
The Sample Editor
VariAudio (Cubase only)
Ö Before you continue, make sure you read the tutorial in
the Getting Started manual.
With the AudioWarp features, editing audio in the time
domain has become significantly easier. However, editing
pitch was limited to having just one single numeric “trans-
pose” value per event or part.
With cutting-edge technology Cubase finally turns the
dreams of musicians and producers into reality: editing
vocal lines in the Sample Editor has become just as seam-
less and quick as if editing MIDI notes in the renowned
Key Editor. This is the new VariAudio feature that offers
completely integrated vocal editing and pitch alteration of
individual notes in monophonic vocal recordings and can
solve intonation and timing problems with only a few
mouse clicks.
And how does it work? First, the vocal line is analyzed and
split into segments shown as graphic representation of
the notes sung. After the detection process is complete,
the recognized notes can be modified entirely “non-de-
structive” so that any modifications to the audio material
can be undone or reverted to the state of the original file.
VariAudio was developed and optimized specifically to be
used with monophonic vocal recordings. Though the de-
tection and stretching of notes of other monophonic audio
recordings, such as those of a saxophone, may work well,
the quality of the end result depends greatly on the generic
condition and structure of the recording’s texture. The fol-
lowing sections explain the exciting functionality of VariAu-
dio in which we only refer to monophonic vocal material.
VariAudio allows you to change your audio on the vertical
axis (see “Changing the pitch” on page 247) and on the
horizontal axis (see “Warping segments” on page 250).
Ö If you load projects with VariAudio files in Cubase Stu-
dio, the original files will be played back and your VariAu-
dio modifications will be ignored. If you want to hear your
modifications in Cubase Studio, you will have to bounce
the audio files that have been edited with the Cubase
VariAudio features.
Understanding the waveform display in
VariAudio
When you open monophonic vocal recordings in the Sam-
ple Editor and click the Segments or the Pitch & Warp
mode on the VariAudio tab, your audio will be analyzed and
segmented to display the tonal portions, i.e. the notes sung
or played. This process is called segmentation. The seg-
mentation allows you to easily associate the audio with
your lyrics and to introduce pitch and timing changes.
In between the different segments you may find gaps where
non-tonal portions have been detected:
In this example, at the beginning of the waveform, you can
see a gap where no segment is shown. Such gaps can be
caused by non-tonal portions of the audio, e.g. breath
sounds.
Ö Please note that the audio waveform displayed on the
VariAudio tab is always shown as mono, even if you opened
a stereo or multi-channel file.
Audio waveform
Segments
Gap