
User manual
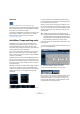
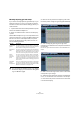
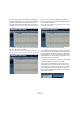
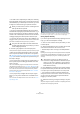
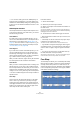

Table Of Contents
- Table of Contents
- Part I: Getting into the details
- About this manual
- VST Connections: Setting up input and output busses
- The Project window
- Playback and the Transport panel
- Recording
- Fades, crossfades and envelopes
- The Arranger track
- The Transpose functions
- The mixer
- Control Room (Cubase only)
- Audio effects
- VST Instruments and Instrument tracks
- Surround sound (Cubase only)
- Automation
- Audio processing and functions
- The Sample Editor
- The Audio Part Editor
- The Pool
- The MediaBay
- Working with Track Presets
- Track Quick Controls
- Remote controlling Cubase
- MIDI realtime parameters and effects
- Using MIDI devices
- MIDI processing and quantizing
- The MIDI editors
- Introduction
- Opening a MIDI editor
- The Key Editor - Overview
- Key Editor operations
- The In-Place Editor
- The Drum Editor - Overview
- Drum Editor operations
- Working with drum maps
- Using drum name lists
- The List Editor - Overview
- List Editor operations
- Working with System Exclusive messages
- Recording System Exclusive parameter changes
- Editing System Exclusive messages
- VST Expression
- The Logical Editor, Transformer and Input Transformer
- The Project Logical Editor
- Editing tempo and signature
- The Project Browser
- Export Audio Mixdown
- Synchronization
- Video
- ReWire
- File handling
- Customizing
- Key commands
- Part II: Score layout and printing
- How the Score Editor works
- The basics
- About this chapter
- Preparations
- Opening the Score Editor
- The project cursor
- Playing back and recording
- Page Mode
- Changing the Zoom factor
- The active staff
- Making page setup settings
- Designing your work space
- About the Score Editor context menus
- About dialogs in the Score Editor
- Setting key, clef and time signature
- Transposing instruments
- Printing from the Score Editor
- Exporting pages as image files
- Working order
- Force update
- Transcribing MIDI recordings
- Entering and editing notes
- About this chapter
- Score settings
- Note values and positions
- Adding and editing notes
- Selecting notes
- Moving notes
- Duplicating notes
- Cut, copy and paste
- Editing pitches of individual notes
- Changing the length of notes
- Splitting a note in two
- Working with the Display Quantize tool
- Split (piano) staves
- Strategies: Multiple staves
- Inserting and editing clefs, keys or time signatures
- Deleting notes
- Staff settings
- Polyphonic voicing
- About this chapter
- Background: Polyphonic voicing
- Setting up the voices
- Strategies: How many voices do I need?
- Entering notes into voices
- Checking which voice a note belongs to
- Moving notes between voices
- Handling rests
- Voices and Display Quantize
- Creating crossed voicings
- Automatic polyphonic voicing - Merge All Staves
- Converting voices to tracks - Extract Voices
- Additional note and rest formatting
- Working with symbols
- Working with chords
- Working with text
- Working with layouts
- Working with MusicXML
- Designing your score: additional techniques
- Scoring for drums
- Creating tablature
- The score and MIDI playback
- Tips and Tricks
- Index

237
The Sample Editor
• If you hear a single sound split into two slice you can
disable an individual slice by pressing [Alt]/[Option] (the
pointer turns into a cross) and clicking on the correspond-
ing hitpoint handle.
The hitpoint handle gets smaller and its line disappears to indicate that it
is disabled. To reactivate a disabled hitpoint, [Alt]/[Option]-click on the
hitpoint handle again.
• If you hear “double hits” (e.g. a snare hit being followed
by a hi-hat hit within the same slice) you can add further hit-
points manually, or you can raise the sensitivity slider until
the hitpoint appears, lock this hitpoint by pointing on the
handle until it becomes green and click on it.
Locked hitpoints are displayed in a darker color. After locking the hitpoint
you can drag the sensitivity slider to the original setting and the locked
hitpoint will remain shown. You can unlock a locked hitpoint by clicking
on its handle.
• If you want to delete a hitpoint, simply drag it out of the
Sample Editor window.
Hitpoints that you have created manually can also be deleted by clicking
their handle.
Match-quantizing audio
Hitpoints can have individual Q-points. These are mainly
used for audio quantizing. Their function is to define the
point to which the quantizing will apply. Sometimes a slice
might have a slow attack, and a peak further into the slice
which you wish to use as the Q-point. When you apply
quantize, the Q-point will define where the warp tab will
be added. This also defines the point which will be
stretched to a grid position when quantizing.
• To activate Q-points, open the Preferences (Editing–
Audio page) and activate the option “Hitpoints have Q-
Points”.
Next time you use the Calculate Hitpoints function, the hitpoints will have
Q-points.
• To offset the position of a Q-point in relation to the hit-
point, simply click on the “Q” icon and drag it to the right
to the desired position.
Creating groove quantize maps
You can generate groove quantize maps based on the
hitpoints you have created in the Sample Editor. Groove
quantizing is not meant for correcting errors, but for creat-
ing rhythmic feels. This is done by comparing your re-
corded music with a “groove” (a timing grid generated
from the file) and moving the appropriate notes so that
their timing matches the one of the groove. In other words,
you can extract the timing from an audio loop and use it for
quantizing MIDI parts (or other audio loops, after slicing
them).
Proceed as follows:
1. Check the audio tempo and define the audio grid as
described above.
2. Create and edit hitpoints as described above.
You don’t have to create slices – just set up the hitpoints.
• You should try to get approximately one slice per eighth
note, sixteenth note or whatever the loop requires when
setting hitpoints for extracting a groove.
It can be helpful to use one of the note value-based options on the “Use”
pop-up menu when you’re setting up the hitpoints (see “Calculating hit-
points and slicing a loop” on page 235).
3. When you have finished setting the hitpoints, click on
the Make Groove button in the Hitpoints tab of the Sample
Editor Inspector or select “Create Groove Quantize from
Hitpoints” from the Hitpoints submenu on the Audio menu.
The groove is extracted.
4. If you now pull down the Quantize Type pop-up menu
in the Project window you will find an additional item at the
bottom of the list, with the same name as the file from
which you extracted the groove.
This groove can now be selected as a base for quantizing, just like any
other quantize value. See “The Quantizing functions” on page 326.
5. If you want to save this groove, open the Quantize
Setup dialog and store it as a preset.
!
Sounds with a slow attack have their rhythmic center
at some point before the peak.