
User manual
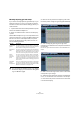
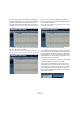
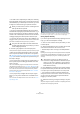
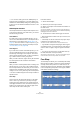

Table Of Contents
- Table of Contents
- Part I: Getting into the details
- About this manual
- VST Connections: Setting up input and output busses
- The Project window
- Playback and the Transport panel
- Recording
- Fades, crossfades and envelopes
- The Arranger track
- The Transpose functions
- The mixer
- Control Room (Cubase only)
- Audio effects
- VST Instruments and Instrument tracks
- Surround sound (Cubase only)
- Automation
- Audio processing and functions
- The Sample Editor
- The Audio Part Editor
- The Pool
- The MediaBay
- Working with Track Presets
- Track Quick Controls
- Remote controlling Cubase
- MIDI realtime parameters and effects
- Using MIDI devices
- MIDI processing and quantizing
- The MIDI editors
- Introduction
- Opening a MIDI editor
- The Key Editor - Overview
- Key Editor operations
- The In-Place Editor
- The Drum Editor - Overview
- Drum Editor operations
- Working with drum maps
- Using drum name lists
- The List Editor - Overview
- List Editor operations
- Working with System Exclusive messages
- Recording System Exclusive parameter changes
- Editing System Exclusive messages
- VST Expression
- The Logical Editor, Transformer and Input Transformer
- The Project Logical Editor
- Editing tempo and signature
- The Project Browser
- Export Audio Mixdown
- Synchronization
- Video
- ReWire
- File handling
- Customizing
- Key commands
- Part II: Score layout and printing
- How the Score Editor works
- The basics
- About this chapter
- Preparations
- Opening the Score Editor
- The project cursor
- Playing back and recording
- Page Mode
- Changing the Zoom factor
- The active staff
- Making page setup settings
- Designing your work space
- About the Score Editor context menus
- About dialogs in the Score Editor
- Setting key, clef and time signature
- Transposing instruments
- Printing from the Score Editor
- Exporting pages as image files
- Working order
- Force update
- Transcribing MIDI recordings
- Entering and editing notes
- About this chapter
- Score settings
- Note values and positions
- Adding and editing notes
- Selecting notes
- Moving notes
- Duplicating notes
- Cut, copy and paste
- Editing pitches of individual notes
- Changing the length of notes
- Splitting a note in two
- Working with the Display Quantize tool
- Split (piano) staves
- Strategies: Multiple staves
- Inserting and editing clefs, keys or time signatures
- Deleting notes
- Staff settings
- Polyphonic voicing
- About this chapter
- Background: Polyphonic voicing
- Setting up the voices
- Strategies: How many voices do I need?
- Entering notes into voices
- Checking which voice a note belongs to
- Moving notes between voices
- Handling rests
- Voices and Display Quantize
- Creating crossed voicings
- Automatic polyphonic voicing - Merge All Staves
- Converting voices to tracks - Extract Voices
- Additional note and rest formatting
- Working with symbols
- Working with chords
- Working with text
- Working with layouts
- Working with MusicXML
- Designing your score: additional techniques
- Scoring for drums
- Creating tablature
- The score and MIDI playback
- Tips and Tricks
- Index

234
The Sample Editor
Selecting an algorithm for realtime playback
In the Algorithm pop-up in the toolbar you can select the
algorithm to be applied on realtime playback.
In this pop-up you can find various options that govern the
audio quality of the realtime time stretching. There are pre-
sets for common types of audio material and an Advanced
option which allows you to manually set warp parameters:
If you select the Advanced menu item, a dialog opens
where you can manually adjust the three parameters that
govern the sound quality of the time stretching:
Working with hitpoints and slices
Hitpoint detection is a special feature of the Sample Edi-
tor. It detects attack transients in an audio file and then
adds a type of marker, i.e. a “hitpoint”, at each transient.
These hitpoints allow you to create “slices”, where each
slice ideally represents each individual sound or “beat” in
a loop (drum or other rhythmic loops work best with this
feature). When you have successfully sliced the audio file,
you can do a number of useful things with it:
• Change the tempo without affecting the pitch.
• Extract the timing (a groove map) from a drum loop. This can
then be applied to quantize other events.
• Replace individual sounds in a drum loop.
• Edit the actual playing in the drum loop without affecting the
basic feel.
• Extract sounds from loops.
You can further edit these slices in the Audio Part Editor.
For example you can:
• Remove or mute slices.
• Change the loop by reordering, replacing or quantizing slices.
• Apply processing or effects to individual slices.
• Create new files from individual slices using the “Bounce Se-
lection” function on the Audio menu.
• Realtime transpose and stretch slices.
• Edit slice envelopes.
Option Description
Drums This mode is best for percussive sounds, because it will not
change the timing of your audio. Using this option for pitched
audio will lead to noticeable artifacts. In this case, you can try
the Mix mode.
Plucked This should be used for audio with transients and a relatively
stable spectral sound character (e.g. plucked instruments).
Pads Use this mode for pitched audio with slower rhythm and a
stable spectral sound character. This will minimize sound arti-
facts, but the rhythmic accuracy will not be preserved.
Vocals This mode was optimized for slower signals with transients
and a prominent tonal character (e.g. vocals).
Mix This mode will preserve the rhythm and minimize the artifacts
for pitched material which does not meet the above criteria
(i.e. with a less homogenous sound character).
This will be selected by default for audio that is not catego-
rized.
Advanced This allows for a manual tweaking of the time stretching pa-
rameters. By default, the settings that are shown when you
open the dialog are those of the last used preset (except if
the Solo mode was selected, see below). The Advanced set-
tings are described in more detail below this table.
Solo This mode will preserve the formants of the audio. It should
only be used for monophonic material (solo woodwind/brass
instruments or solo vocals, monophonic synths or string in-
struments that do not play harmonies).
Parameter Description
Grain size The realtime time stretching algorithm splits the audio into
small pieces called “grains”. This parameter determines the
size of the grains. For material with many transients you
should use low Grain size values for best results.
Overlap Overlap is the percentage of the whole grain that will over-
lap with other grains. Use higher values for material with a
stable sound character.
Variance Variance is also a percentage of the whole length of the
grains and sets a variation in positioning so that the overlap-
ping area will sound smooth. A Variance setting of 0 will
produce a sound akin to time stretching used in early sam-
plers, whereas higher settings will produce more (rhythmic)
“smearing” effects but less audio artifacts.