
User manual
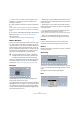
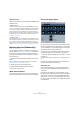
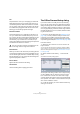
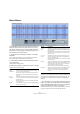
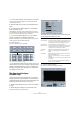
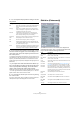

Table Of Contents
- Table of Contents
- Part I: Getting into the details
- About this manual
- VST Connections: Setting up input and output busses
- The Project window
- Playback and the Transport panel
- Recording
- Fades, crossfades and envelopes
- The Arranger track
- The Transpose functions
- The mixer
- Control Room (Cubase only)
- Audio effects
- VST Instruments and Instrument tracks
- Surround sound (Cubase only)
- Automation
- Audio processing and functions
- The Sample Editor
- The Audio Part Editor
- The Pool
- The MediaBay
- Working with Track Presets
- Track Quick Controls
- Remote controlling Cubase
- MIDI realtime parameters and effects
- Using MIDI devices
- MIDI processing and quantizing
- The MIDI editors
- Introduction
- Opening a MIDI editor
- The Key Editor - Overview
- Key Editor operations
- The In-Place Editor
- The Drum Editor - Overview
- Drum Editor operations
- Working with drum maps
- Using drum name lists
- The List Editor - Overview
- List Editor operations
- Working with System Exclusive messages
- Recording System Exclusive parameter changes
- Editing System Exclusive messages
- VST Expression
- The Logical Editor, Transformer and Input Transformer
- The Project Logical Editor
- Editing tempo and signature
- The Project Browser
- Export Audio Mixdown
- Synchronization
- Video
- ReWire
- File handling
- Customizing
- Key commands
- Part II: Score layout and printing
- How the Score Editor works
- The basics
- About this chapter
- Preparations
- Opening the Score Editor
- The project cursor
- Playing back and recording
- Page Mode
- Changing the Zoom factor
- The active staff
- Making page setup settings
- Designing your work space
- About the Score Editor context menus
- About dialogs in the Score Editor
- Setting key, clef and time signature
- Transposing instruments
- Printing from the Score Editor
- Exporting pages as image files
- Working order
- Force update
- Transcribing MIDI recordings
- Entering and editing notes
- About this chapter
- Score settings
- Note values and positions
- Adding and editing notes
- Selecting notes
- Moving notes
- Duplicating notes
- Cut, copy and paste
- Editing pitches of individual notes
- Changing the length of notes
- Splitting a note in two
- Working with the Display Quantize tool
- Split (piano) staves
- Strategies: Multiple staves
- Inserting and editing clefs, keys or time signatures
- Deleting notes
- Staff settings
- Polyphonic voicing
- About this chapter
- Background: Polyphonic voicing
- Setting up the voices
- Strategies: How many voices do I need?
- Entering notes into voices
- Checking which voice a note belongs to
- Moving notes between voices
- Handling rests
- Voices and Display Quantize
- Creating crossed voicings
- Automatic polyphonic voicing - Merge All Staves
- Converting voices to tracks - Extract Voices
- Additional note and rest formatting
- Working with symbols
- Working with chords
- Working with text
- Working with layouts
- Working with MusicXML
- Designing your score: additional techniques
- Scoring for drums
- Creating tablature
- The score and MIDI playback
- Tips and Tricks
- Index

213
Audio processing and functions
Algorithm section
Allows you to select a time stretch algorithm: MPEX 4 and
Realtime mode.
• MPEX 4 mode
This mode is based on Prosoniq’s proprietary MPEX (Minimum Percei-
ved Loss Time Compression/Expansion) algorithm. This algorithm (which
is also used in Prosoniq’s TimeFactory™ application) uses an artificial
neural network for time series prediction in the scale space domain to
achieve high end time and pitch scaling. This gives the best possible au-
dio quality result. You can choose between 7 quality settings, see “Pitch
Shift Mode” on page 209.
• Realtime mode
This is the algorithm used for the realtime time stretching features in Cu-
base. Although this algorithm is optimized for time stretching in realtime,
you can use it for offline processing as well. The Presets pop-up con-
tains the same presets as found in the Algorithm pop-up in the Sample
Editor, see “Selecting an algorithm for realtime playback” on page 234.
Applying plug-ins (Cubase only)
You can add plug-in effects in realtime during playback
(see the chapter “Audio effects” on page 150). However,
sometimes it is useful to “permanently” apply effects to
one or several selected events. In Cubase, this is done in
the following way:
1. Make a selection in the Project window, the Pool or an
editor.
Effects are applied according to the same rules as Processing (see
“Common settings and features” on page 206).
2. Select “Plug-ins” from the Audio menu.
3. Select the desired effect from the submenu.
The Process Plug-in dialog appears.
About stereo and mono
If you are applying an effect to mono audio material, only
the left side of the effect’s stereo output will be applied.
The process plug-in dialog
The process plug-in dialog for the StudioChorus effect.
The upper section of the process plug-in dialog contains
the effect parameters of the selected plug-in. For details
on the parameters of the included plug-ins, see the sepa-
rate PDF document “Plug-in Reference”.
The lower section of the dialog contains settings for the
actual processing. These are common to all plug-ins.
• If the lower section is hidden, click the “More…” button
to display it.
Clicking the button again (now labeled “Less…”) will hide the lower sec-
tion.
The following settings and functions are available in the
common, lower section of the dialog:
Wet mix/Dry mix
These two sliders allow you to specify the balance be-
tween wet (processed) and dry (original) signal in the re-
sulting clip.
Normally the two sliders are “reverse-ganged”, so that
raising the Wet mix slider lowers the Dry mix slider by the
same amount. However, if you press [Alt]/[Option] and
drag a slider, you can move it independently. This allows
you to set e.g. 80% dry and 80% wet signal. Be careful to
avoid distortion.