
User manual

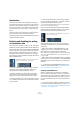
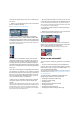
Table Of Contents
- Table of Contents
- Part I: Getting into the details
- About this manual
- VST Connections: Setting up input and output busses
- The Project window
- Playback and the Transport panel
- Recording
- Fades, crossfades and envelopes
- The Arranger track
- The Transpose functions
- The mixer
- Control Room (Cubase only)
- Audio effects
- VST Instruments and Instrument tracks
- Surround sound (Cubase only)
- Automation
- Audio processing and functions
- The Sample Editor
- The Audio Part Editor
- The Pool
- The MediaBay
- Working with Track Presets
- Track Quick Controls
- Remote controlling Cubase
- MIDI realtime parameters and effects
- Using MIDI devices
- MIDI processing and quantizing
- The MIDI editors
- Introduction
- Opening a MIDI editor
- The Key Editor - Overview
- Key Editor operations
- The In-Place Editor
- The Drum Editor - Overview
- Drum Editor operations
- Working with drum maps
- Using drum name lists
- The List Editor - Overview
- List Editor operations
- Working with System Exclusive messages
- Recording System Exclusive parameter changes
- Editing System Exclusive messages
- VST Expression
- The Logical Editor, Transformer and Input Transformer
- The Project Logical Editor
- Editing tempo and signature
- The Project Browser
- Export Audio Mixdown
- Synchronization
- Video
- ReWire
- File handling
- Customizing
- Key commands
- Part II: Score layout and printing
- How the Score Editor works
- The basics
- About this chapter
- Preparations
- Opening the Score Editor
- The project cursor
- Playing back and recording
- Page Mode
- Changing the Zoom factor
- The active staff
- Making page setup settings
- Designing your work space
- About the Score Editor context menus
- About dialogs in the Score Editor
- Setting key, clef and time signature
- Transposing instruments
- Printing from the Score Editor
- Exporting pages as image files
- Working order
- Force update
- Transcribing MIDI recordings
- Entering and editing notes
- About this chapter
- Score settings
- Note values and positions
- Adding and editing notes
- Selecting notes
- Moving notes
- Duplicating notes
- Cut, copy and paste
- Editing pitches of individual notes
- Changing the length of notes
- Splitting a note in two
- Working with the Display Quantize tool
- Split (piano) staves
- Strategies: Multiple staves
- Inserting and editing clefs, keys or time signatures
- Deleting notes
- Staff settings
- Polyphonic voicing
- About this chapter
- Background: Polyphonic voicing
- Setting up the voices
- Strategies: How many voices do I need?
- Entering notes into voices
- Checking which voice a note belongs to
- Moving notes between voices
- Handling rests
- Voices and Display Quantize
- Creating crossed voicings
- Automatic polyphonic voicing - Merge All Staves
- Converting voices to tracks - Extract Voices
- Additional note and rest formatting
- Working with symbols
- Working with chords
- Working with text
- Working with layouts
- Working with MusicXML
- Designing your score: additional techniques
- Scoring for drums
- Creating tablature
- The score and MIDI playback
- Tips and Tricks
- Index

181
Surround sound (Cubase only)
Background
What is Surround sound?
Surround is a common name for various techniques for po-
sitioning audio in reference to the listener. Whereas regular
stereo is limited to left/right positioning, within a relatively
narrow field, surround sound opens possibilities of posi-
tioning an audio source anywhere around the listener.
Surround sound comes in many flavors, from the ill-fated
Quadraphonic format for vinyl discs launched in the 70’s,
to today’s more successful incarnations.
The differences between the formats are in two areas:
• The number and configuration of speakers.
This varies from two speakers up to 6.
• The intended final coding format.
This depends on the media the audio will be “stored” on: film, broadcast
video or DVD, for example.
Surround sound is a large topic, there are entire books
and regular publications devoted to the subject. This
chapter will not provide an in-depth introduction to sur-
round sound as such. Instead it will concentrate on the
specific implementation in Cubase.
Surround sound in Cubase
Cubase has integrated surround sound features with sup-
port for several formats. This support goes all the way
through the audio path – all audio channels and busses
can handle multiple speaker channel configurations (up to
6 channels). A channel in the mixer can either carry com-
plete surround mixes, or an individual speaker channel
which is part of a surround setup.
• Audio channels can be routed freely to surround channels.
• The SurroundPanner function in the mixer allows you to
graphically position channels in the surround field. This plug-
ins is described in detail in the section “Using the Surround-
Panner” on page 184.
• Cubase is ready for surround specific plug-ins, that is plug-ins
with multi-channel support specifically designed for surround
sound mixing tasks (the included “Mix6to2” plug-in is an exam-
ple of this). Due to their multi-channel support, plug-ins con-
forming to the VST 3 standard will work well in a surround
configuration, even if the are note specifically designed for sur-
round. The plug-ins that are included with Cubase are de-
scribed in the separate pdf document “Plug-in Reference”.
• You configure Cubase for surround by defining input and out-
put busses in the desired surround format, and specifying
which audio inputs and outputs should be used for the differ-
ent channels in the busses. This is done in the VST Connec-
tions window.
Encoding
The result of a surround mix in Cubase is either the multi-
channel audio sent from the surround output bus to your
surround speaker setup, or (if you use the Export audio
feature) audio file(s) on your hard disk. Exported surround
mixes can either be split (one mono file per speaker chan-
nel) or interleaved (a single file containing all the surround
channels).
Getting from this step to the final product (surround sound
on DVD, etc.) requires special software and possibly
hardware. This equipment will encode the signal into the
desired format, possibly compress the audio and store it
on the final media.
Exactly what type of software and/or hardware you need
depends on what kind of format you are mixing for and is
not dependent on Cubase in any way.
The VST Connections window
In this window you can add input and output busses.
There is a complete selection of common surround con-
figurations available, as well as standard mono or stereo
busses.
The Bus Name column contains the currently configured
busses as they will appear in the Input and Output Rou-
ting pop-ups in the mixer.
VST Connections showing the Outputs page. The “5.1 Out” bus is un-
folded, displaying the individual speaker channels, with their physical
output ports displayed in the Device Port column to the right.
Click here to add a bus.
The currently configured busses
The outputs selected for the
channels of the bus