
User manual
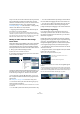
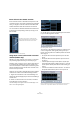
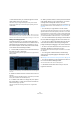
Table Of Contents
- Table of Contents
- Part I: Getting into the details
- About this manual
- VST Connections: Setting up input and output busses
- The Project window
- Playback and the Transport panel
- Recording
- Fades, crossfades and envelopes
- The Arranger track
- The Transpose functions
- The mixer
- Control Room (Cubase only)
- Audio effects
- VST Instruments and Instrument tracks
- Surround sound (Cubase only)
- Automation
- Audio processing and functions
- The Sample Editor
- The Audio Part Editor
- The Pool
- The MediaBay
- Working with Track Presets
- Track Quick Controls
- Remote controlling Cubase
- MIDI realtime parameters and effects
- Using MIDI devices
- MIDI processing and quantizing
- The MIDI editors
- Introduction
- Opening a MIDI editor
- The Key Editor - Overview
- Key Editor operations
- The In-Place Editor
- The Drum Editor - Overview
- Drum Editor operations
- Working with drum maps
- Using drum name lists
- The List Editor - Overview
- List Editor operations
- Working with System Exclusive messages
- Recording System Exclusive parameter changes
- Editing System Exclusive messages
- VST Expression
- The Logical Editor, Transformer and Input Transformer
- The Project Logical Editor
- Editing tempo and signature
- The Project Browser
- Export Audio Mixdown
- Synchronization
- Video
- ReWire
- File handling
- Customizing
- Key commands
- Part II: Score layout and printing
- How the Score Editor works
- The basics
- About this chapter
- Preparations
- Opening the Score Editor
- The project cursor
- Playing back and recording
- Page Mode
- Changing the Zoom factor
- The active staff
- Making page setup settings
- Designing your work space
- About the Score Editor context menus
- About dialogs in the Score Editor
- Setting key, clef and time signature
- Transposing instruments
- Printing from the Score Editor
- Exporting pages as image files
- Working order
- Force update
- Transcribing MIDI recordings
- Entering and editing notes
- About this chapter
- Score settings
- Note values and positions
- Adding and editing notes
- Selecting notes
- Moving notes
- Duplicating notes
- Cut, copy and paste
- Editing pitches of individual notes
- Changing the length of notes
- Splitting a note in two
- Working with the Display Quantize tool
- Split (piano) staves
- Strategies: Multiple staves
- Inserting and editing clefs, keys or time signatures
- Deleting notes
- Staff settings
- Polyphonic voicing
- About this chapter
- Background: Polyphonic voicing
- Setting up the voices
- Strategies: How many voices do I need?
- Entering notes into voices
- Checking which voice a note belongs to
- Moving notes between voices
- Handling rests
- Voices and Display Quantize
- Creating crossed voicings
- Automatic polyphonic voicing - Merge All Staves
- Converting voices to tracks - Extract Voices
- Additional note and rest formatting
- Working with symbols
- Working with chords
- Working with text
- Working with layouts
- Working with MusicXML
- Designing your score: additional techniques
- Scoring for drums
- Creating tablature
- The score and MIDI playback
- Tips and Tricks
- Index

157
Audio effects
After freezing the Inserts for a track, you hear the track
play back as before but the insert effects do not have to
be calculated in real time, easing the load on the computer
processor. Typically, you would freeze a track when it is
finished and you do not need to edit it anymore.
• You can only freeze audio tracks this way, not group
channel tracks or FX channel tracks.
• The last two insert effects will not be frozen. This is
because these are post-fader insert slots.
• You can also freeze VST instruments and their insert
effects – see the chapter “VST Instruments and Instru-
ment tracks” on page 169.
Unfreezing
If you need to edit the events on a frozen track or make
settings for the insert effects, you can unfreeze the track:
1. Click the Freeze button in the Inspector for the track.
You will be asked whether you really want to unfreeze the channel and if
you wish to keep or delete the freeze files.
2. Click “Unfreeze” or “Keep Freeze files”.
This reactivates the frozen insert effects. Clicking “Keep Freeze Files”
will unfreeze the channel but not delete the freeze files. After editing, you
can freeze the track again.
Send effects
Background
As their name implies, send effects are outside of an audio
channel’s signal path, i.e. the audio data to be processed
must be sent to the effect (as opposed to insert effects,
which are inserted into the channel’s signal path).
To this end, Cubase provides FX channel tracks. When
you have created such a track, it is added to the Track list
and can be selected as a routing target in the Send slots
of audio channels.
• When selecting an FX channel track in one of the send
slots of an audio channel, the audio is sent to the FX chan-
nel and through any insert effects set up for it.
Each audio channel has eight sends, which can be routed to different FX
channels, and thus different FX channel insert effect configurations. You
control the amount of signal sent to the FX channel by adjusting the ef-
fect send level.
• If you have added several effects to the FX channel, the
signal passes through the effects in series, from the top
(the first slot) downward.
This allows for “custom” send effect configurations – e.g. a chorus fol-
lowed by a reverb followed by an EQ and so on.
• The FX channel track has its own channel strip in the
mixer, the effect return channel.
Here you can adjust the effect return level and balance, add EQ and
route the effect return to any output bus.
• Each FX channel track can have any number of automa-
tion tracks, for automating various effect parameters.
See the chapter “Automation” on page 188 for more information.
Setting up send effects
Adding an FX channel track
1. Pull down the Project menu and select “FX Channel”
from the “Add Track” submenu.
A dialog appears.
2. Select a channel configuration for the FX channel
track.
Normally, stereo is a good choice since most effect plug-ins have stereo
outputs.
3. Select an effect for the FX channel track.
This is not strictly necessary at this point – you can leave the plug-in
pop-up menu set to “No Effect” and add effects to the FX channel later if
you like.
4. Click OK.
An FX channel track is added to the Track list, and the selected effect, if
any, is loaded into the first insert effect slot for the FX channel (in that
case, the lit Inserts tab for the FX channel track in the Inspector indicates
that an effect has been assigned and automatically activated).