
User manual
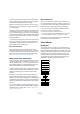
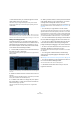
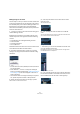
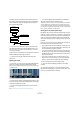
Table Of Contents
- Table of Contents
- Part I: Getting into the details
- About this manual
- VST Connections: Setting up input and output busses
- The Project window
- Playback and the Transport panel
- Recording
- Fades, crossfades and envelopes
- The Arranger track
- The Transpose functions
- The mixer
- Control Room (Cubase only)
- Audio effects
- VST Instruments and Instrument tracks
- Surround sound (Cubase only)
- Automation
- Audio processing and functions
- The Sample Editor
- The Audio Part Editor
- The Pool
- The MediaBay
- Working with Track Presets
- Track Quick Controls
- Remote controlling Cubase
- MIDI realtime parameters and effects
- Using MIDI devices
- MIDI processing and quantizing
- The MIDI editors
- Introduction
- Opening a MIDI editor
- The Key Editor - Overview
- Key Editor operations
- The In-Place Editor
- The Drum Editor - Overview
- Drum Editor operations
- Working with drum maps
- Using drum name lists
- The List Editor - Overview
- List Editor operations
- Working with System Exclusive messages
- Recording System Exclusive parameter changes
- Editing System Exclusive messages
- VST Expression
- The Logical Editor, Transformer and Input Transformer
- The Project Logical Editor
- Editing tempo and signature
- The Project Browser
- Export Audio Mixdown
- Synchronization
- Video
- ReWire
- File handling
- Customizing
- Key commands
- Part II: Score layout and printing
- How the Score Editor works
- The basics
- About this chapter
- Preparations
- Opening the Score Editor
- The project cursor
- Playing back and recording
- Page Mode
- Changing the Zoom factor
- The active staff
- Making page setup settings
- Designing your work space
- About the Score Editor context menus
- About dialogs in the Score Editor
- Setting key, clef and time signature
- Transposing instruments
- Printing from the Score Editor
- Exporting pages as image files
- Working order
- Force update
- Transcribing MIDI recordings
- Entering and editing notes
- About this chapter
- Score settings
- Note values and positions
- Adding and editing notes
- Selecting notes
- Moving notes
- Duplicating notes
- Cut, copy and paste
- Editing pitches of individual notes
- Changing the length of notes
- Splitting a note in two
- Working with the Display Quantize tool
- Split (piano) staves
- Strategies: Multiple staves
- Inserting and editing clefs, keys or time signatures
- Deleting notes
- Staff settings
- Polyphonic voicing
- About this chapter
- Background: Polyphonic voicing
- Setting up the voices
- Strategies: How many voices do I need?
- Entering notes into voices
- Checking which voice a note belongs to
- Moving notes between voices
- Handling rests
- Voices and Display Quantize
- Creating crossed voicings
- Automatic polyphonic voicing - Merge All Staves
- Converting voices to tracks - Extract Voices
- Additional note and rest formatting
- Working with symbols
- Working with chords
- Working with text
- Working with layouts
- Working with MusicXML
- Designing your score: additional techniques
- Scoring for drums
- Creating tablature
- The score and MIDI playback
- Tips and Tricks
- Index

152
Audio effects
This is achieved by activating the option “Suspend VST3
plug-in processing when no audio signals are received” in
the Preferences dialog (VST–Plug-ins page).
When this is activated, VST 3 plug-ins will not consume
CPU power on silent passages, i.e. when no audio data
runs through them.
Be aware, however, that this can lead to a situation where
you added more plug-ins on “transport stop” than the sys-
tem can handle on playback. Therefore, you should always
find the passage with the largest number of events playing
simultaneously to make sure that your system offers the re-
quired performance.
Ö Activating this option can increase your system perfor-
mance a lot in certain projects, but it also makes it more
unpredictable whether the project can play back fine on
any timecode position of the project.
About side-chain inputs
Several VST3 effects feature side-chain inputs. This
means that the operation of the effect can be controlled
via external signals routed to the side-chain input. The ef-
fect processing is still applied to the main audio signal.
See “Using the Side-Chain input” on page 161.
About plug-in delay compensation
A plug-in effect may have some inherent delay or latency.
This means that it takes a brief time for the plug-in to pro-
cess the audio fed into it – as a result, the output audio
will be slightly delayed. This especially applies to dynam-
ics processors featuring “look-ahead” functionality.
Cubase provides full plug-in delay compensation through-
out the entire audio path. All plug-in delays are compen-
sated for, maintaining the sync and timing of all audio
channels.
Normally, you do not have to make any settings for this.
However, VST3 dynamics plug-ins with look-ahead func-
tionality have a “Live” button, allowing you to disengage the
look-ahead to minimize latency, if they are to be used during
realtime recording (see the separate manual “Plug-in Ref-
erence”).
You can also constrain the delay compensation, which is
useful to avoid latency when recording audio or playing a
VST Instrument in real time. See “Constrain Delay Com-
pensation” on page 179.
About tempo sync
Plug-ins can receive timing and tempo information from
the host application (in this case, Cubase). Typically, this
is used to synchronize certain plug-in parameters (such as
modulation rates or delay times) to the project tempo.
• This information is automatically provided to any VST
plug-in (2.0 or later) that “requests it”.
You do not have to make any special settings for this.
• You set up tempo sync by specifying a base note value.
You can use straight, triplet or dotted note values (1/1 to 1/32).
Please refer to the separate manual “Plug-in Reference”
for details about the included effects.
Insert effects
Background
As the name implies, insert effects are inserted into the
audio signal path – this means that the audio channel data
will be routed through the effect. You can add up to eight
different insert effects independently for each audio chan-
nel (audio track, group channel track, FX channel track,
VST Instrument channel or ReWire channel) or bus. The
signal passes through the effects in series from the top
downwards, with the signal path shown below:
Input gain
Insert effect 1
Insert effect 2
Insert effect 3
Insert effect 6
EQ
Volume (fader)
Insert effect 7
Insert effect 8
Insert effect 4
Insert effect 5