
User manual
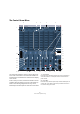
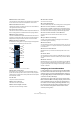


Table Of Contents
- Table of Contents
- Part I: Getting into the details
- About this manual
- VST Connections: Setting up input and output busses
- The Project window
- Playback and the Transport panel
- Recording
- Fades, crossfades and envelopes
- The Arranger track
- The Transpose functions
- The mixer
- Control Room (Cubase only)
- Audio effects
- VST Instruments and Instrument tracks
- Surround sound (Cubase only)
- Automation
- Audio processing and functions
- The Sample Editor
- The Audio Part Editor
- The Pool
- The MediaBay
- Working with Track Presets
- Track Quick Controls
- Remote controlling Cubase
- MIDI realtime parameters and effects
- Using MIDI devices
- MIDI processing and quantizing
- The MIDI editors
- Introduction
- Opening a MIDI editor
- The Key Editor - Overview
- Key Editor operations
- The In-Place Editor
- The Drum Editor - Overview
- Drum Editor operations
- Working with drum maps
- Using drum name lists
- The List Editor - Overview
- List Editor operations
- Working with System Exclusive messages
- Recording System Exclusive parameter changes
- Editing System Exclusive messages
- VST Expression
- The Logical Editor, Transformer and Input Transformer
- The Project Logical Editor
- Editing tempo and signature
- The Project Browser
- Export Audio Mixdown
- Synchronization
- Video
- ReWire
- File handling
- Customizing
- Key commands
- Part II: Score layout and printing
- How the Score Editor works
- The basics
- About this chapter
- Preparations
- Opening the Score Editor
- The project cursor
- Playing back and recording
- Page Mode
- Changing the Zoom factor
- The active staff
- Making page setup settings
- Designing your work space
- About the Score Editor context menus
- About dialogs in the Score Editor
- Setting key, clef and time signature
- Transposing instruments
- Printing from the Score Editor
- Exporting pages as image files
- Working order
- Force update
- Transcribing MIDI recordings
- Entering and editing notes
- About this chapter
- Score settings
- Note values and positions
- Adding and editing notes
- Selecting notes
- Moving notes
- Duplicating notes
- Cut, copy and paste
- Editing pitches of individual notes
- Changing the length of notes
- Splitting a note in two
- Working with the Display Quantize tool
- Split (piano) staves
- Strategies: Multiple staves
- Inserting and editing clefs, keys or time signatures
- Deleting notes
- Staff settings
- Polyphonic voicing
- About this chapter
- Background: Polyphonic voicing
- Setting up the voices
- Strategies: How many voices do I need?
- Entering notes into voices
- Checking which voice a note belongs to
- Moving notes between voices
- Handling rests
- Voices and Display Quantize
- Creating crossed voicings
- Automatic polyphonic voicing - Merge All Staves
- Converting voices to tracks - Extract Voices
- Additional note and rest formatting
- Working with symbols
- Working with chords
- Working with text
- Working with layouts
- Working with MusicXML
- Designing your score: additional techniques
- Scoring for drums
- Creating tablature
- The score and MIDI playback
- Tips and Tricks
- Index

148
Control Room (Cubase only)
4. Choose the “Use Current Pan Settings” option to
copy pan information from the main mix to the Studio
Sends on selected tracks.
Studio Sends are either mono or stereo. If the Send is mono, the pan
setting will still be copied. However, the output of the Studio Send will
be a sum of the left and right channels.
5. Choose the “Enable Studio Sends” option to activate
the Sends on selected channels.
By default, Studio Sends are not enabled even when level and pan infor-
mation is copied to them. You must enable them in order to hear the Stu-
dio cue mix.
By copying the level and pan information from the main
mix to the Studio Sends, a rough balance can be created
in a matter of moments. Next, you may alter the level and
pan settings on any channel’s Studio Sends to change the
mix to meet the performer’s needs. This may require in-
creasing the volume of the performer herself. This is often
referred to as a “more me” mix.
Adjusting the overall Studio Send level
Levels in the main mix are often optimized for the loudest
signal level possible without clipping. However, when you
are creating a “more me” mix, you may find that there is not
enough headroom available in the Studio Send to turn up
channels without clipping becoming a possibility.
Fortunately, the Studio Sends have an option to adjust
multiple send levels at the same time, allowing you to keep
the blend intact while lowering the overall volume to make
room for “more me” signals.
Once you have created a Studio Send mix, proceed as
follows to adjust their relative levels.
1. Select all the channels you wish to modify.
Only selected channels are affected by the context menu commands.
2. Right-click anywhere in the Studio mixer strip on the
Control Room Mixer to open the context menu for that
Studio.
You may also use the context menu outside of the Studio strip to adjust
all four Studio Sends on the selected channels at the same time.
3. Choose the “Change Studio Sends Level” option from
the Studio submenu.
This will bring up a gain window with a checkbox that reads “Relative
Mode”. Make sure this is activated if you want to adjust already existing
levels.
4. Either use the up and down arrow buttons or click on
the numeric readout to open a pop-up fader and adjust
the gain as necessary.
The level of all selected Studio Sends will be adjusted by the amount
shown here. For example, if the amount reads -3dB, then each Studio
Send level is reduced by 3dB.
5. Click OK to change the level.
It is possible to view these changes as they occur if you have the Project
Mixer open and the extended view set to show the Studio Sends.
Using Studio Sends from outputs
Each output also has Studio Sends. Studio Sends from
the Main Mix output can be used to route the main mix in-
stantly to the Studio output.
Any level changes made to the main mix are reflected in
the signal sent by the Studio Send. Setting the level lower
than 0dB can leave headroom for “more me” signals in the
Studio channel output.
Post-Fader Studio Sends
It is also possible to use the Studio Sends as post-fader
aux sends. This is another way for the cue mix to follow
changes made to the Main Mix. The Reset function is very
helpful in this regard.
To reset the Studio Sends to the post-fader default level
of -6dB, proceed as follows:
1. Select all the channels you wish to reset.
Studio Send commands only work on selected channels.
!
If you deactivate the “Relative Mode” option, all Stu-
dio Sends will be set to the same absolute level.
While the dialog window is still open, you may check
the “Relative Mode” box again and reload the previ-
ous relative levels. Only when you click OK, will the
level settings be made permanent. Choosing Cancel
returns all Send levels to their previous settings.