
User manual
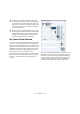
Table Of Contents
- Table of Contents
- Part I: Getting into the details
- About this manual
- VST Connections: Setting up input and output busses
- The Project window
- Playback and the Transport panel
- Recording
- Fades, crossfades and envelopes
- The Arranger track
- The Transpose functions
- The mixer
- Control Room (Cubase only)
- Audio effects
- VST Instruments and Instrument tracks
- Surround sound (Cubase only)
- Automation
- Audio processing and functions
- The Sample Editor
- The Audio Part Editor
- The Pool
- The MediaBay
- Working with Track Presets
- Track Quick Controls
- Remote controlling Cubase
- MIDI realtime parameters and effects
- Using MIDI devices
- MIDI processing and quantizing
- The MIDI editors
- Introduction
- Opening a MIDI editor
- The Key Editor - Overview
- Key Editor operations
- The In-Place Editor
- The Drum Editor - Overview
- Drum Editor operations
- Working with drum maps
- Using drum name lists
- The List Editor - Overview
- List Editor operations
- Working with System Exclusive messages
- Recording System Exclusive parameter changes
- Editing System Exclusive messages
- VST Expression
- The Logical Editor, Transformer and Input Transformer
- The Project Logical Editor
- Editing tempo and signature
- The Project Browser
- Export Audio Mixdown
- Synchronization
- Video
- ReWire
- File handling
- Customizing
- Key commands
- Part II: Score layout and printing
- How the Score Editor works
- The basics
- About this chapter
- Preparations
- Opening the Score Editor
- The project cursor
- Playing back and recording
- Page Mode
- Changing the Zoom factor
- The active staff
- Making page setup settings
- Designing your work space
- About the Score Editor context menus
- About dialogs in the Score Editor
- Setting key, clef and time signature
- Transposing instruments
- Printing from the Score Editor
- Exporting pages as image files
- Working order
- Force update
- Transcribing MIDI recordings
- Entering and editing notes
- About this chapter
- Score settings
- Note values and positions
- Adding and editing notes
- Selecting notes
- Moving notes
- Duplicating notes
- Cut, copy and paste
- Editing pitches of individual notes
- Changing the length of notes
- Splitting a note in two
- Working with the Display Quantize tool
- Split (piano) staves
- Strategies: Multiple staves
- Inserting and editing clefs, keys or time signatures
- Deleting notes
- Staff settings
- Polyphonic voicing
- About this chapter
- Background: Polyphonic voicing
- Setting up the voices
- Strategies: How many voices do I need?
- Entering notes into voices
- Checking which voice a note belongs to
- Moving notes between voices
- Handling rests
- Voices and Display Quantize
- Creating crossed voicings
- Automatic polyphonic voicing - Merge All Staves
- Converting voices to tracks - Extract Voices
- Additional note and rest formatting
- Working with symbols
- Working with chords
- Working with text
- Working with layouts
- Working with MusicXML
- Designing your score: additional techniques
- Scoring for drums
- Creating tablature
- The score and MIDI playback
- Tips and Tricks
- Index
137
Control Room (Cubase only)
Control Room operations
In traditional analog studios, the control room section of
the console contained the most used set of controls in the
whole studio. Often, the studio monitor level had all the
markings rubbed off from so much use.
The need to constantly be able to switch monitoring
sources, adjust the volume of monitors and route various
cue mixes and other sources to headphone systems is the
norm in most sessions. Meeting the needs of several per-
formers in the studio plus a producer and the engineer be-
comes a constant task that requires flexibility and ease of
operation. Communication between everyone must be
flawlessly clear without intruding on the creativity of per-
formers.
With all this in mind, the Cubase Control Room Mixer is
designed to fill those needs with a simple yet highly flexi-
ble solution. The virtual mixing environment of VST is the
ideal solution to the varied needs of a control room matrix.
With a virtual mixer, a high degree of customization and
precise settings are possible with the ability to completely
recall these settings at any time.
Configuring the Control Room
The Control Room features are configured in several loca-
tions within Cubase.
• The VST Connections window has a tab labelled “Studio” in
which the hardware inputs and output are defined for the
Control Room channels.
• On the Devices menu you will find the Control Room Over-
view that gives you a visual overview of the Control Room
channels and signal flow.
• On the Devices menu you will find the Control Room Mixer
which allows operation of the Control Room features.
• In the Preferences dialog (VST–Control Room page) you will
find some general Control Room settings.
VST Connections – Studio tab
The Studio tab of the VST Connections window is where
you configure the inputs and outputs for the Control Room
Mixer. For more information, see the chapter “VST Connec-
tions: Setting up input and output busses” on page 13. By
default, one stereo Monitor channel is created after install-
ing Cubase.
Control Room channels
There are five types of channels that you can create, each
defining either an input or output of the Control Room
Mixer. As more channels are created, the Control Room
Mixer expands to display controls for each channel.
• Monitors
Each Monitor channel is a set of outputs that are connected to monitor
speakers in the Control Room. Each Monitor can be configured for a
mono, stereo or up to 6.0 surround speaker configuration. Up to four
Monitors can be created, each with a different speaker configuration.
• Phones
The Phones channel is used by the engineer in the control room for
checking cue mixes and as another option for listening to the mix or ex-
ternal inputs on a pair of headphones. It is not intended for cue mixes that
performers use while recording. Only one stereo Headphone channel is
available.
•Studios
Studio channels are intended for sending cue mixes to performers in the
studio during recording. They have talkback and click functions and can
monitor the main mix, external inputs or a dedicated cue mix. Up to four
Studios can be created allowing four discrete cue mixes for performers.
• External inputs
External inputs are for monitoring external devices such as CD players,
multi-channel recorders or any other audio source. Up to six external in-
puts can be created with various configurations from mono up to 6.0 sur-
round.
• Talkback
The Talkback is a mono input used for a communications system be-
tween the control room and performers in the studio. Only one mono
Talkback channel is available.
Control Room channels cannot share hardware inputs or
outputs with external FX or external instruments, as de-
fined in the VST Connections window (see “Connecting
the external effect/instrument” on page 20). As you create
connections for each channel, only those device ports that
have not been used for external FX or instruments will be
available.