
Remote Control Devices


20
Mackie Control
signed to button 2 and so on. In this way, you can switch
between any of the first eight channel views of your pro-
gram by pressing one of the buttons in the Fader Groups
section.
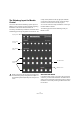
Using the faders
The faders of Mackie Control are used for hands-on level
control and mixing, and allow precise adjustments of the
corresponding channel levels in your application. Since
the faders are motorized, they will move to reflect any level
automation you have created in your projects. The faders
will also move when you select a new set of eight chan-
nels to control, instantly jumping to reflect the current lev-
els of the eight channels.
• The faders are also touch sensitive, which means that
as soon as you move a fader manually, the motors are
“overridden”.
In other words, if you have automated level changes, you can grab a
fader at any time, overriding the automation – just as you can click and
hold a moving fader on screen with the mouse.
• Even though the faders are very quiet, there may be sit-
uations when you want absolute silence – e.g. when mix-
ing an extremely soft and subtle piece of music. If that is
the case, you can disable the motors by clicking the Mo-
tors button in the Action Keys section.
When you are finished, click the Motors button again. The fader motors
are enabled again, and the faders will instantly move to reflect the current
levels.
Rec/Rdy
The buttons directly underneath the row of V-Pots are
used to arm a track for recording. The LEDs indicate the
record arming state for a particular track.
The Signal LEDs underneath the Rec/Rdy buttons indi-
cate signal activity on the channels. The LED lights up as
soon as the level meter for a channel shows any activity.
Mute and Solo
The two rows of buttons underneath the Rec/Rdy buttons
allow you to mute or solo channels. The following rules
apply:
• You can mute or solo several channels at the same time.
• The Mute and Solo buttons always show the status of
the current set of eight channels!
This means that if you mute a channel and then select another set of
eight channels for fader control, the Mute indicator will go dark.
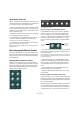
Using the Select buttons
In the rows of buttons above the faders you will find the
Select buttons. These are used for selecting a single
channel for detailed settings (see “Selected Channel
mode” on page 21).
• Only one channel at a time can be selected.
• When you solo a channel, it is automatically selected as
well.
• If you select a channel and then select another set of
eight channels for fader control, the Select button will go
dark.
This is because the channel is still selected, but it’s not shown in the cur-
rent fader set.
!
Turning the motors off does not affect the program
automation – all automation data saved in your
project is played back as usual.
!
If you have soloed a channel, this is indicated by the
Rude Solo LED at the top right of the Mackie Control
panel. You can un-solo or un-mute any channel or
combination of channels by pressing (without or with
Shift) the Solo Defeat button. See “Working with
windows” on page 30.