
Quick Start
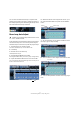
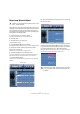


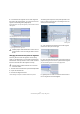
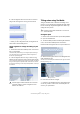
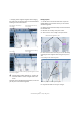
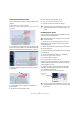
Table Of Contents
- English
- Table of Contents
- Introduction
- System requirements and installation
- Setting up your system
- Tutorial 1: Recording audio
- Tutorial 2: Editing audio
- Tutorial 3: Recording and editing MIDI
- Tutorial 4: Working with loops
- Tutorial 5: External MIDI instruments (Cubase only)
- Tutorial 6: Mixing and effects
- Tutorial 7: Surround production (Cubase only)
- Tutorial 8: Editing audio II - tempo and groove
- Tutorial 9: Media management
- Index
- Español
- Tabla de Contenidos
- Introducción
- Requisitos del sistema e instalación
- Configuración del sistema
- Tutorial 1: Grabación de audio
- Tutorial 2: Editar audio
- Tutorial 3: Grabar y editar MIDI
- Tutorial 4: Trabajar con loops
- Tutorial 5: Instrumentos MIDI externos (sólo Cubase)
- Tutorial 6: Mezclar y efectos
- Tutorial 7: Producción surround (sólo Cubase)
- Tutorial 8: Editar audio II - tempo y groove
- Tutorial 9: Gestión de medios
- Índice alfabético

80
Tutorial 8: Editing audio II – tempo and groove
Creating a flair with the vocals
Let’s do something fun with the vocals by creating a flair
upwards.
1. Move the ‘dy’ in ‘ready’ up to ‘G3’.
Do this by selecting the two segments that make up ‘dy’ in ‘ready’. Move
them together.
2. Now switch to the Segments mode by pressing [Tab]
and move the mouse pointer to the lower border of the seg-
ment. You will notice that the pointer becomes a scissor.
3. Split the end of the segment so that it looks like the
picture below.
4. Click anywhere but the segments to deselect the
three segments.
5. Switch back to Pitch & Warp mode.
6. Now move the last segment up to ‘C4’.
This creates a very natural flair upwards in the vocals.
7. Play back the audio to hear all the changes.
Polishing up the vocals
In this section we are going to Pitch Quantize the vocals
and make some small adjustments.
1. Double-click on the Vocal audio event to open the
Sample Editor and scroll down so that you can see the
VariAudio segments.
2. Make sure that the Pitch & Warp mode is selected un-
der the VariAudio tab.
3. From the Edit menu choose Select All or press [Ctrl]/
[Command]-[A].
4. Move the Pitch Quantize slider up to around 80%.
This will move the segments to the nearest note.
5. Listen back to the changes.
The Pitch Quantize slider puts everything in tune.
Notice that the phrase ‘well babe’ just doesn’t sound right.
Sometimes being a little bit out of tune sounds right for
certain phrases in a vocal.
6. Select the three segments that make up the phrase
‘well babe’ and choose Pitch Changes from the Reset
menu under the VariAudio tab.
This will move these segments back to their original pitch.
This is the right spot to split.
!
Load the project called “VariAudio 12” found in the
“Tutorial 8” folder to hear the changes made to the
vocals.
!
Load the project called “VariAudio 13” found in the
“Tutorial 8” folder.
!
Load the project called “VariAudio 14” found in the
“Tutorial 8” folder to hear all the final changes made
to the vocals.
Reset Pitch
Changes