
Quick Start
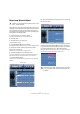

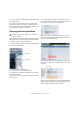

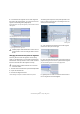
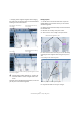
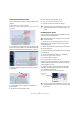
Table Of Contents
- English
- Table of Contents
- Introduction
- System requirements and installation
- Setting up your system
- Tutorial 1: Recording audio
- Tutorial 2: Editing audio
- Tutorial 3: Recording and editing MIDI
- Tutorial 4: Working with loops
- Tutorial 5: External MIDI instruments (Cubase only)
- Tutorial 6: Mixing and effects
- Tutorial 7: Surround production (Cubase only)
- Tutorial 8: Editing audio II - tempo and groove
- Tutorial 9: Media management
- Index
- Español
- Tabla de Contenidos
- Introducción
- Requisitos del sistema e instalación
- Configuración del sistema
- Tutorial 1: Grabación de audio
- Tutorial 2: Editar audio
- Tutorial 3: Grabar y editar MIDI
- Tutorial 4: Trabajar con loops
- Tutorial 5: Instrumentos MIDI externos (sólo Cubase)
- Tutorial 6: Mezclar y efectos
- Tutorial 7: Producción surround (sólo Cubase)
- Tutorial 8: Editar audio II - tempo y groove
- Tutorial 9: Gestión de medios
- Índice alfabético

76
Tutorial 8: Editing audio II – tempo and groove
6. Just before those segments are two other segments
that need to be glued together. You can click on the first
segment while holding down [Alt]/[Option].
A glue tube appears. This joins the segment you have clicked on with the
next segment.
Hold [Alt]/[Option] and click on the first segment…
…to glue together the two segments.
Changing the start and end points of segments
There may be times when the segments are not exactly
where you would like them. You will need to edit their start
and end times. This may be due to noise or other variances
that cause the audio file to be analyzed incorrectly.
1. Double-click on the audio file to open the Sample Editor.
2. Open the VariAudio tab.
3. Activate the Segments button.
Cubase will begin to analyze the audio file and detect its pitches.
The fifth segment requires its start point adjusted. A hint
here is to look at the audio file in the background to see
where the waveform begins.
4. Click and hold at the beginning of the fifth segment
and move its start point to the right.
5. Now click and hold at the end of the forth segment to
adjusts its length so that it lines up with the fifth segment.
The forth and fifth segments are now in their right positions.
It’s generally best to make sure that the end and start of
the two segments are butted together.
!
Load the project called “VariAudio 4” found in the “Tu-
torial 8” folder to see to the changes made to this au-
dio file.
!
Load the project called “VariAudio 5” found in the
“Tutorial 8” folder.
Fifth segment