
Quick Start
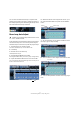
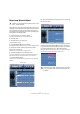

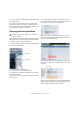

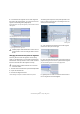
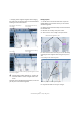
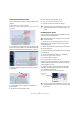
Table Of Contents
- English
- Table of Contents
- Introduction
- System requirements and installation
- Setting up your system
- Tutorial 1: Recording audio
- Tutorial 2: Editing audio
- Tutorial 3: Recording and editing MIDI
- Tutorial 4: Working with loops
- Tutorial 5: External MIDI instruments (Cubase only)
- Tutorial 6: Mixing and effects
- Tutorial 7: Surround production (Cubase only)
- Tutorial 8: Editing audio II - tempo and groove
- Tutorial 9: Media management
- Index
- Español
- Tabla de Contenidos
- Introducción
- Requisitos del sistema e instalación
- Configuración del sistema
- Tutorial 1: Grabación de audio
- Tutorial 2: Editar audio
- Tutorial 3: Grabar y editar MIDI
- Tutorial 4: Trabajar con loops
- Tutorial 5: Instrumentos MIDI externos (sólo Cubase)
- Tutorial 6: Mezclar y efectos
- Tutorial 7: Producción surround (sólo Cubase)
- Tutorial 8: Editar audio II - tempo y groove
- Tutorial 9: Gestión de medios
- Índice alfabético

73
Tutorial 8: Editing audio II – tempo and groove
10. Move the beat grid lines close to the beginning of the
attacks of the waveform display.
Zoom in to line up the beat grid lines exactly. Do this for the entire drum
loop in all the locations that appear to be off time.
11. Close the Sample Editor.
12. Click on the drum loop and select Loop Selection from
the Transport menu.
You can now hear that the drum loop is in perfect time with
the project tempo. Feel free to change the tempo on the
Transport panel by first deactivating the Tempo Track and
notice that the drum loop will follow.
Working with selections
In this example we have an audio file with unknown tempo.
We only want to use a small section of the audio file to
create a drum loop.
1. Activate Play on the Transport panel.
You will hear that the drum loop is off time with the click.
2. Activate Stop.
3. Double-click on the drum loop.
The Sample Editor will open.
4. We are going to create a 2-bar loop from this audio
file. Make sure the Range Selection tool is selected. Click
and drag to make a selection to a portion of the audio file
that you will use as a drum loop. Somewhere just after bar
5 and just after bar 7.
To get the selection to match our example click on the
Range tab and enter 411427 in the Start field and
616843 in the End Field.
5. Click on the Hitpoints tab and choose Slice & Close.
You now have a loop that is cut to the selection you made and can now
loop to the project tempo. The Sample Editor will close and you will be
returned to the Project window.
!
Load the project called “Tempo and Groove 5” found
in the “Tutorial 8” folder to see the beat grid line ad-
justments.
!
Load the project called “Tempo and Groove 6” found
in the “Tutorial 8” folder.
Range Selection tool
Range tab
Hitpoints tab
Slice & Close