
Quick Start


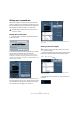


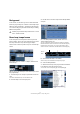
Table Of Contents
- English
- Table of Contents
- Introduction
- System requirements and installation
- Setting up your system
- Tutorial 1: Recording audio
- Tutorial 2: Editing audio
- Tutorial 3: Recording and editing MIDI
- Tutorial 4: Working with loops
- Tutorial 5: External MIDI instruments (Cubase only)
- Tutorial 6: Mixing and effects
- Tutorial 7: Surround production (Cubase only)
- Tutorial 8: Editing audio II - tempo and groove
- Tutorial 9: Media management
- Index
- Español
- Tabla de Contenidos
- Introducción
- Requisitos del sistema e instalación
- Configuración del sistema
- Tutorial 1: Grabación de audio
- Tutorial 2: Editar audio
- Tutorial 3: Grabar y editar MIDI
- Tutorial 4: Trabajar con loops
- Tutorial 5: Instrumentos MIDI externos (sólo Cubase)
- Tutorial 6: Mezclar y efectos
- Tutorial 7: Producción surround (sólo Cubase)
- Tutorial 8: Editar audio II - tempo y groove
- Tutorial 9: Gestión de medios
- Índice alfabético

67
Tutorial 7: Surround production (Cubase only)
• In this case you could have a surround panner for each
track.
Make sure you look up the chapter “Surround Sound” in the Operation
Manual for more detailed information on the surround panner.
We now have all the inputs and outputs set up. Move on
to the next section for information on surround recording.
Recording in surround
We are now ready to record in surround sound. This means
we are going to record 6 channels at a time. These chan-
nels are routed to the 5.1 output we’ve set up in the “VST
Connections” window. We have 6 mono inputs as the in-
puts. We could have used one audio track that is config-
ured as a 5.1 track as discussed previously, but using 6
mono tracks allows us flexibility for future changes and
edits.
• The basic recording procedures are described in the
chapter “Tutorial 1: Recording audio” on page 23. For
more detailed information see the “Recording” chapter
in the Operation Manual.
Behind the scenes we have 6 channels of audio (a sur-
round sound mix) coming in our 6 mono inputs. You’ll be
able to hear this once you load the next project.
1. Activate the “Record Enable” and “Monitor” buttons for
the tracks.
2. Make sure Cycle is turned off (not highlighted) and
that you are starting recording at bar 1.
3. Click the Record button to record.
4. Click the Stop button when you are finished recording.
5. Turn off the “Record Enable” and “Monitor” buttons for
all the tracks so that we don’t hear the inputs or record on
the tracks any more.
Congratulations! You have just recorded a 5.1 mix in Cu-
base. Move ahead to the next section to learn how to ex-
port a surround file.
!
Load the project called “Surround 4” found in the
“Tutorial 7” folder.
Record Enable
Monitor